Introduction
Stylesheets introduce a powerful, CSS-like styling mechanism to Viz Engine. It enables designers and developers to define and apply styles systematically, particularly when working with a large number of similar objects. It is ideal for scenarios where many objects of the same type require unified visual treatment, where stylesheets allow for easy and maintainable bulk styling.
The use of Stylesheets in Viz Engine is entirely optional. Users can enable stylesheet functionality based on the demands of their specific workflow or project. This allows teams to adopt it incrementally or only where it offers clear advantages.
Stylesheet-based styling in Viz Engine is structured around three distinct phases:
Style Definition: This is where visual attributes are established. You define how things should look— including colors, shapes, sizes, and other visual rules that describe the design language of your scene.
Style Selection: Here, logic determines which defined style is appropriate for each object. Styles are chosen dynamically based on StyleSelect plug-in, container name, plug-in type and the current format.
Style Application: The selected style is applied to the object, ensuring consistent visual treatment across similar elements throughout the scene.
Enabling and Using Stylesheets
Stylesheet functionality is disabled by default and must be explicitly enabled in the Scene Settings under the Stylesheet section:
Defining Styles
Adding Styles
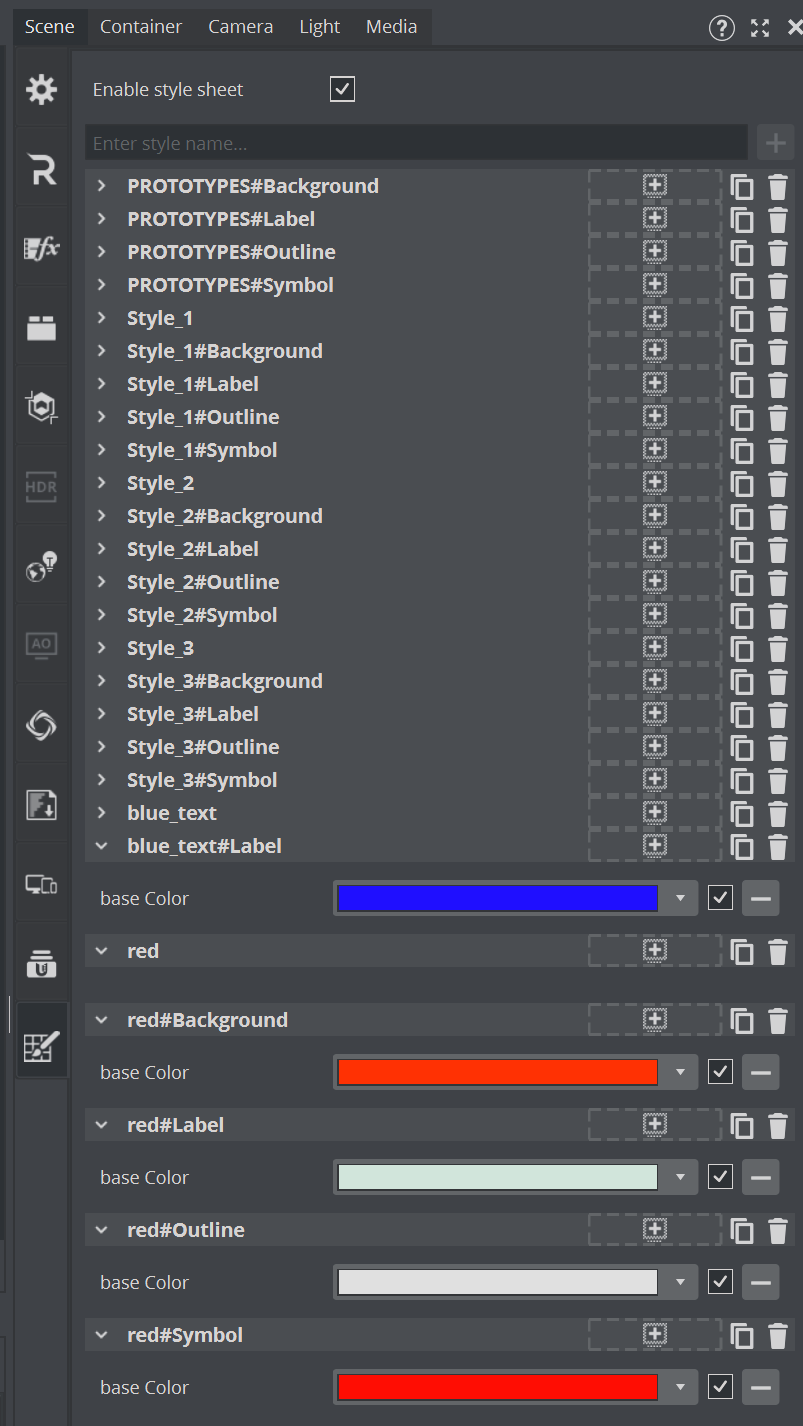
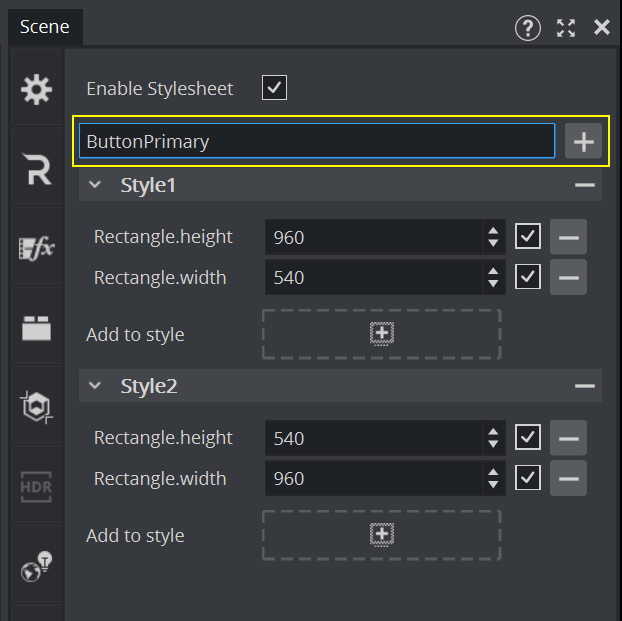
Styles can be added directly within the Stylesheet section of the Scene Settings in Viz Artist. In the input field, type the name of the style you want to create. This can include format prefixes, container name suffixes, or plug-in type suffixes (for example, ButtonPrimaryor Portrait:ButtonPrimary or Portrait:ButtonPrimary#MainButton).
Naming Conventions and Syntax
To ensure clarity and consistency across your stylesheet design, style names need to follow these naming conventions:
Alphanumeric Identifiers: Style names must begin with an alphanumeric string (for example,
ButtonPrimary,TitleStyle1). This serves as the base name for the selector.Format Prefix: Prefix the style name with a format identifier when necessary to indicate conditional styling based on content format:
Syntax:
format:BaseStyleExample:
Portrait:ButtonPrimary
Container Name Suffix: Append the container name using a hash symbol
#to target container with a specific name:Syntax:
BaseStyle#ContainerNameExample:
ButtonPrimary#MainButton
Plugin Type Suffix: Append the plug-in type using an at symbol
@to apply styles based on the object’s plug-in type:Syntax:
BaseStyle@PluginTypeExample:
ButtonPrimary@Rectangle
These naming rules can be combined to create flexible and specific styling conditions. For example, Portrait:ButtonPrimary#MainButton is used only when the format is Portrait, the container name is MainButton, and the style selection has ButtonPrimaryincluded.
Defining Style Values
A range of style values that can be applied to control both built-in visual attributes and plugin-specific properties. These values define how objects appear and behave when a style is applied.
Built-in Style Properties
The following predefined StyleIds represent core visual attributes supported by the stylesheet system:
StyleId | Description |
|---|---|
| Material base color of Phong and PBR Materials |
| Font size of Text |
| Text color of Text |
| Alpha value of Alpha plug-in |
| Position (X, Y, Z) of 3D Transformation |
| Rotation (X, Y, Z) of 3D Transformation |
| Scaling (X, Y, Z) of 3D Transformation |
| Active state of Container |
| Line Width of Expert |
These properties are commonly used to define the visual language of a scene and ensure consistent styling across similar elements.
Plugin Property Support
In addition to built-in properties, stylesheets can also target properties of Function and Geometry Plug-ins, provided those properties are of the following types:
Integer (
int)Floating-point (
float)Color
This allows for dynamic and flexible styling of plugin-driven attributes, such as:
Adjusting a radius or thickness value via a float or int.
Controlling plug-in-specific numeric parameters in a format-aware and maintainable way.
Style Authoring
Viz Artist offers a visual and efficient way to author stylesheets using drag-and-drop interactions. This approach allows designers to build styles directly from scene content, reducing manual effort and ensuring consistency. Instead of manually typing out style definitions, you can drag properties into the stylesheet editor. Viz Artist automatically captures the corresponding StyleId and the current value of each supported property, then inserts them into the selected style block.
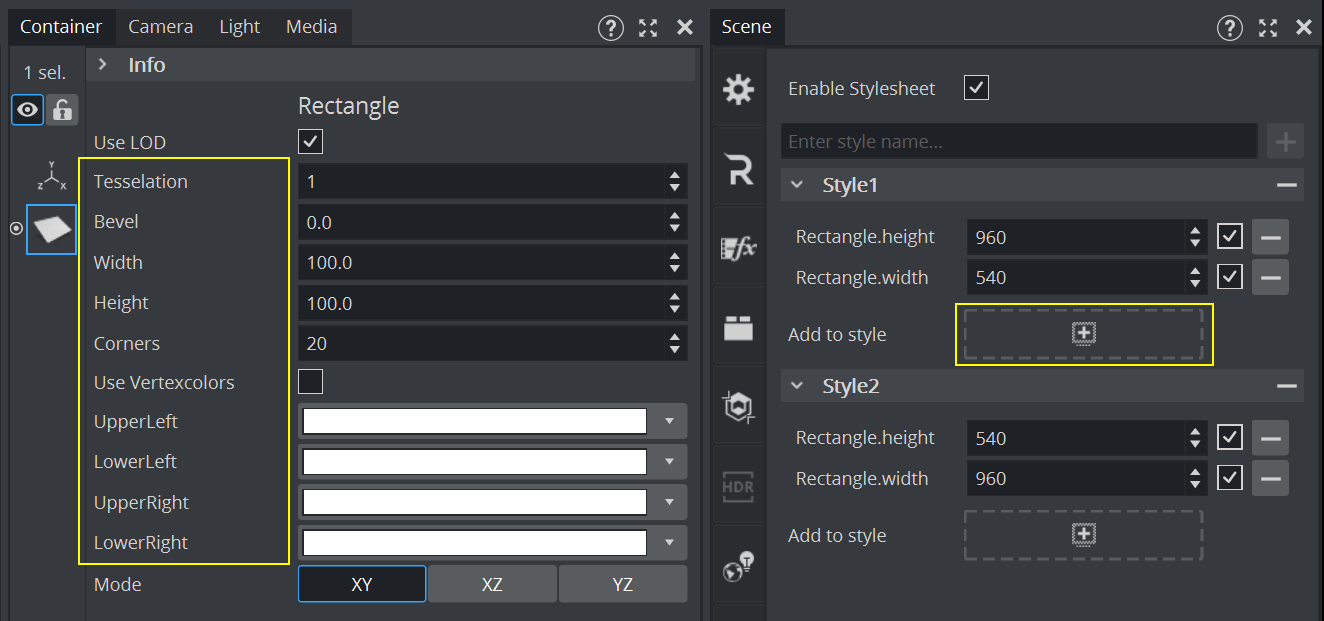
To add a specific property to a Style
Select a container plug-in in the scene.
In the Property Editor, locate the property you want to include in the style.
Drag the name of the property (not the value) to the drop area next to Add to style in the Stylesheet editor.
The property and its current value is added to the selected style.
Selecting Styles
To apply styles defined in a stylesheet, Viz Engine uses the StyleSelect plug-in. This plugin is responsible for determining which styles should be applied to a container and its children.
Using the StyleSelect Plug-in

To enable style selection, the StyleSelect plug-in must be added to a container. This container becomes the starting point for style resolution.
Inheritance to Child Containers
All containers below the one with StyleSelect inherit and use the resolved style(s), unless overridden by another StyleSelect further down the hierarchy.Combining Multiple Styles
The StyleSelect plug-in allows you to specify multiple style names. These styles are combined in the order they are listed.If a property is defined in more than one style, the last style wins (the last defined value for a given
StyleIdtakes precedence).
Multiple Plugins in Hierarchy
You can place multiple StyleSelect plug-ins at different levels in the scene tree. When this occurs:The style values from all active StyleSelect plug-ins in the hierarchy are combined.
Again, if the same property is defined in multiple places, the lowest (deepest) plug-in in the hierarchy takes precedence.
Applying Styles
To ensure that styles are applied correctly and consistently, Viz Engine performs an additional scene tree traversal during the scene update cycle. This traversal is responsible for resolving and applying styles based on the current StyleSelect configuration and the active stylesheet.
When Styles Are Applied
The style application phase occurs:
After the Stage / Animation Update
Before the Transformation Update and Plug-in Execution Traverse.
This timing ensures that:
Any changes made by animations or stage updates are taken into account before styles are applied.
Styles can influence transformations and plug-in behavior in a predictable and consistent way.
Performance Consideration: Explicit Enablement
Because style application introduces an extra traversal of the scene tree, it is disabled by default. This is a deliberate design choice to avoid unnecessary performance overhead in scenes that do not use stylesheets.
This opt-in model ensures that:
You don’t pay for what you don’t use— scenes without stylesheets incur no additional processing cost.
Teams can adopt stylesheets incrementally without impacting existing performance-sensitive workflows.
Subscene Workflow
Viz Engine supports the use of stylesheets in scenes that include subscenes, enabling flexible reuse of visual components with different styling contexts. However, there are important rules to understand regarding how styles are resolved across scene boundaries.
Style Application in Subscenes
Styles are applied within the subscene, but only styles defined in the main scene are considered.
Stylesheets defined inside subscenes are ignored during style resolution.
This ensures that subscenes behave like reusable prototypes, styled externally by the parent scene.
Reusing Prototypes with Different Styles
This design allows you to:
Create a single subscene (for example, a button, label, or graphic element).
Reuse it multiple times in the main scene.
Apply different styles to each instance by placing a
StyleSelectplug-in above each subscene reference and assigning different style names.
Scripting
Styles are scriptable and can be changed at runtime via the Scene object's Style API. Each style is identified by a string name, and individual properties can be accessed via string keys or integer property IDs. The functions return a boolean indicating whether the operation was successful or not.
Generic Style Functions
| Sets an integer value for a style property. |
|
| Sets a float (double) value for a style property. |
|
| Sets a 3D vector value (x, y, z). |
|
| Sets a vertex value. |
|
| Sets a 4D vector value (x, y, z, w). |
|
| Sets a color value. |
|
| Enables or disables a style property. |
|
| Removes a style property. |
|
prop Constants
When using the prop variant of the functions, the following constants can be used to refer to common style properties:
STYLE_PROPERTY_BASECOLORSTYLE_PROPERTY_FONTSIZESTYLE_PROPERTY_TEXTCOLORSTYLE_PROPERTY_OPACITYSTYLE_PROPERTY_POSITIONSTYLE_PROPERTY_ROTATIONSTYLE_PROPERTY_SCALINGSTYLE_PROPERTY_ACTIVESTYLE_PROPERTY_LINEWIDTH
These constants provide a more efficient and type-safe way to reference style properties compared to string keys.
Convenience Functions
For frequently used style properties, the Scene object provides dedicated convenience functions. These are simpler alternatives to using SetStyle* with property constants.
Function | Description |
|---|---|
| Sets the base color of the style. |
| Sets the font size. |
| Sets the text color. |
| Sets the opacity (transparency). |
| Sets the 3D position. |
| Sets the 3D rotation. |
| Sets the 3D scaling. |
| Activates or deactivates the style. |