This is the end-to-end walkthrough for a first-time online installation. Offline and hybrid flows are noted where they diverge.
Launching vamctl
- On the installer host, run
vamctl.exeas Administrator.- From a Vizrt distribution: double-click the installer executable.
- From an existing install: it is available at
C:\Program Files\Vizrt\vamctl\vamctl.exe.
- A console window opens briefly, then your default browser launches and shows the wizard at
http://127.0.0.1:<port>/. The wizard opens on its first step, Prepare Installer.
The installer hosts its own local web server on a loopback port. Leave the console window open for the duration of the install. If you close it, the wizard disconnects.
If the browser does not open automatically, copy the URL from the console window into a browser manually.
The wizard tracks its own progress in the left sidebar, and the header shows the current step. The total number of steps depends on the workflow you choose — creating a new cluster adds the Cluster Setup sub-steps — so this guide refers to screens by name rather than number.
Choose a Workflow
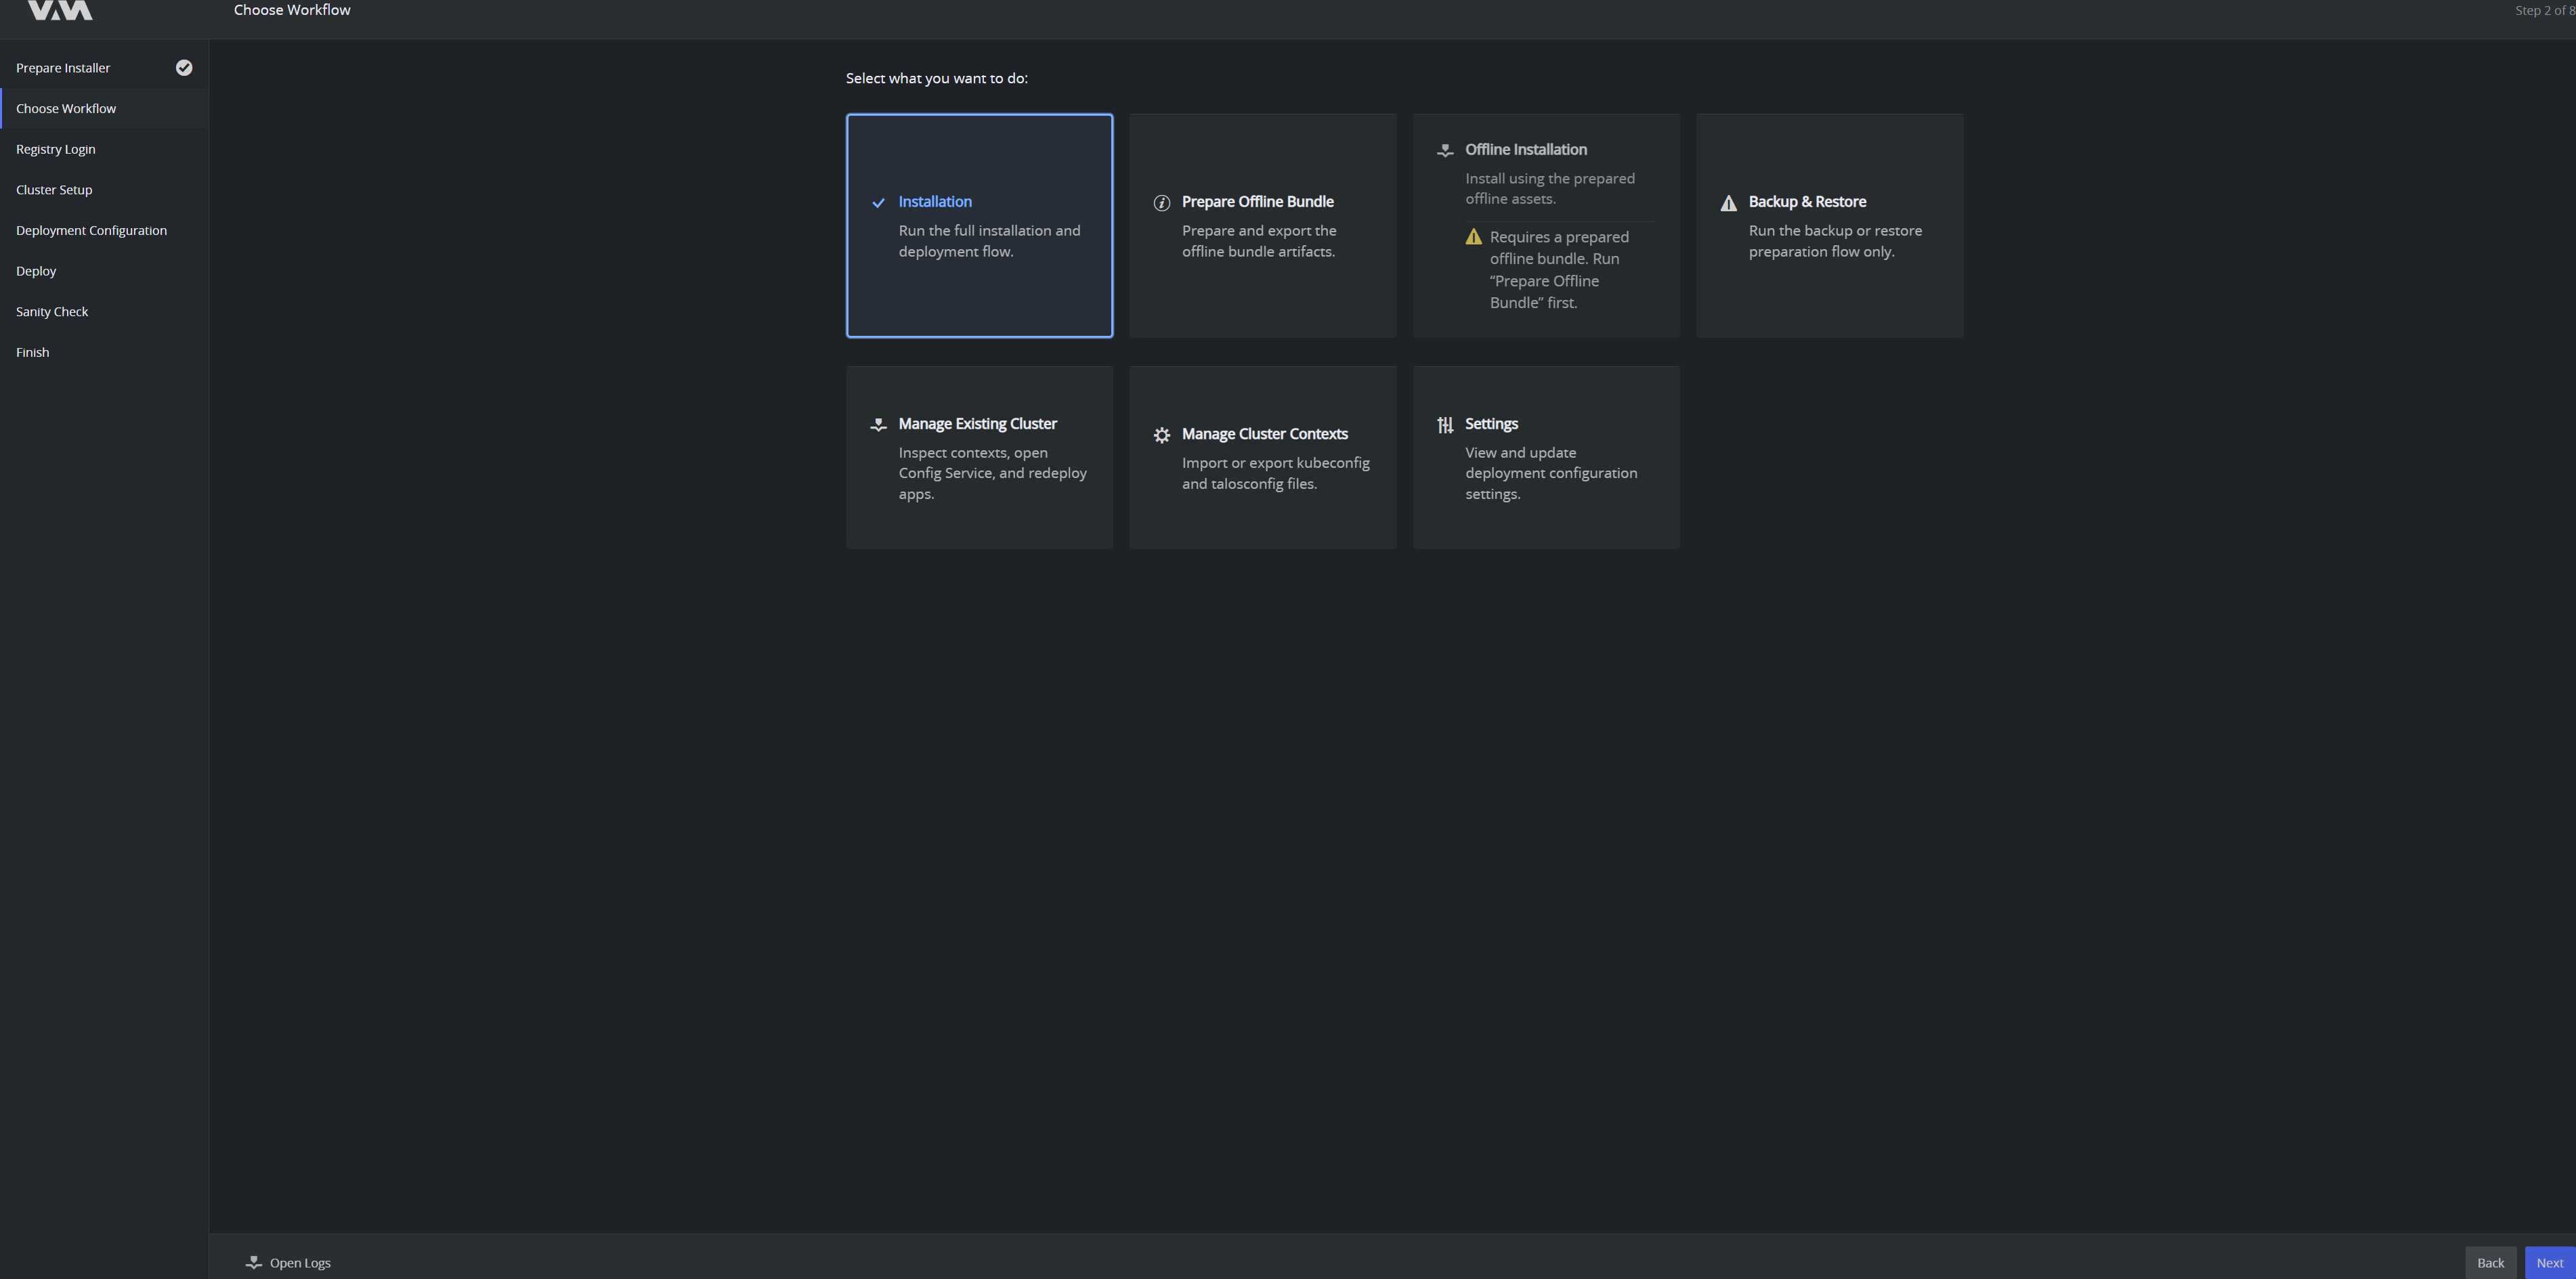
Select what you want to do. For a fresh installation, choose Installation.
Workflow | Use it to |
|---|---|
Installation | Run the full installation and deployment flow. |
Prepare Offline Bundle | Prepare and export the offline bundle artifacts. |
Offline Installation | Install using a prepared offline bundle. Run Prepare Offline Bundle first. |
Backup & Restore | Run the backup or restore preparation flow only. |
Manage Existing Cluster | Inspect contexts, open the Configuration Service and redeploy apps. |
Manage Cluster Contexts | Import or export kubeconfig and talosconfig files. |
Settings | View and update deployment configuration settings. |
Click Next.
Prepare Installer
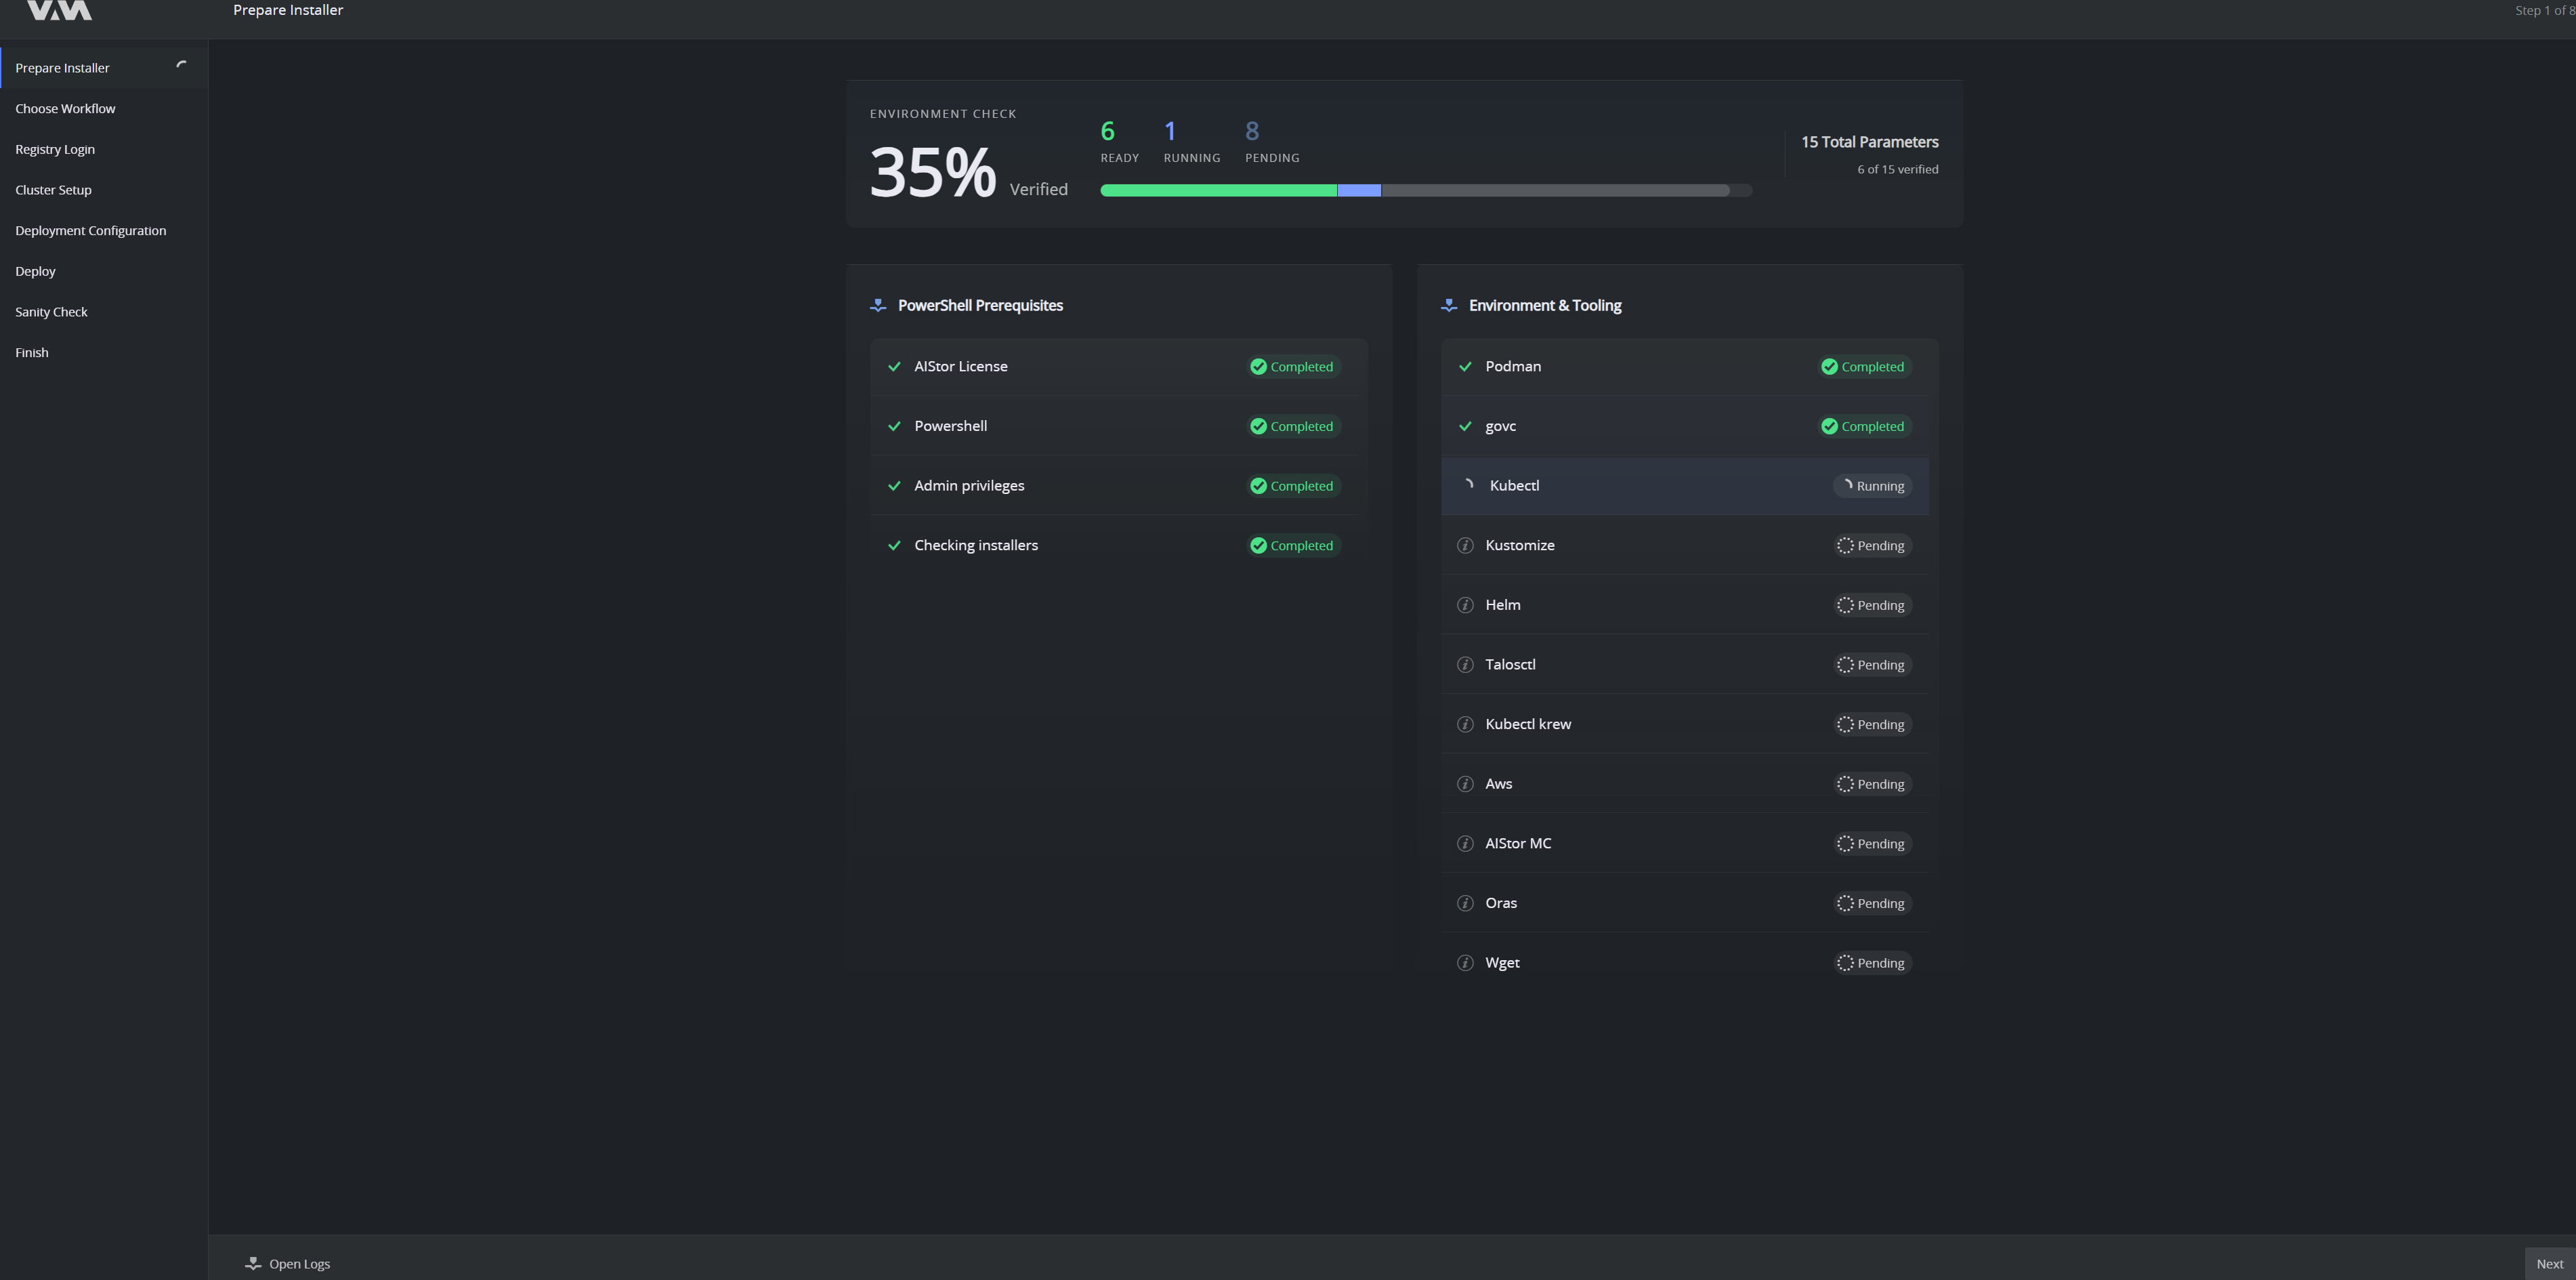
The first step runs an environment check. It verifies the host and then downloads and verifies the command-line tools the installer needs. The header shows overall progress and how many parameters are verified.
PowerShell Prerequisites covers the host itself: the AIStor license, the PowerShell version, administrator privileges and the installers already present on the machine.
Environment & Tooling verifies each tool in turn — Podman, govc, Kubectl, Kustomize, Helm, Talosctl, Kubectl krew, Aws, AIStor MC, Oras and Wget. Each row reports Completed, Running, or Pending.
Podman is the row that matters most, and the one most likely to fail. The installer uses it to build the Talos boot images that provision the cluster nodes and to stage offline bundles, so it is required for every install — including a plain online install onto Hyper-V. It runs as a rootful Podman machine on WSL 2, which the installer configures itself.
Wait until every row reports Completed, then click Next. If a row fails, use Open Logs at the bottom of the window to read the reason. For Podman failures see Troubleshooting the Installer.
Registry Login
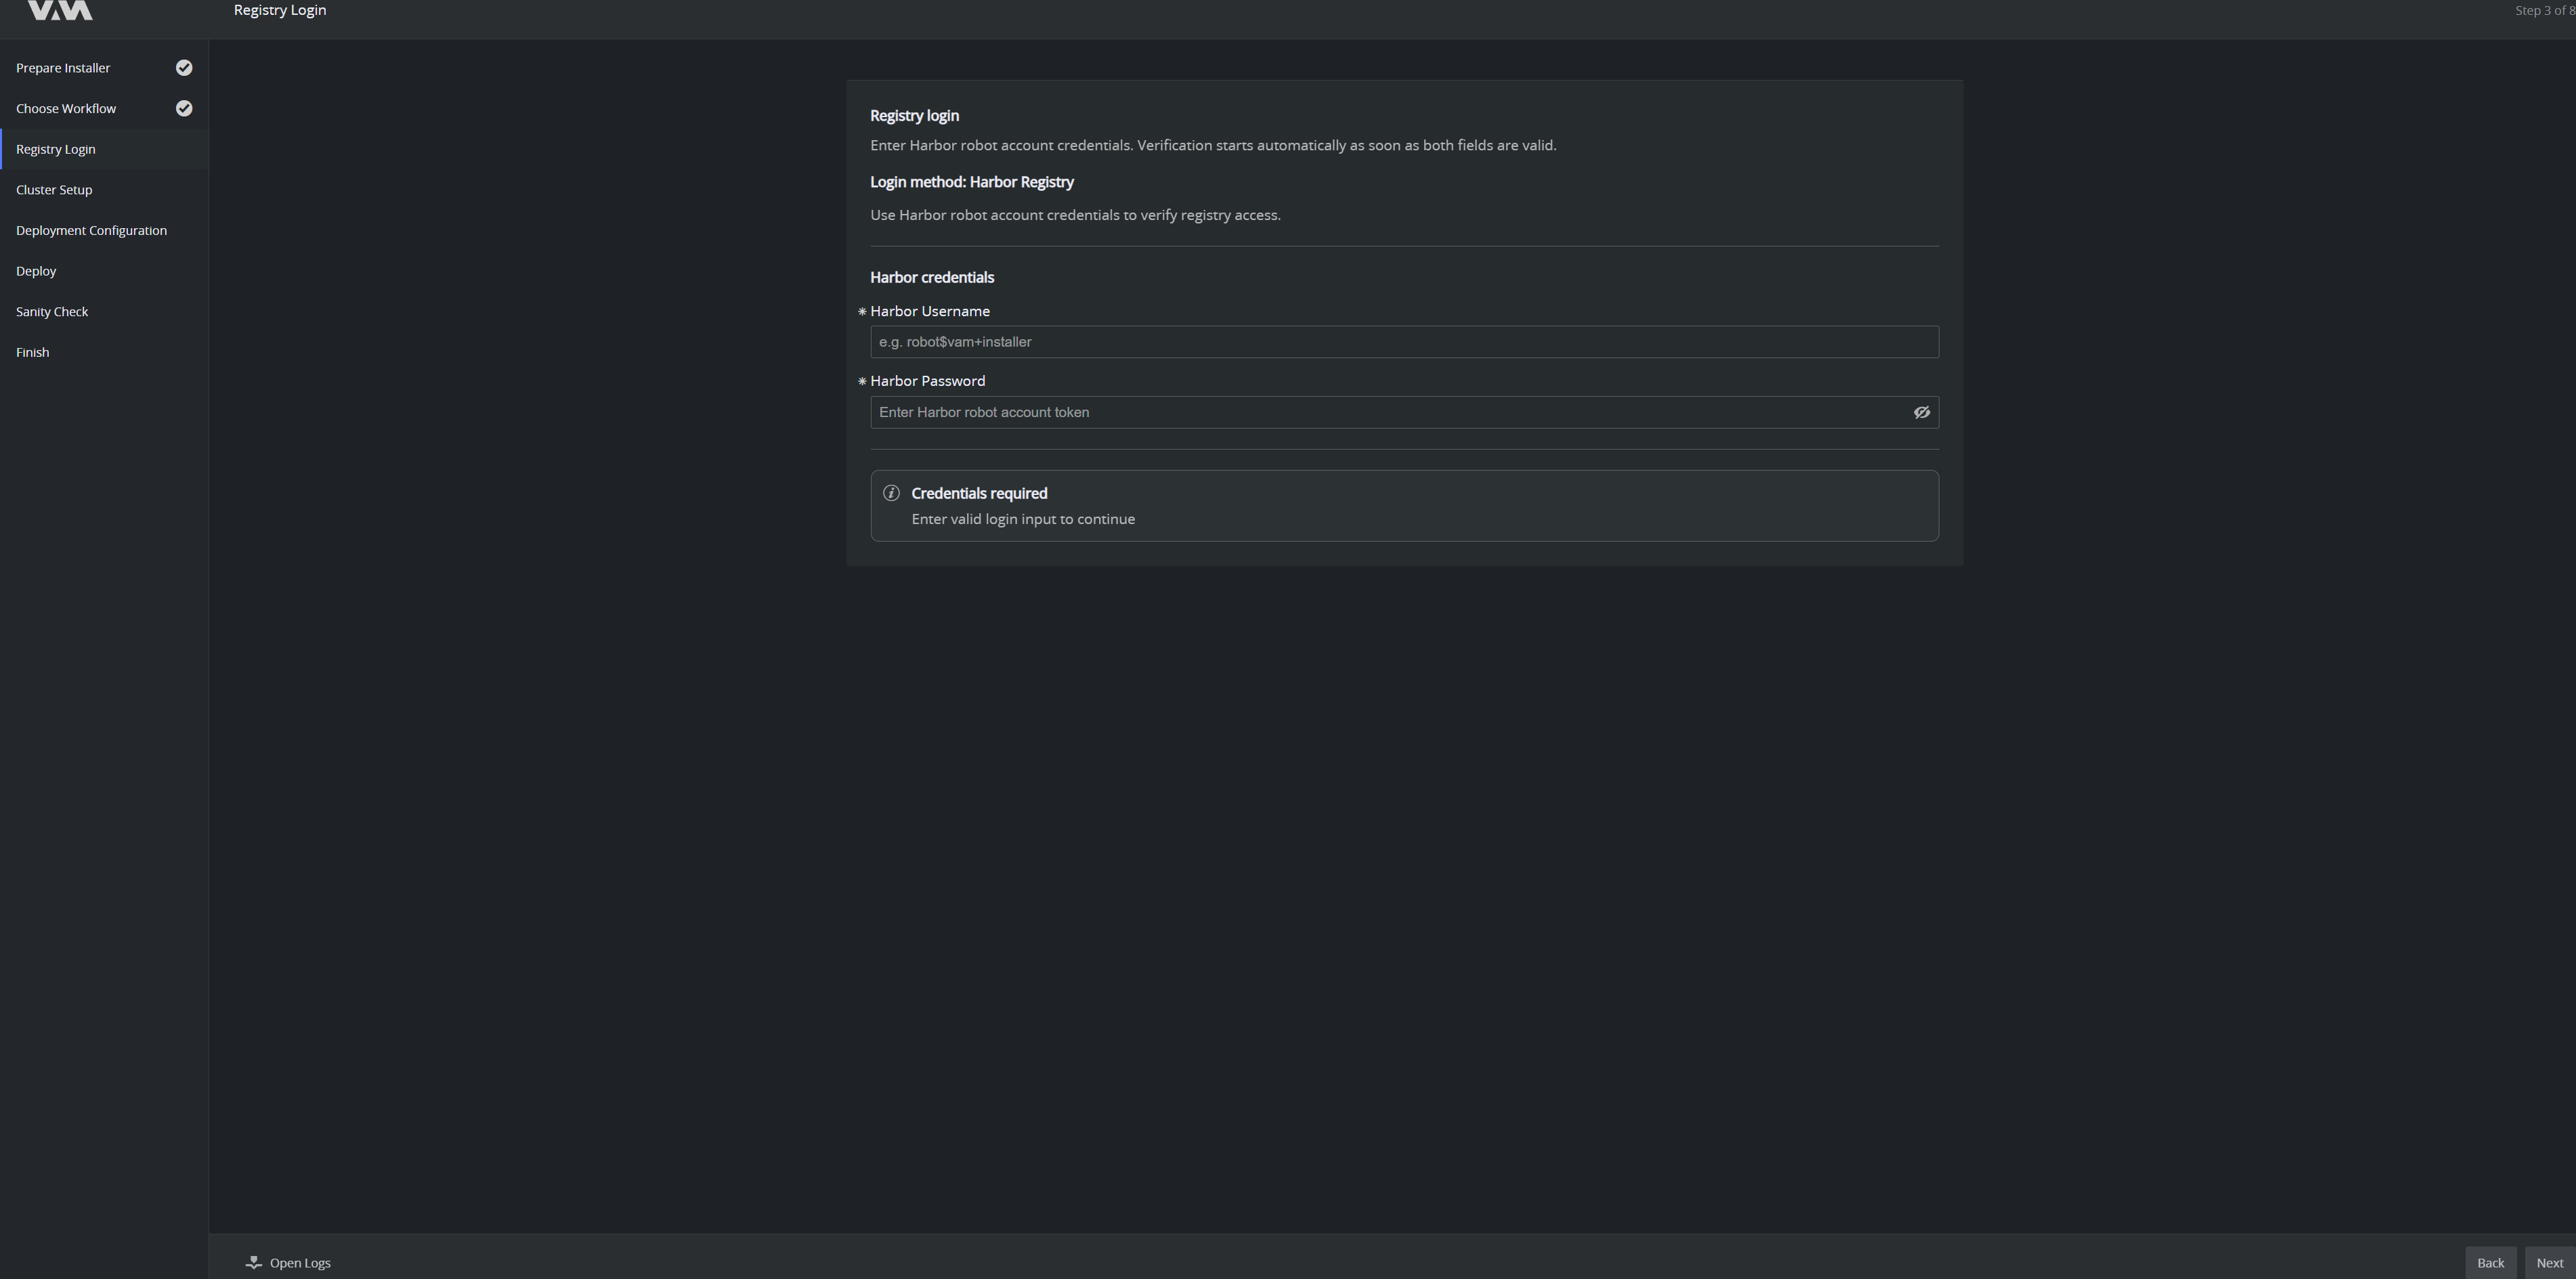
The installer pulls VAM container images and Helm packages from the Harbor registry, so it needs credentials for a Harbor robot account.
- In Harbor Username, type the robot account name, in the form robot$vam+installer.
- In Harbor Password, type the robot account token.
Verification starts automatically as soon as both fields are valid — there is no separate button to press. Until then the panel reports Credentials required. When verification succeeds, click Next.
If verification fails, see Troubleshooting → Registry access.
For an offline install, use the bundle you produced earlier instead. See Offline (Air-Gapped) Installation for the full prepare-transfer-install flow.
Cluster Setup
The Installation workflow always installs the current versions from the registry — there is no version-selection step. To pin versions, use the Prepare Offline Bundle workflow, which lets you choose a version per package. See Offline (Air-Gapped) Installation.
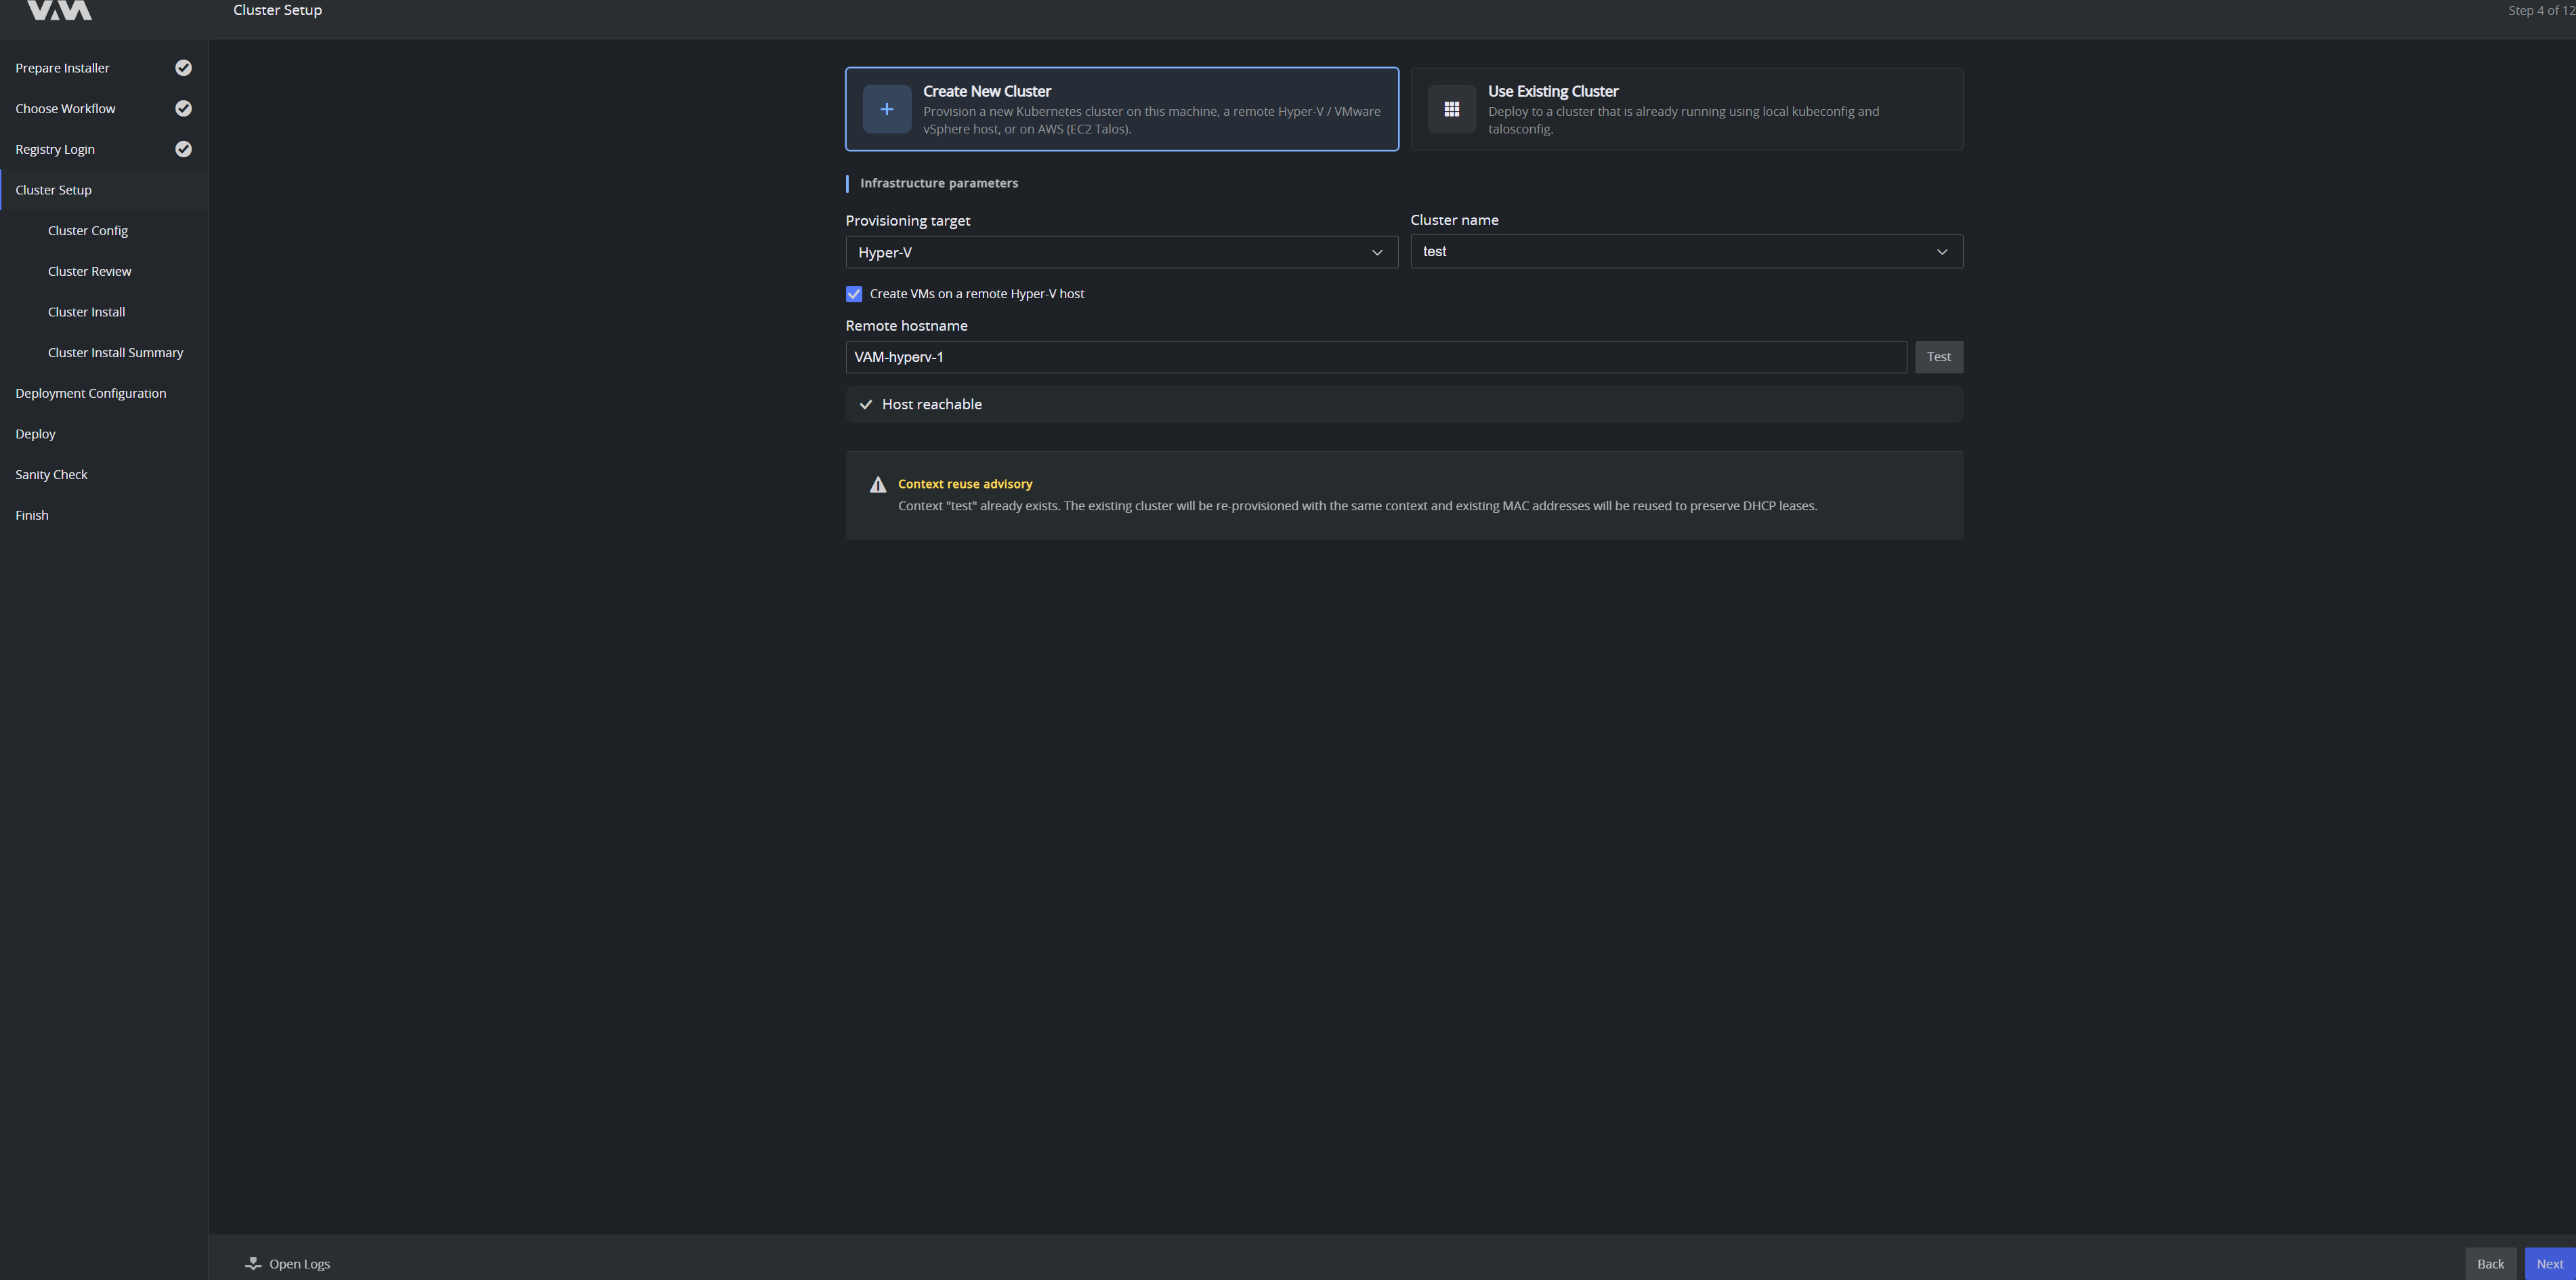
Choose whether the installer builds a cluster or deploys onto one you already run.
Create New Cluster provisions a new Kubernetes cluster on this machine, on a remote Hyper-V or VMware vSphere host, or on AWS (EC2 Talos). Under Infrastructure parameters:
- Provisioning target: the platform that hosts the nodes, for example Hyper-V.
- Cluster name: the name of the cluster context. If the name already exists, the wizard shows a Context reuse advisory: the existing cluster is re-provisioned with the same context, and its MAC addresses are reused so DHCP leases survive.
- Create VMs on a remote Hyper-V host: select this to provision on another host, type its name in Remote hostname, then click Test. The panel reports Host reachable when the connection succeeds.
Use Existing Cluster deploys to a cluster that is already running, using the local kubeconfig and talosconfig. Select the Cluster context to deploy into. Cluster provisioning is skipped and deployment continues directly with Helm. To import or export contexts first, go back to the workflow selection and run Manage Cluster Contexts.
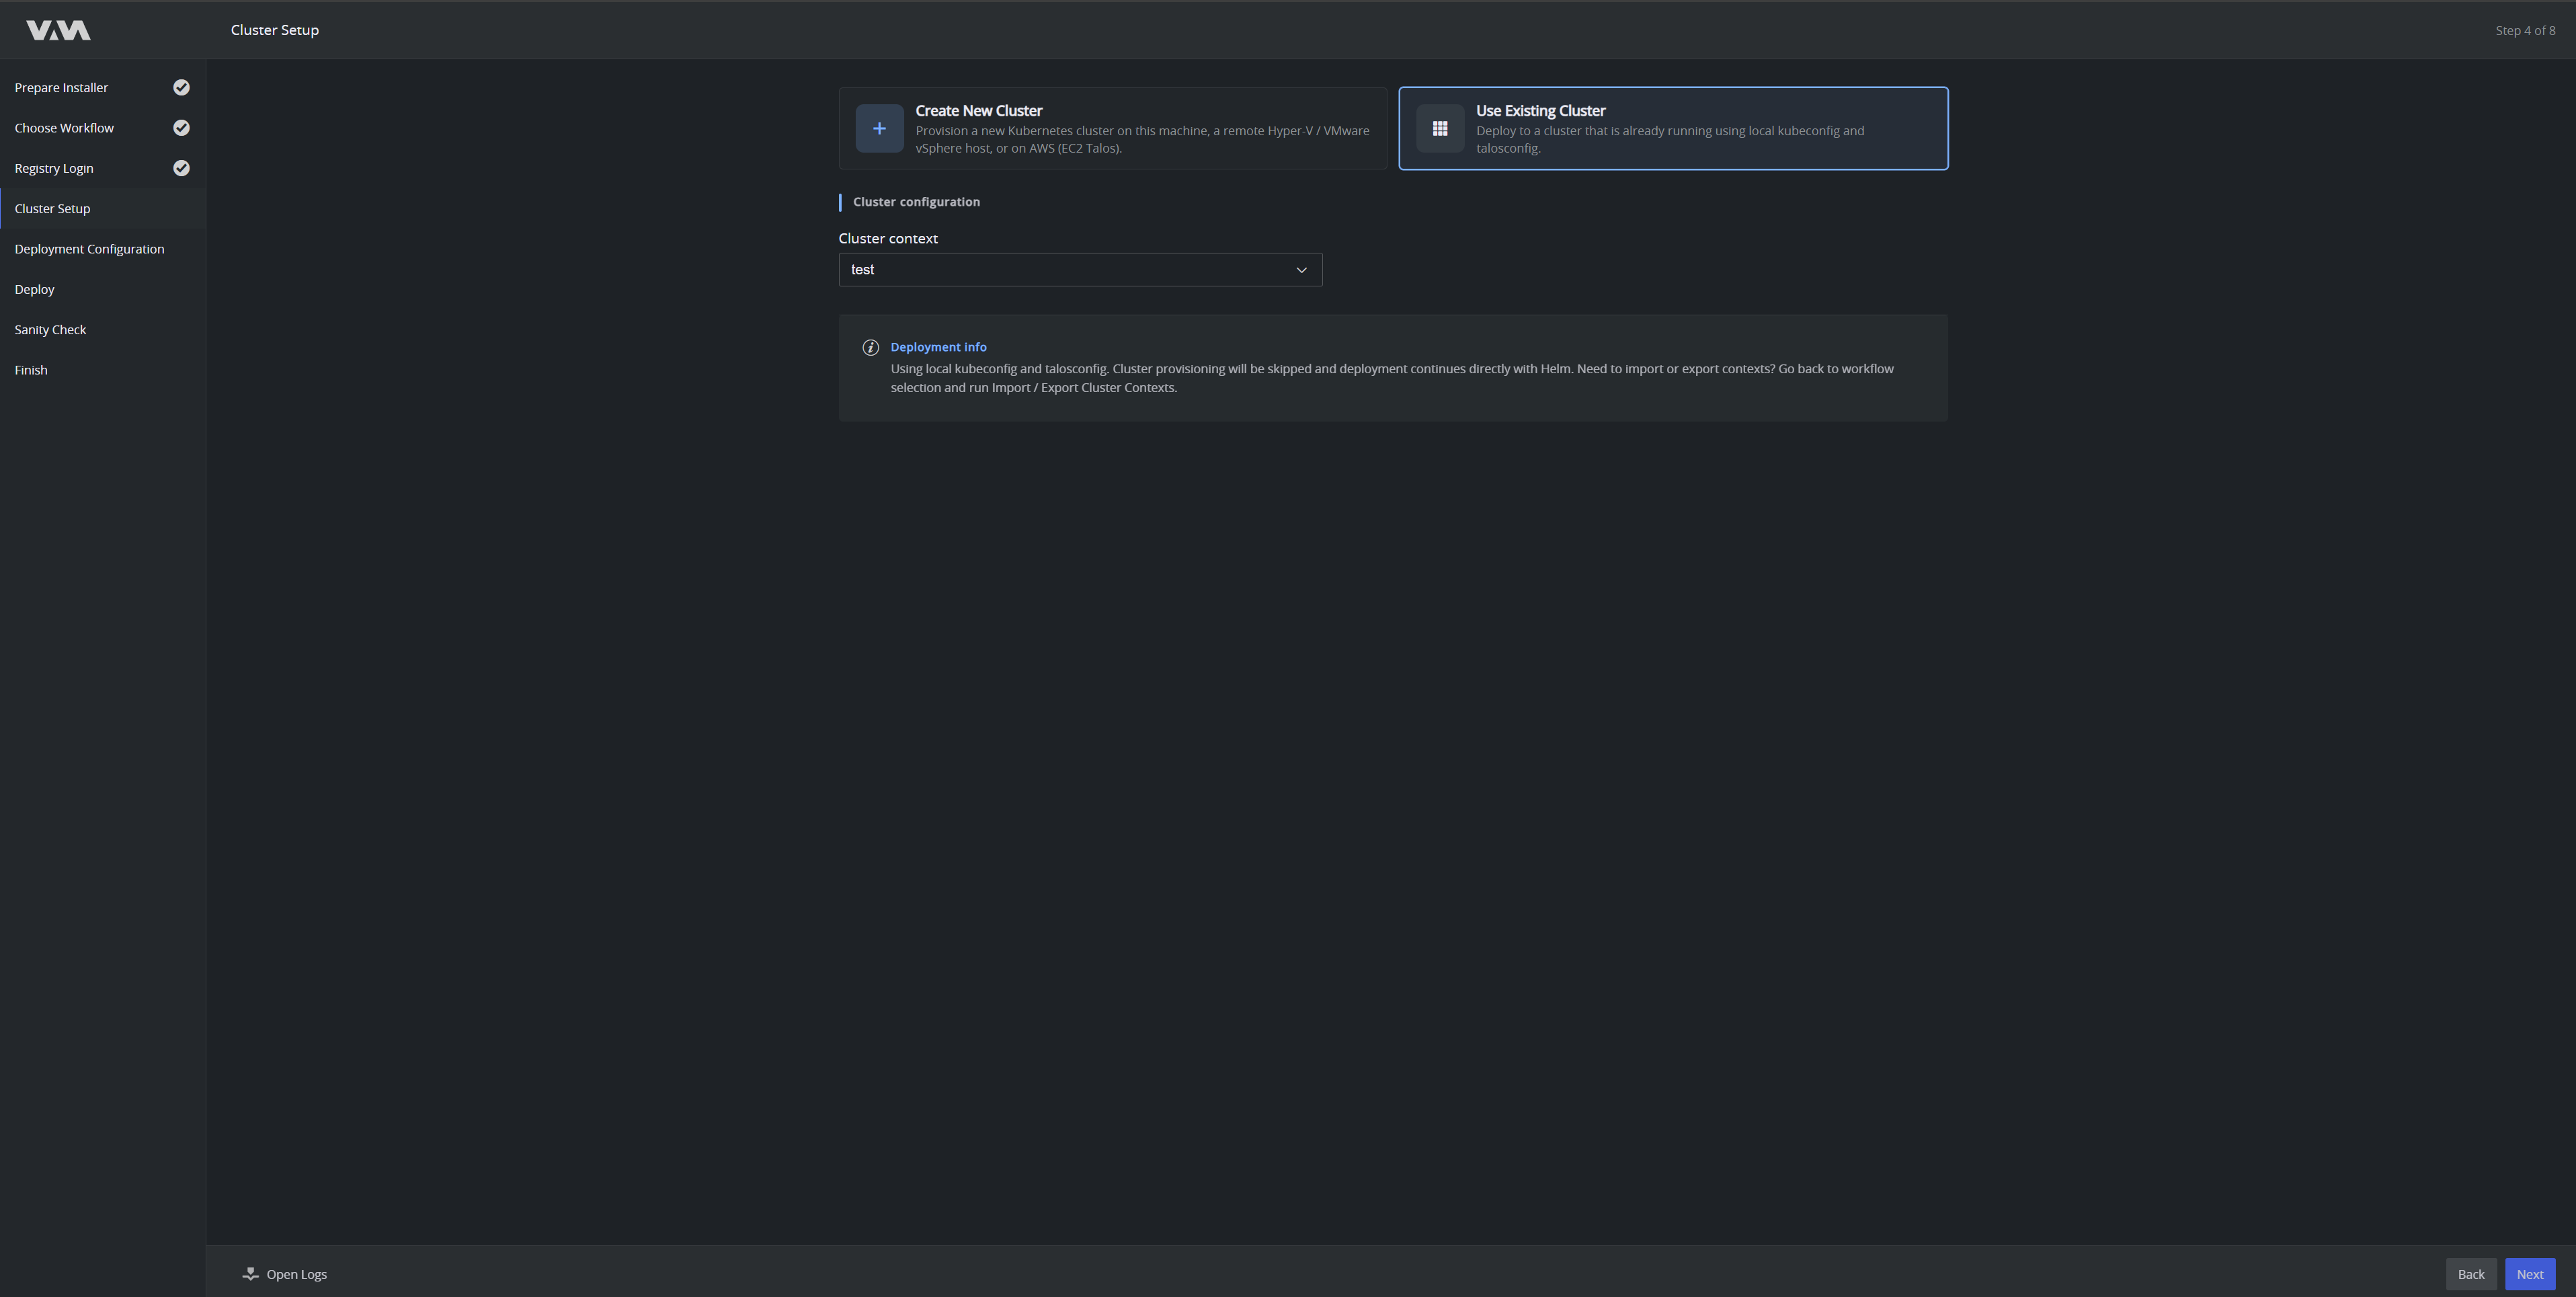
For VMware vSphere, follow the dedicated VMware vSphere Deployment guide for the connection details and required vCenter permissions.
For an existing cluster, the cluster must be empty or dedicated to VAM — the installer does not share a namespace with unrelated workloads. See Existing Kubernetes Cluster for the full prerequisites and flow (storage, certificates, ingress, identity).
Cluster Config
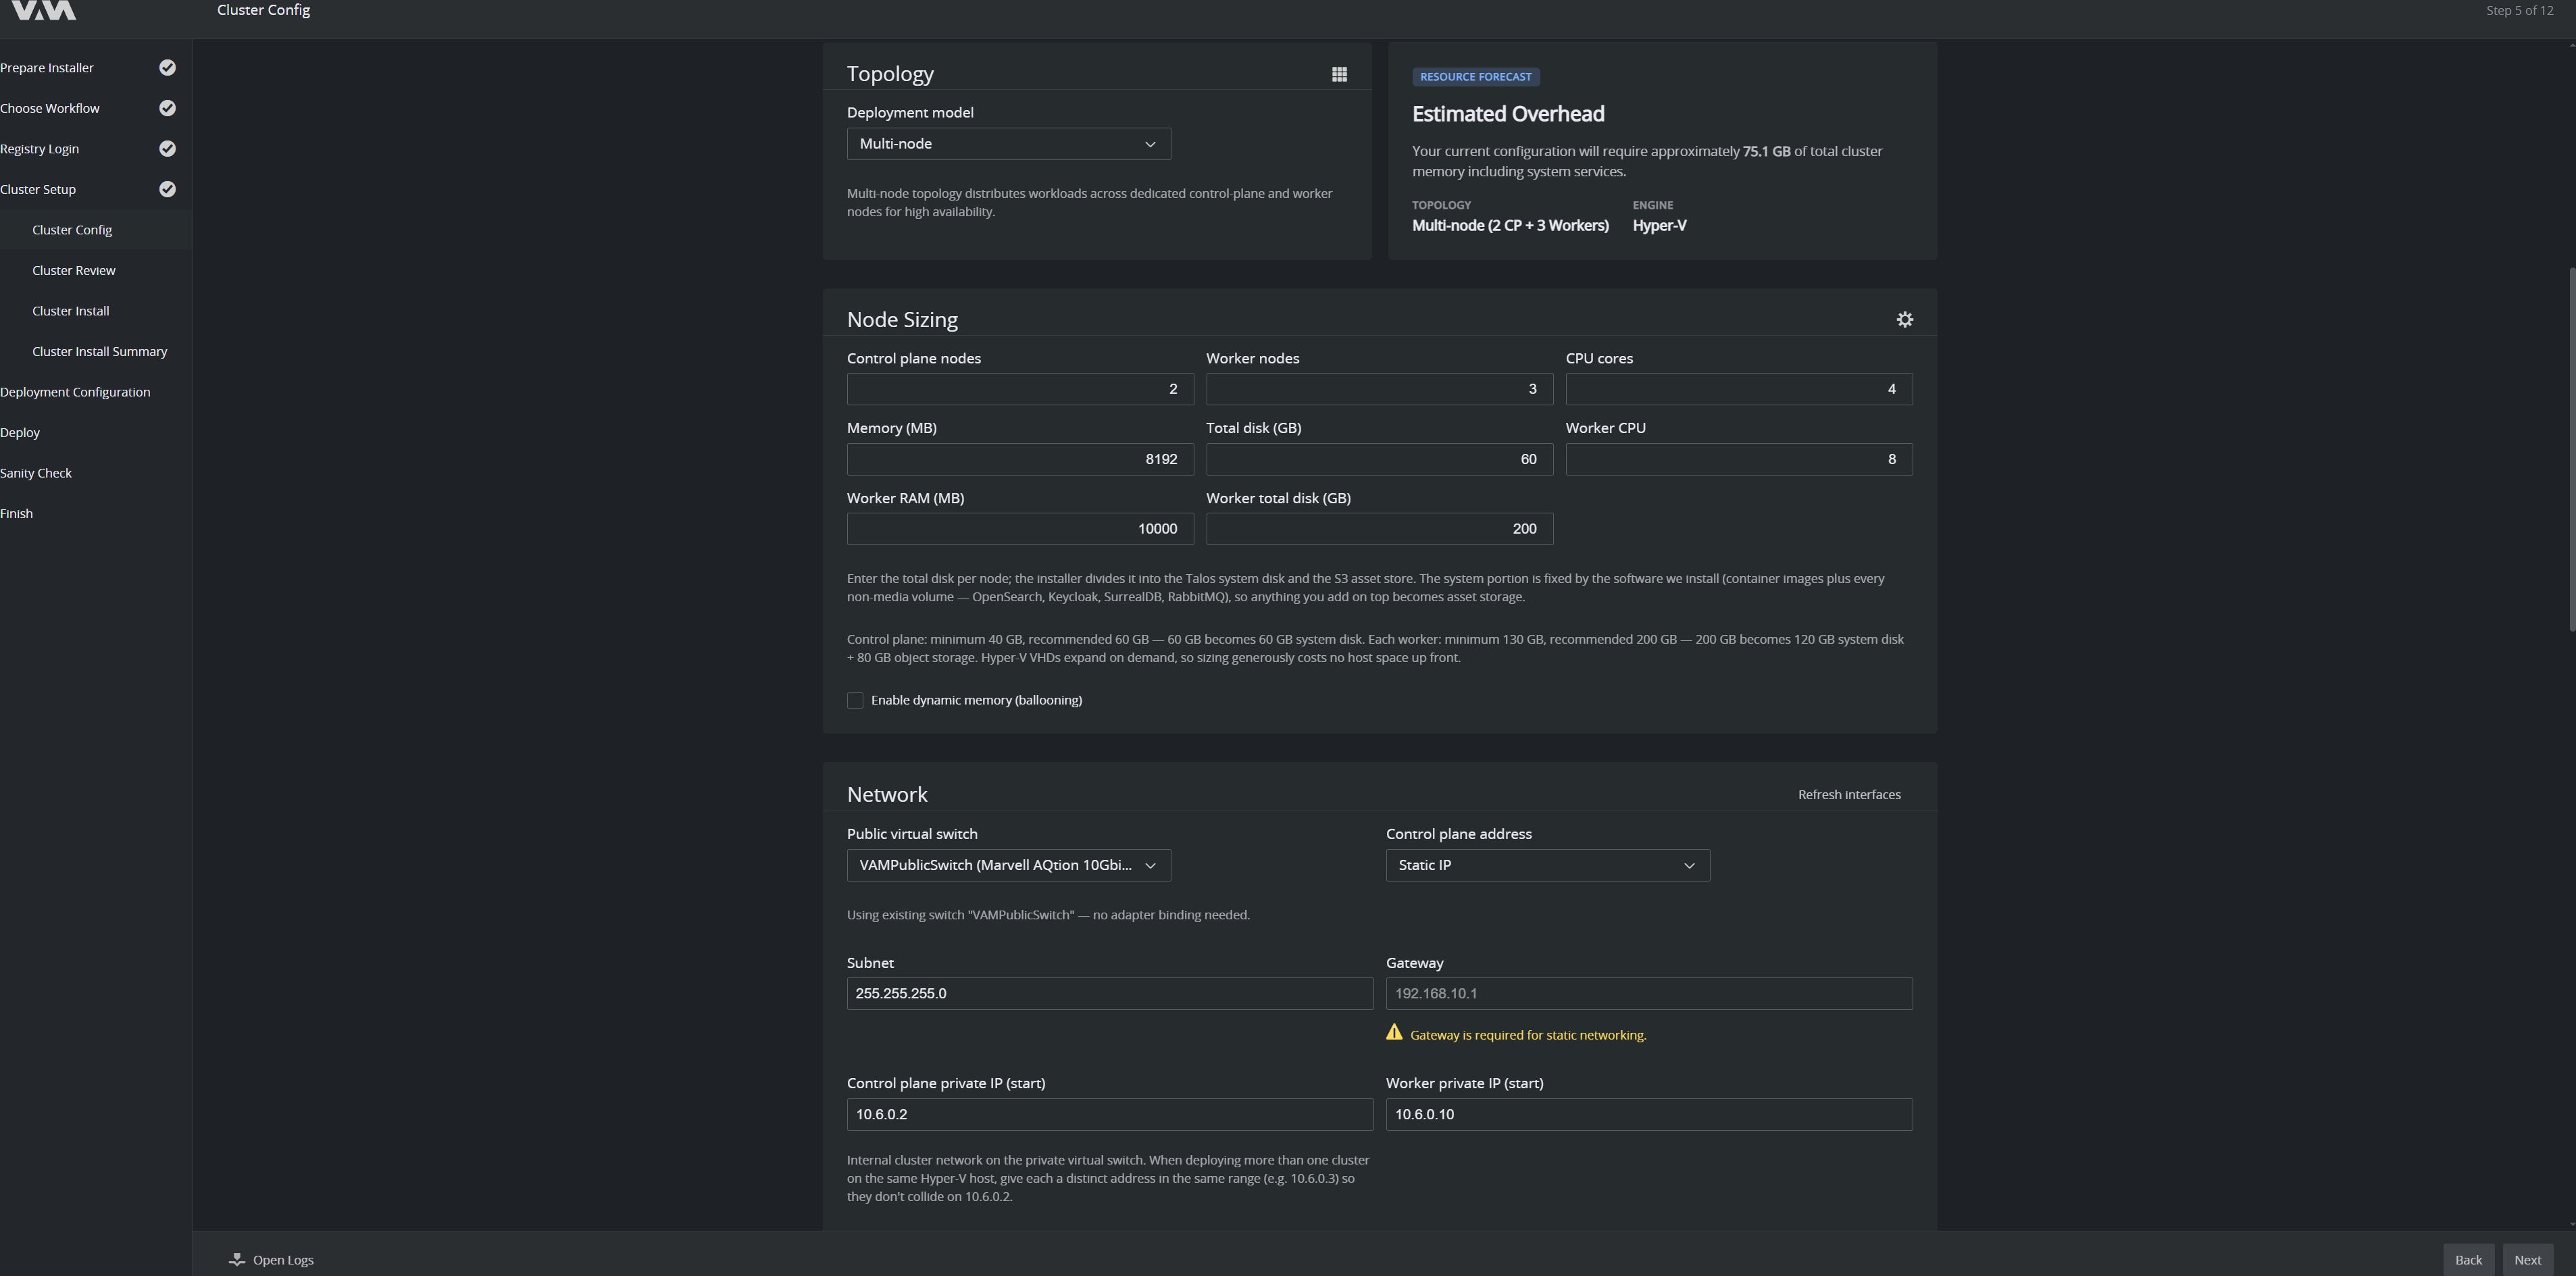
Define the cluster shape. A Resource Forecast panel on the right shows the estimated memory overhead for the current configuration, so you can see the cost of a change as you make it.
Topology
In Deployment model, choose:
- Single-node: fastest path for evaluations.
- Multi-node: distributes workloads across dedicated control-plane and worker nodes for high availability.
Node Sizing
- Control plane nodes and Worker nodes: how many of each.
- CPU cores, Memory (MB), Total disk (GB): per control-plane node.
- Worker CPU, Worker RAM (MB), Worker total disk (GB) — per worker node.
- Enable dynamic memory (ballooning): leave cleared unless the host is memory-constrained.
Total disk is the whole disk per node. The installer divides it into the Talos system disk and the S3 asset store; the system portion is fixed, so anything you add on top becomes asset storage. A control plane needs a minimum of 40 GB (60 GB recommended). Each worker needs a minimum of 130 GB (200 GB recommended, which becomes a 120 GB system disk plus 80 GB object storage). Hyper-V disks expand on demand, so sizing generously costs no host space up front.
Network
- Public virtual switch: the switch the nodes attach to.
- Control plane address: Static IP or DHCP.
- Subnet and Gateway: a gateway is required for static networking.
- Control plane private IP (start) and Worker private IP (start) — the internal cluster network on the private virtual switch. When deploying more than one cluster on the same Hyper-V host, give each a distinct address in the same range so they do not collide.
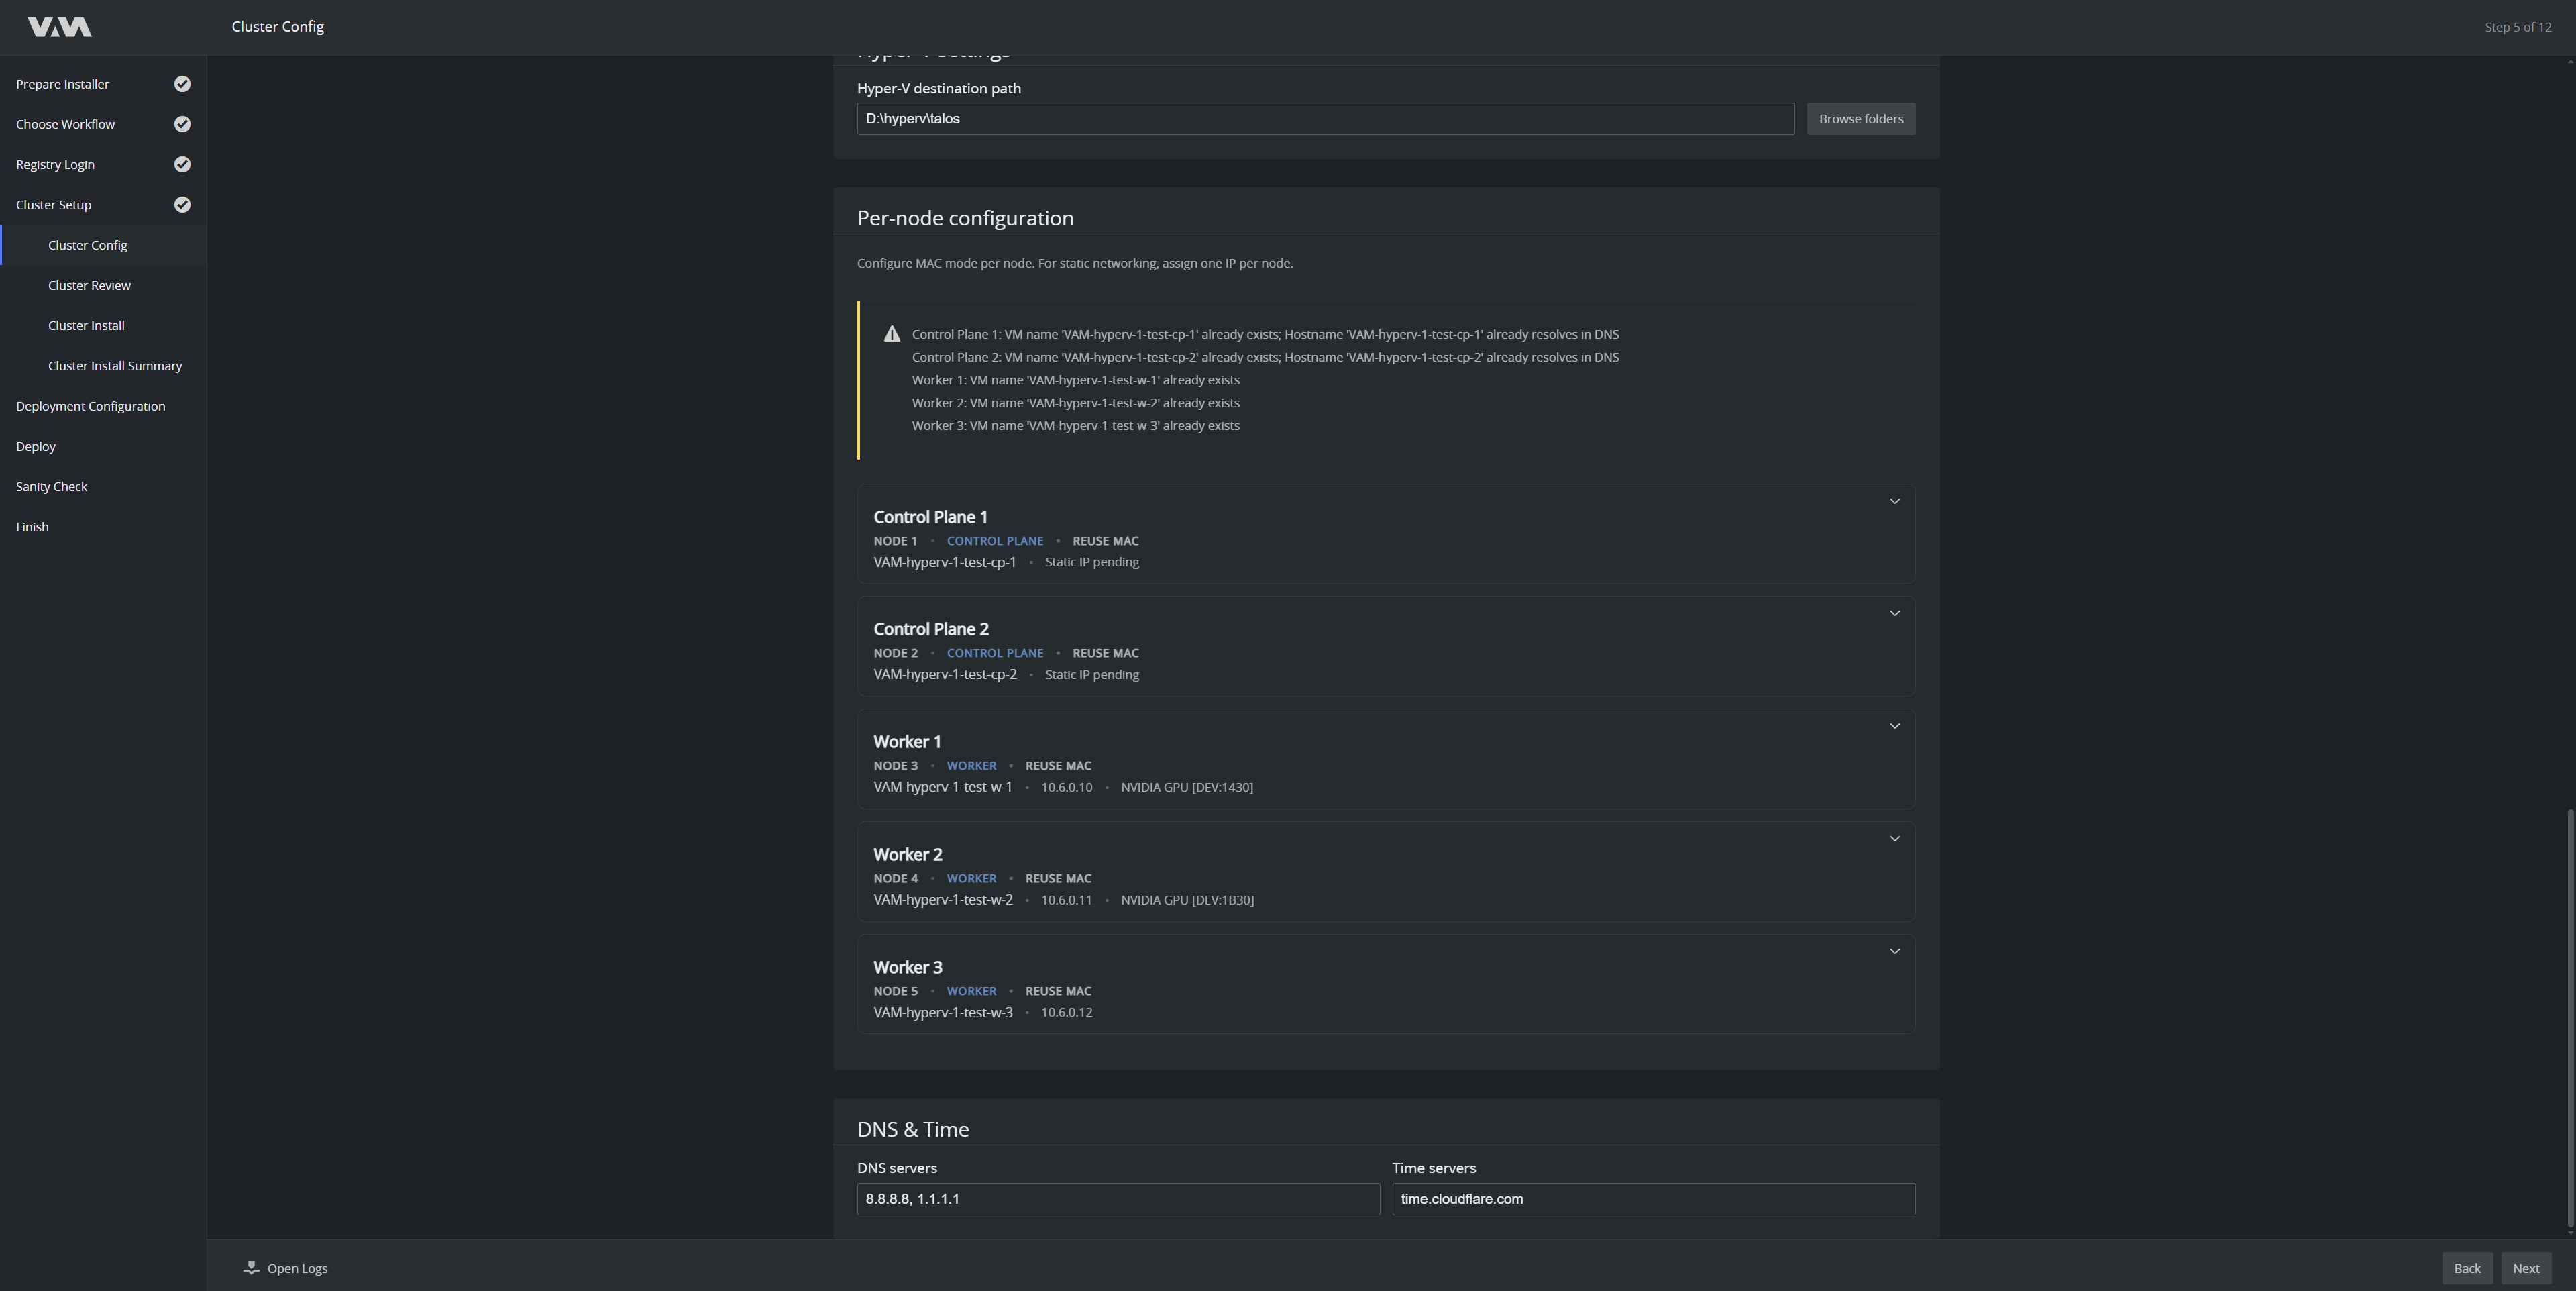
- Hyper-V destination path: where the node disks are stored. Use Browse folders to pick it.
Per-Node Configuration
Each node appears as a card showing its role, hostname, MAC mode and assigned address. Expand a card to set the MAC mode for that node, and to assign a GPU to a worker from the devices the installer found on the host. For static networking, assign one IP per node.
If a node's VM name or DNS record already exists, the wizard lists the conflict above the cards.
DNS and Time
Set DNS servers and Time servers for the cluster nodes.
Cluster Review
Confirm the cluster architecture and network parameters before initialization. Cluster Configuration summarises the cluster name, setup mode, topology, infrastructure and the resources allocated to control planes and workers. Node identities lists each node with its hostname, MAC address, static IP, GPU and effective resources.
Read this screen carefully. Changing the topology after this step requires reinstalling the cluster.
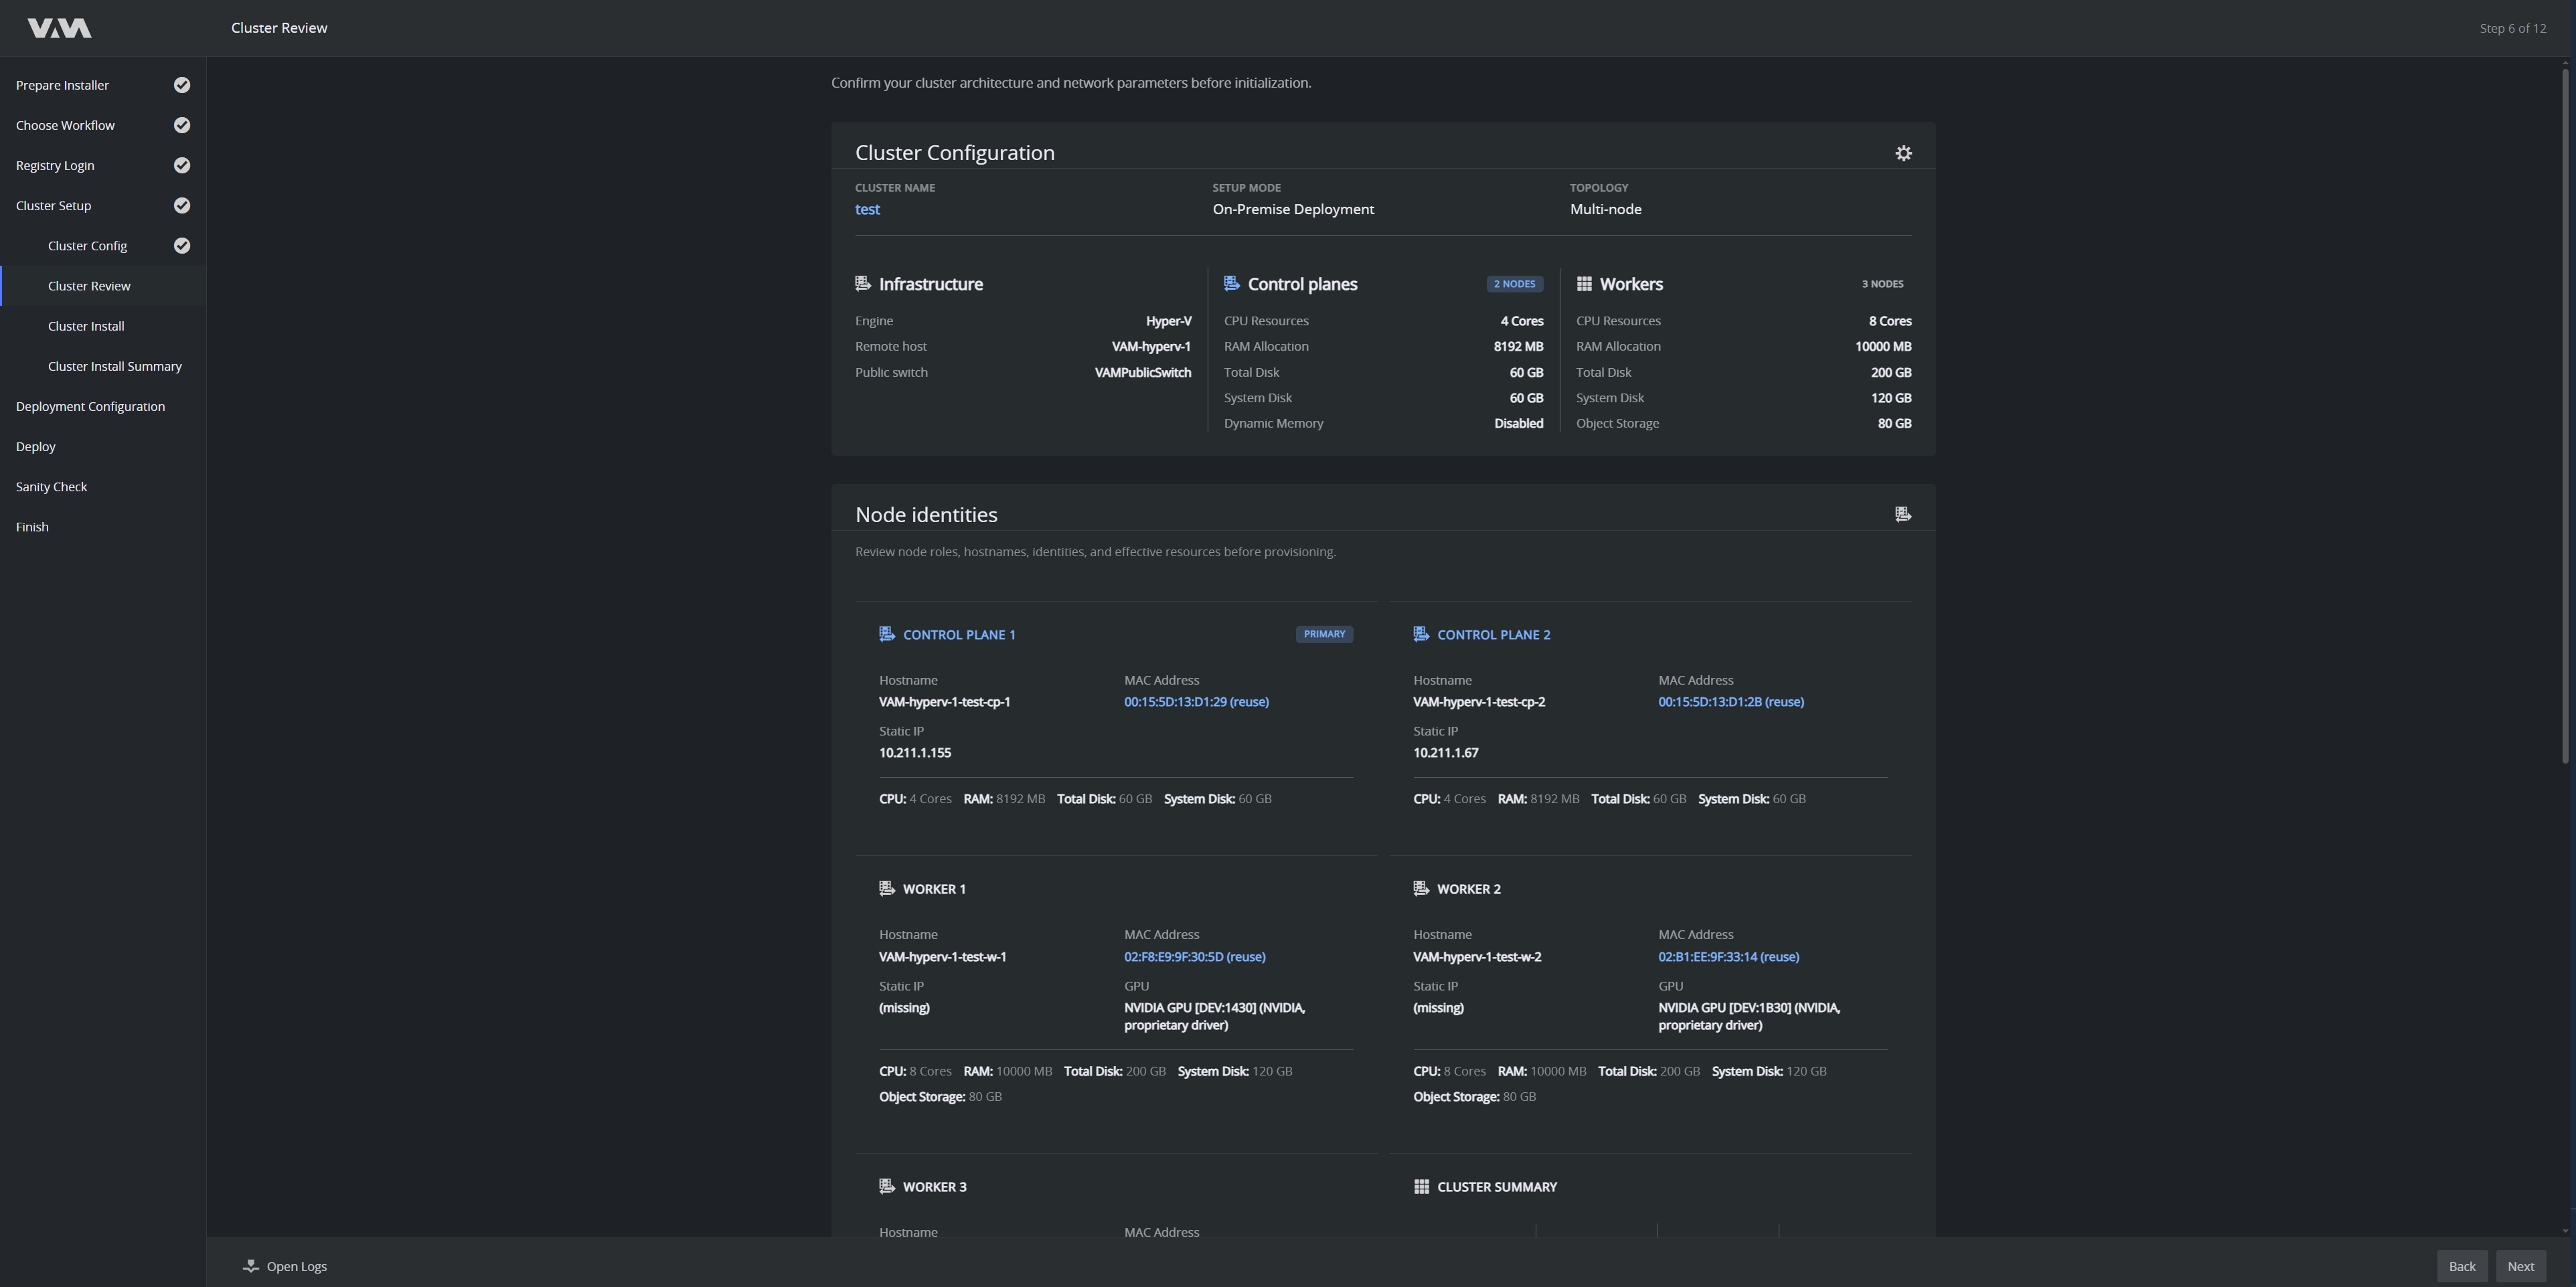
Further down, Network Architecture shows the address type, subnet, gateway, DNS resolvers and time servers. Pre-install checks lists any warnings — for example a planned private IP that is already used by a VM belonging to another cluster, which you must resolve on the Cluster Config step. If VMs from a previous install exist, Existing deployment will be overwritten names each one that is re-provisioned.
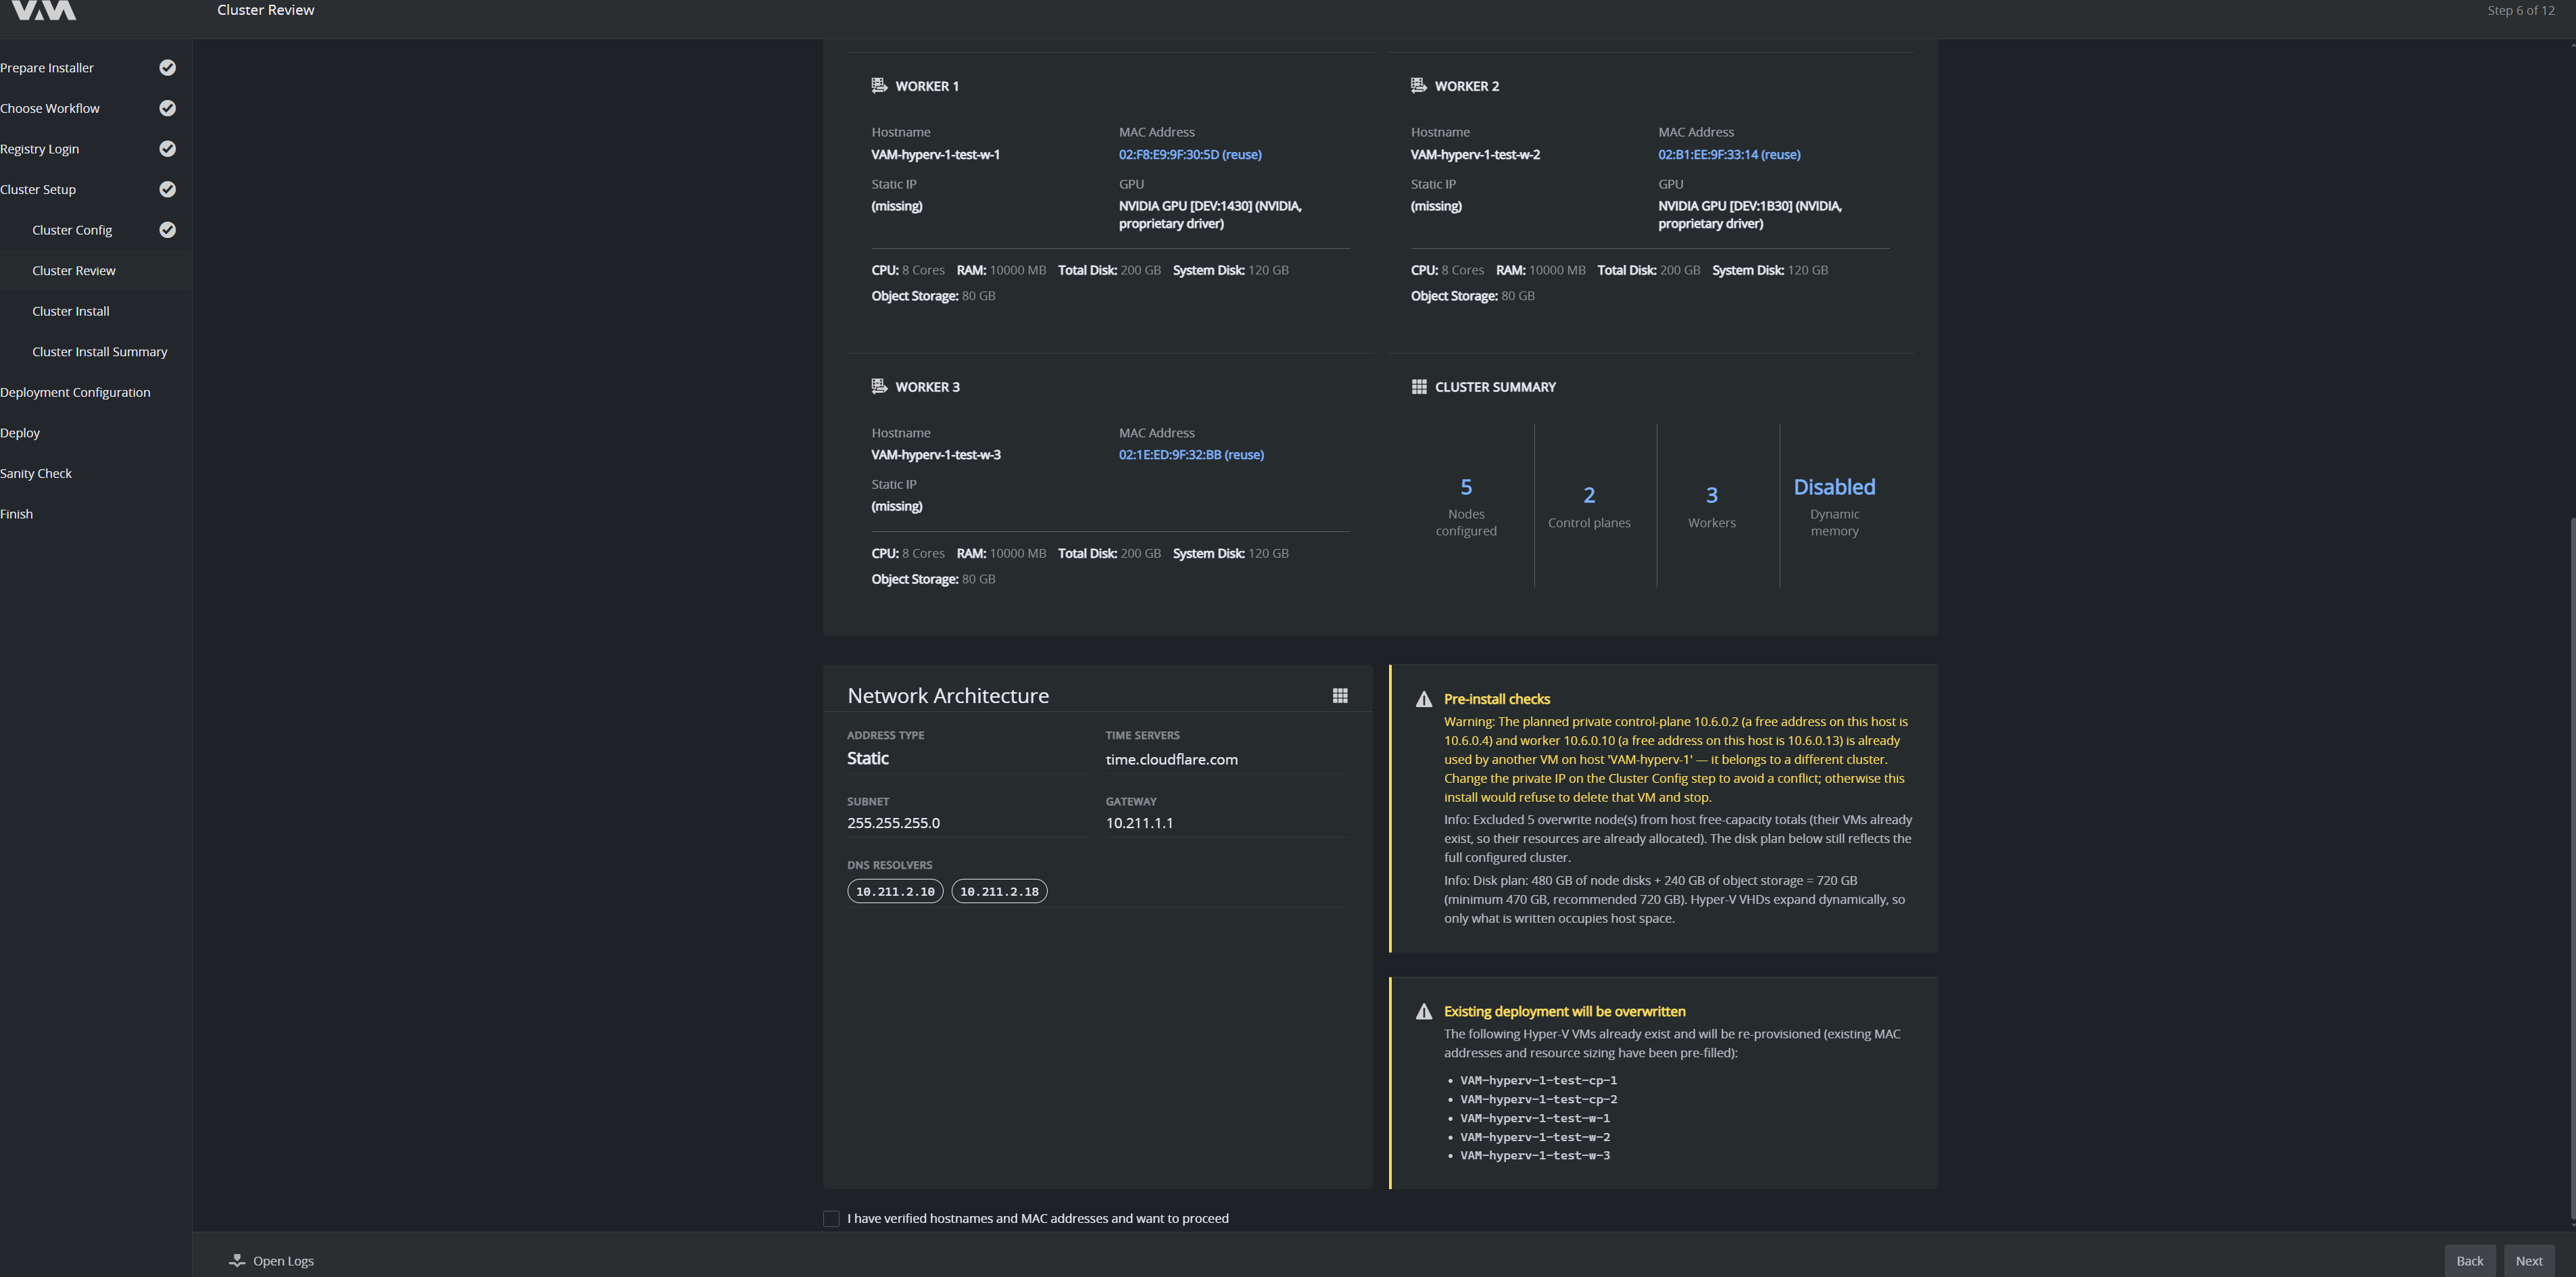
Select I have verified hostnames and MAC addresses and want to proceed, then click Next.
Cluster Install
The installer:
- Provisions the node VMs (or boots existing nodes via Talos).
- Installs Kubernetes.
- Joins worker nodes to the control plane.
- Verifies that the cluster is healthy.
Progress is shown step-by-step with live log output. If a step fails, the wizard pauses and shows the error; expand the step to read the log, then either Retry or Cancel to go back.
This typically takes 10–25 minutes for a single-node install and longer for multi-node. Do not close the wizard window during this step.
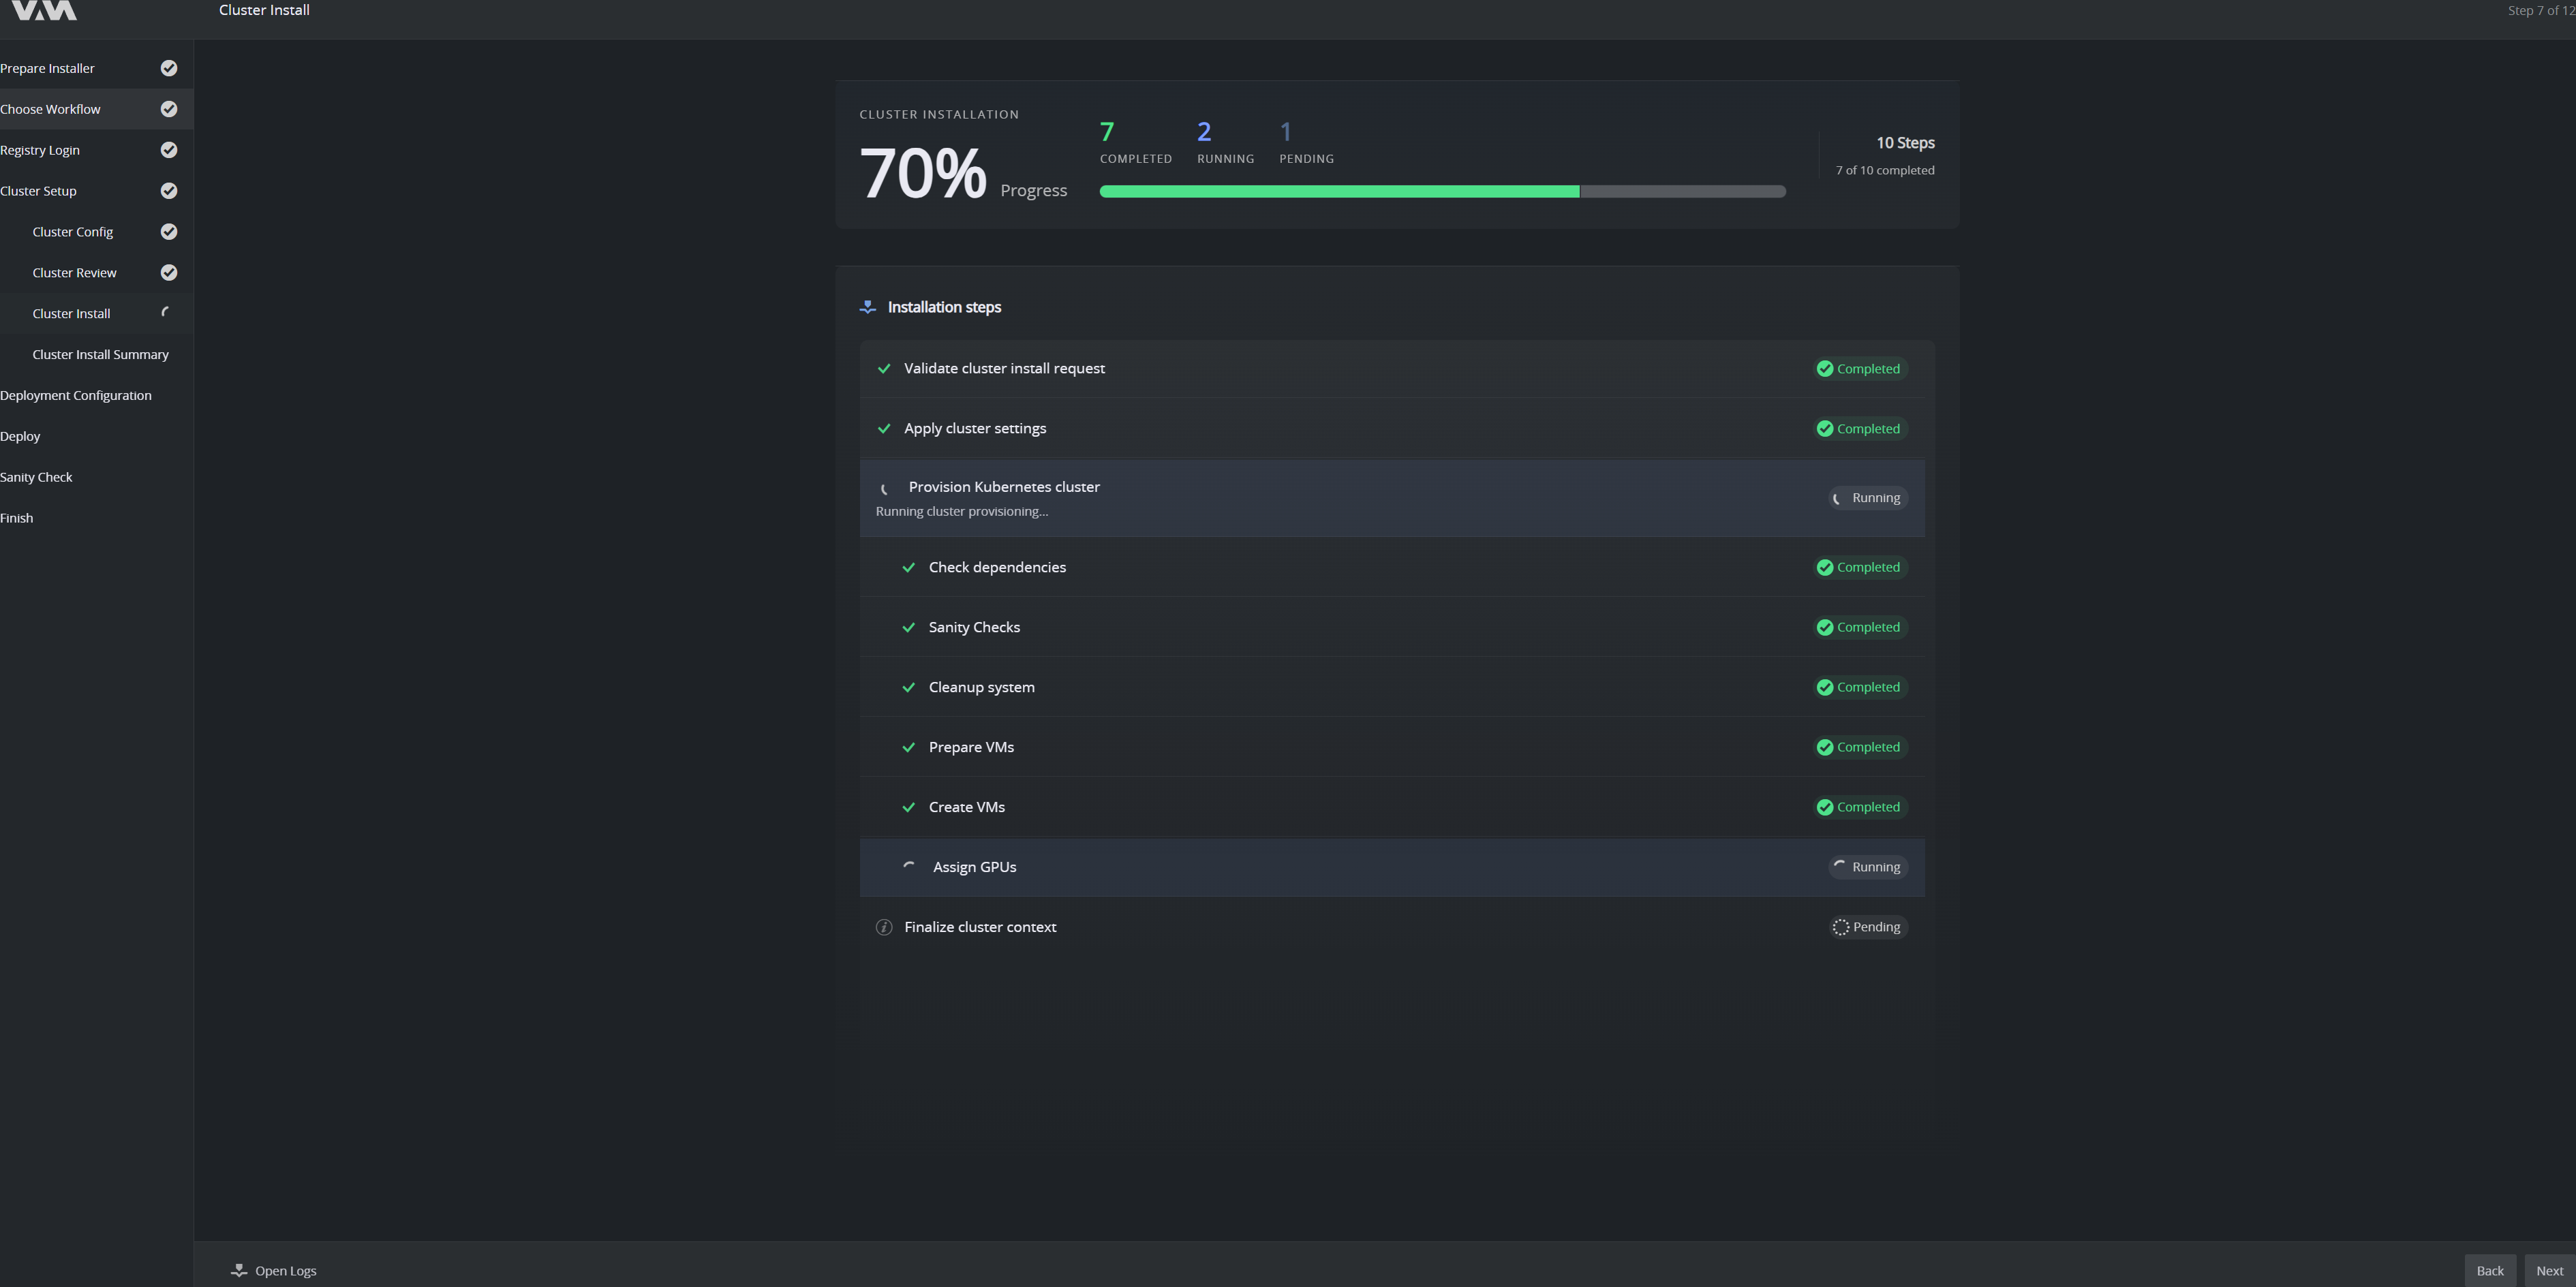
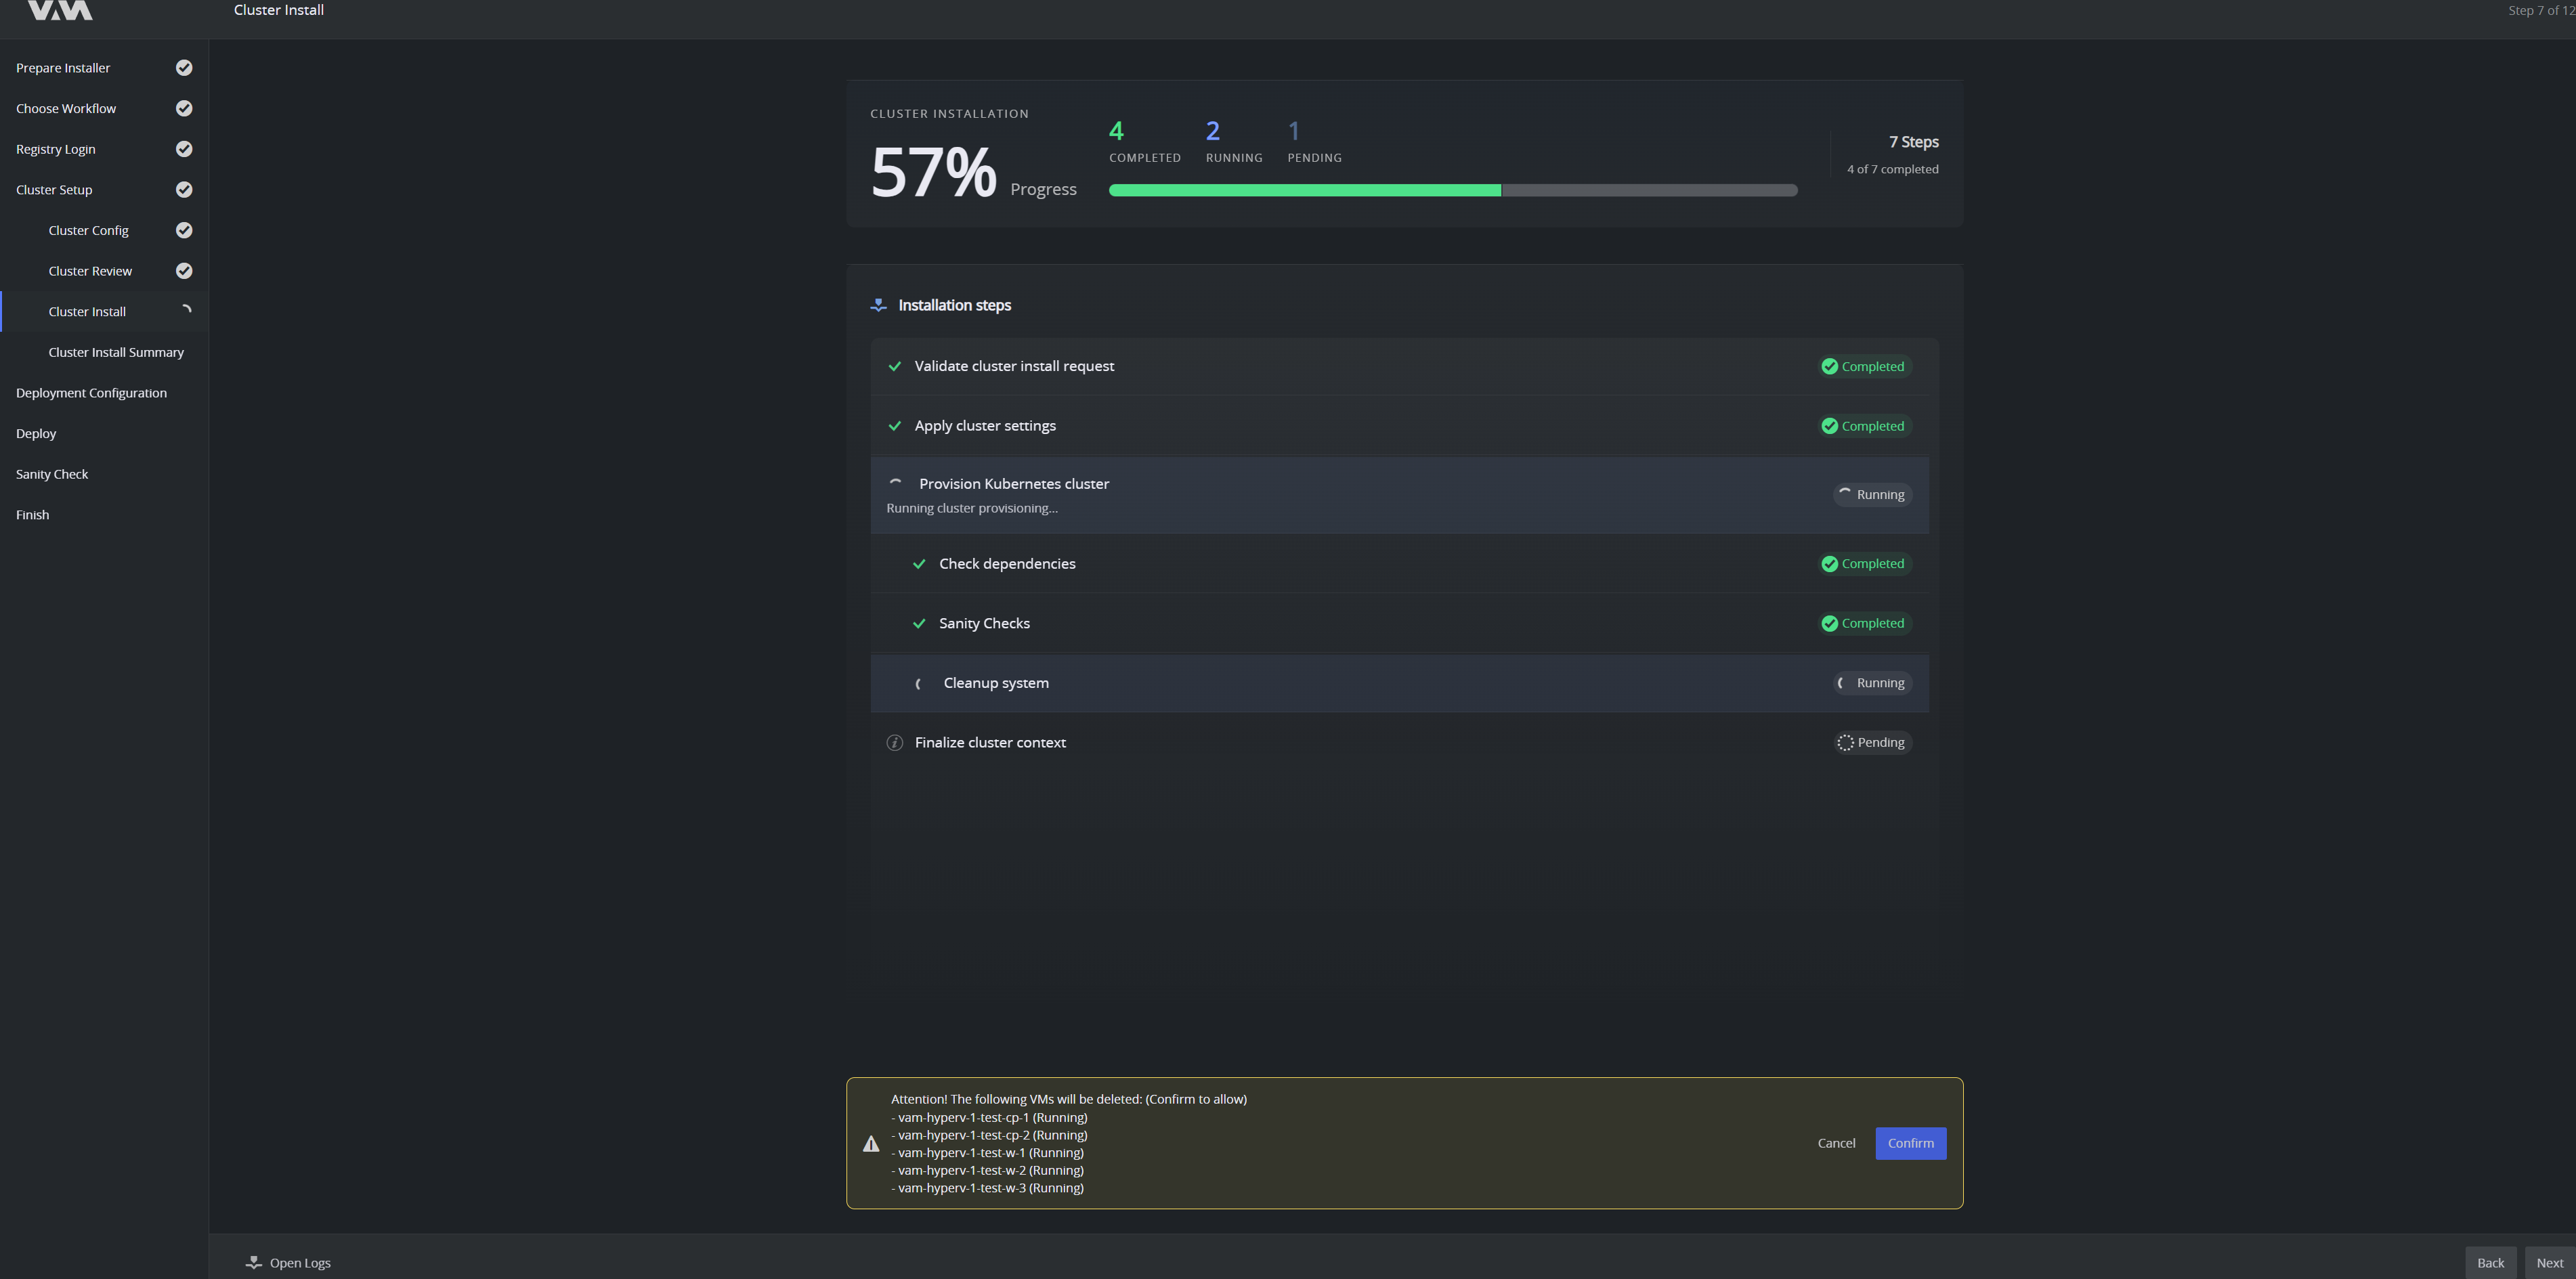
If the target host already has VMs from a previous install, the wizard pauses and asks you to confirm that they may be deleted and re-provisioned. Nothing is removed until you click Confirm.
Cluster Install Summary
When installation finishes, the wizard shows a summary of the cluster it built: each node with its hostname, role and address and the result of the final health verification.
Check that every node reports as expected and that the node count matches what you configured. If a node is missing or unhealthy, use Open Logs to read the installation log before continuing — it is easier to correct the cluster now than after VAM is deployed onto it.
The cluster context is also written to your kubeconfig at this point, so you can inspect the cluster with kubectl from the installer host.
Click Continue.
Deployment Configuration
This step has two views, shown as 1 Infrastructure and 2 Deployment Options at the top of the page.
View 1 — Infrastructure
Prepare the cluster infrastructure: choose the deployment namespace, configure DirectPV storage and deploy any missing GPU support packages.
- Deployment namespace: the namespace for the main VAM deployment. Once infrastructure setup has started the namespace is locked, and the field explains why.
- Storage Configuration: DirectPV is installed with the platform, but its drives are not initialized yet. The Recommended Configuration panel proposes a layout from the drives it finds and reports usable capacity, raw capacity, storage efficiency and how many drive and node failures the layout survives. Read the warnings before accepting: they call out HDD-only drives, drives with an existing filesystem that are formatted and single-node layouts that have no node-failure redundancy.
- AIStor Object Storage Configuration: derived from the same drives: servers, volumes per server, disk size and the erasure coding level.
- GPU Infrastructure: lists detected vendors and the required, installed and missing GPU packages. Use Refresh Status after installing one.
On first entry the panel discovers the drives on the cluster nodes; use Discover Drives if it has not started, or Refresh Drives to re-scan later.
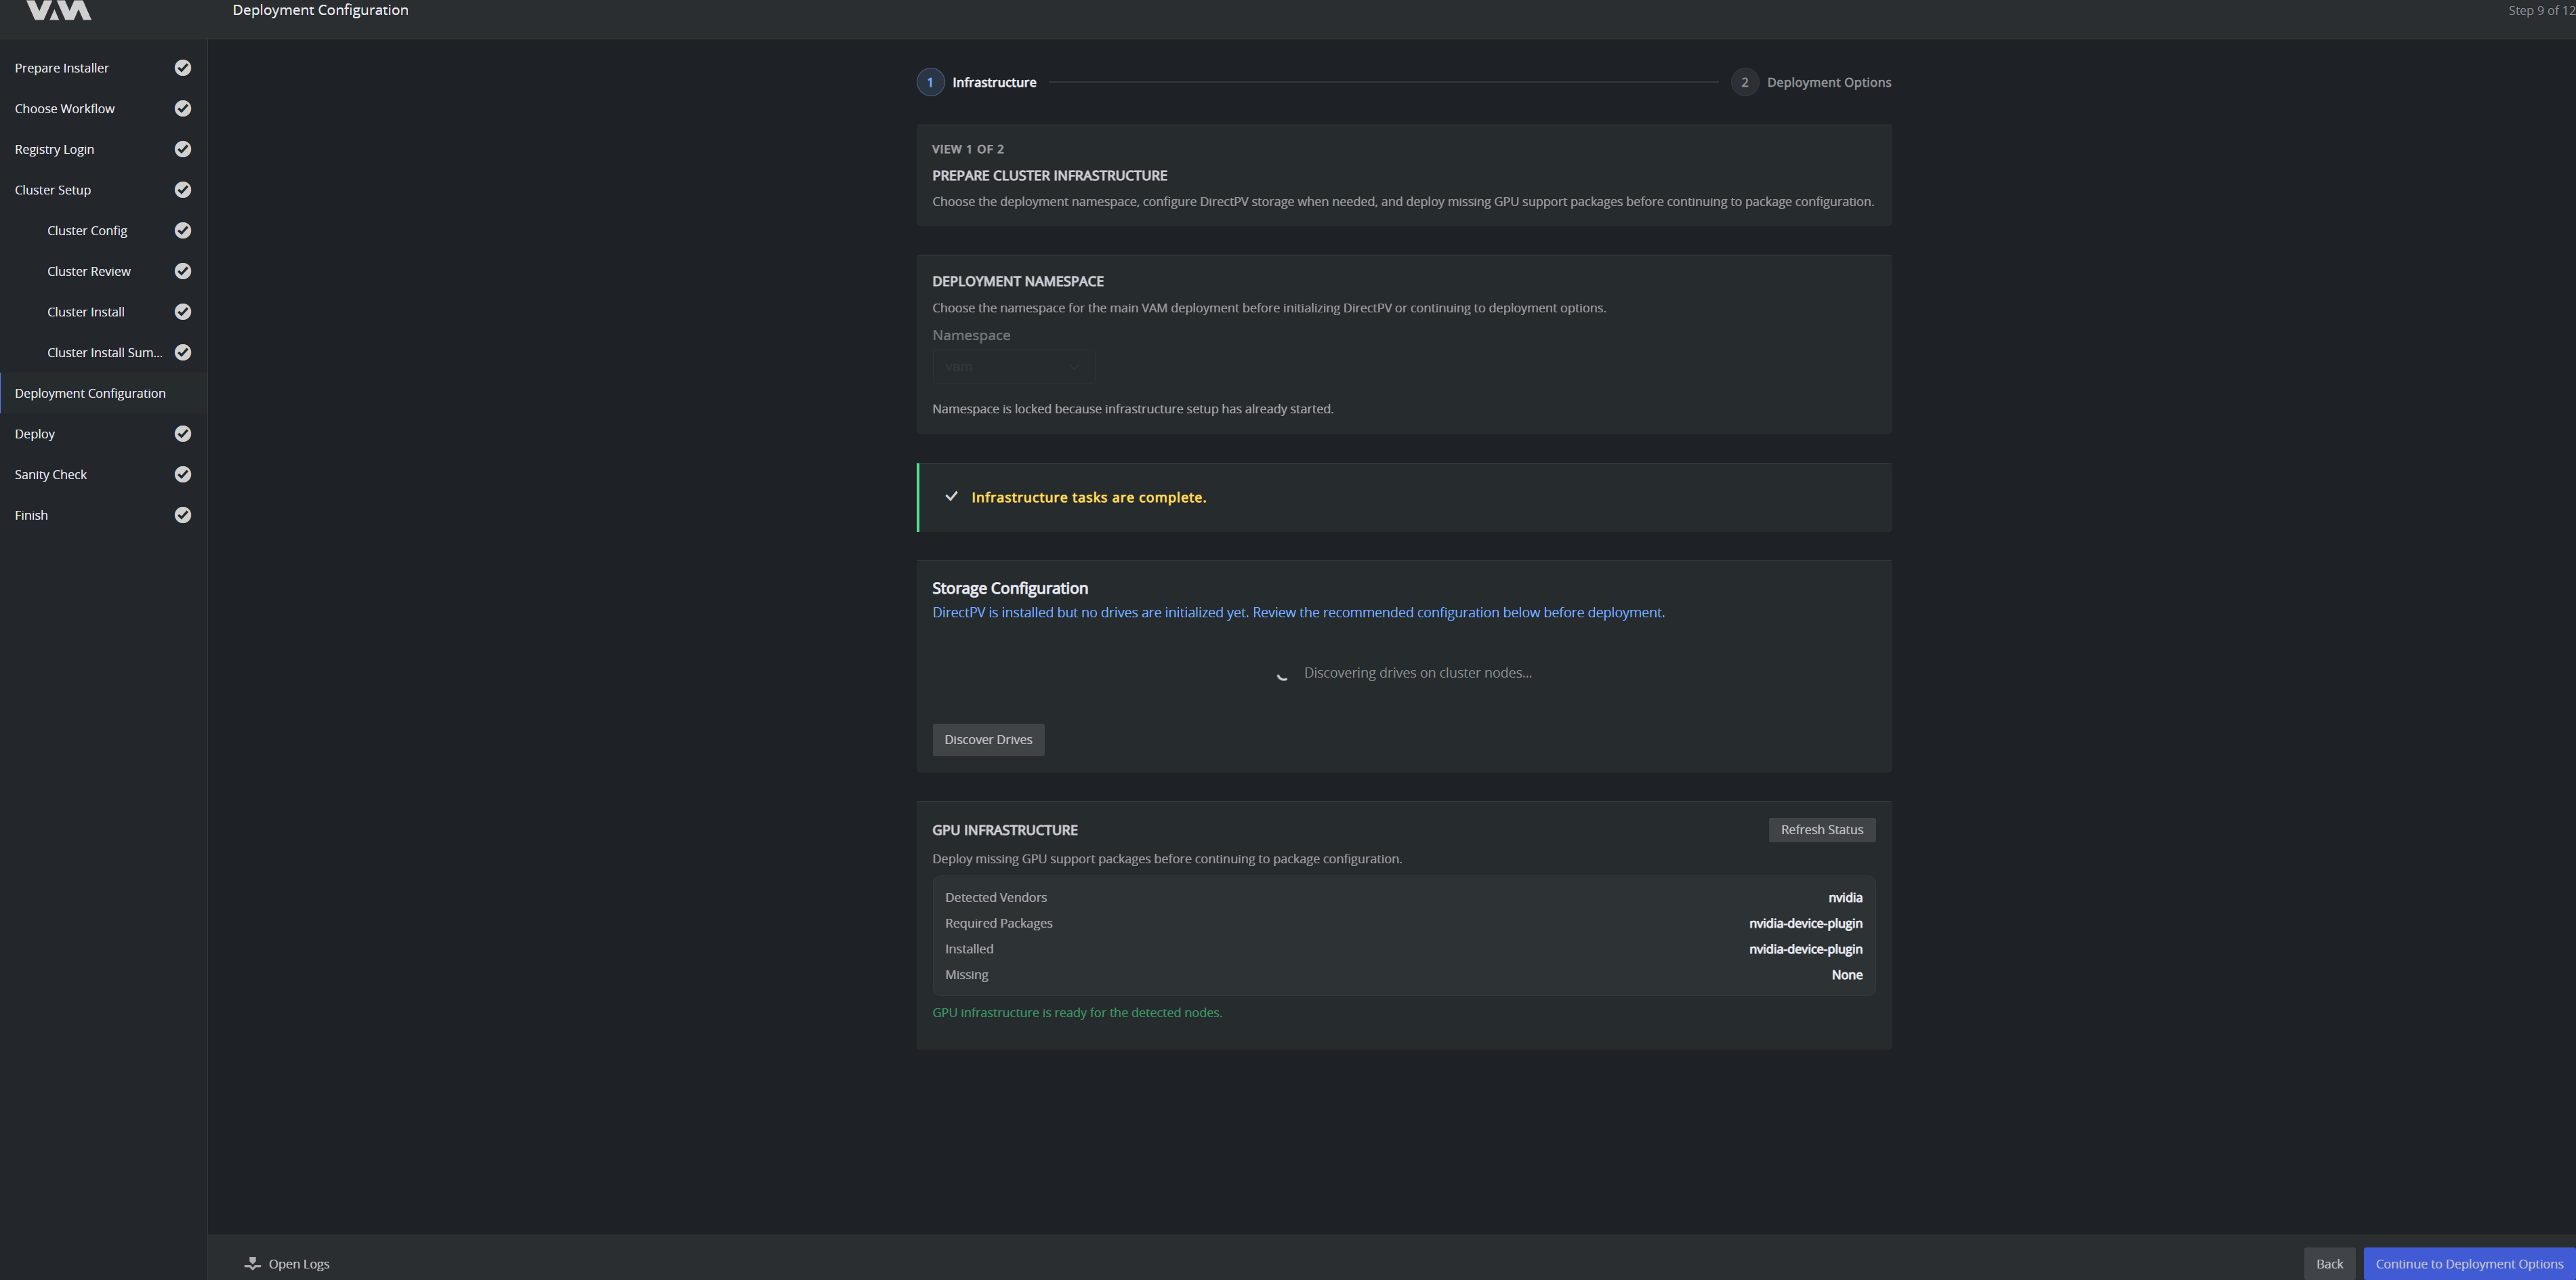
When discovery finishes, the Recommended Configuration panel appears. Review it, then click Apply Recommended Config to accept the layout.
Applying a configuration formats any selected drive that already has a filesystem. Confirm the drive list before you apply it.
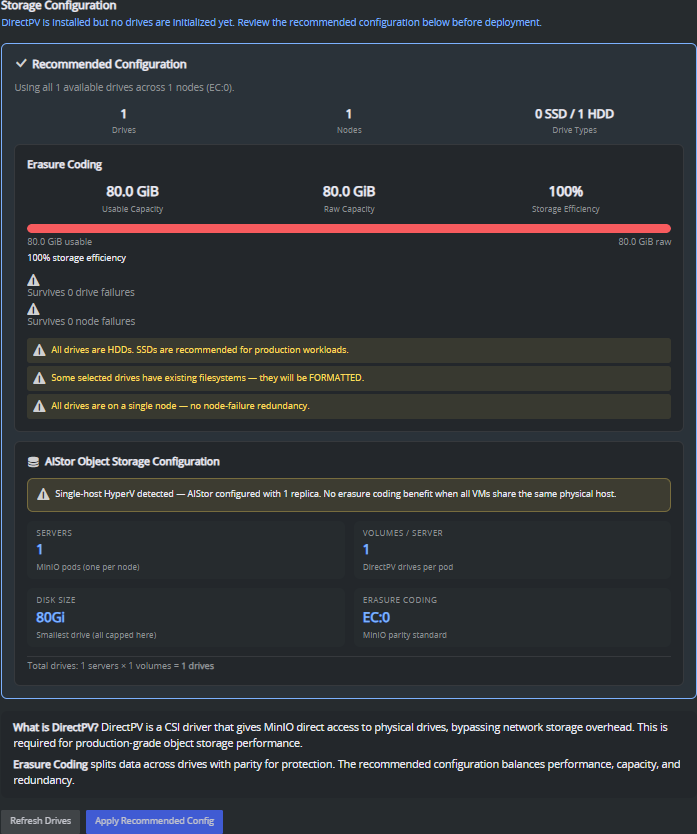
Click Continue to Deployment Options.
View 2 — Deployment Options
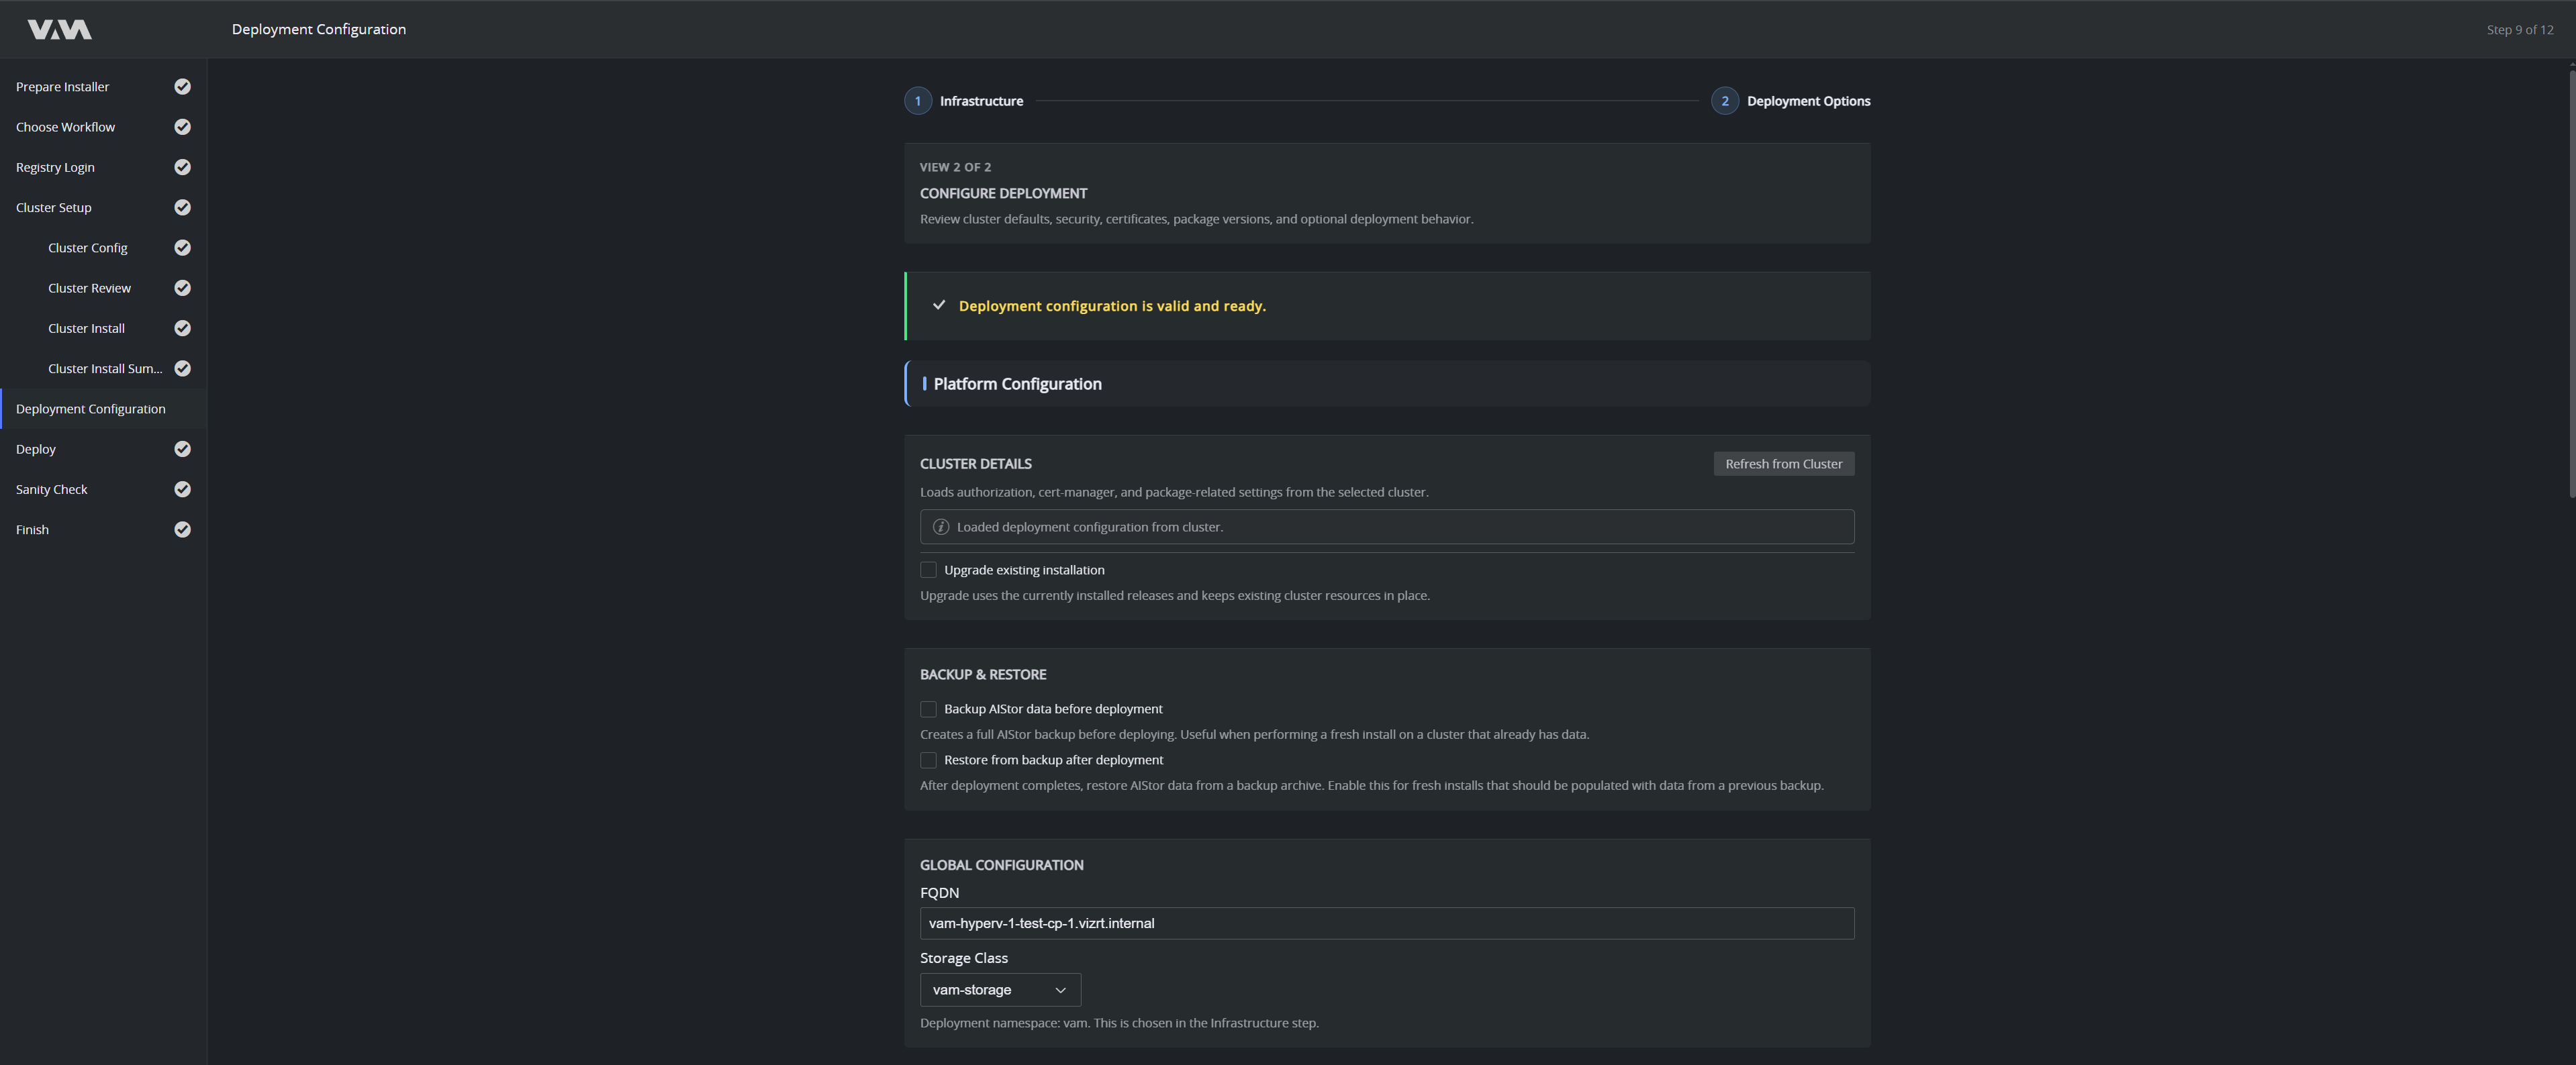
Review cluster defaults, security, certificates, package versions and optional deployment behavior. The banner at the top reports whether the configuration is valid and ready.
- Cluster Details: the installer loads the existing deployment configuration from the selected cluster. Use Refresh from Cluster to reload it. Select Upgrade existing installation to keep the currently installed releases and existing cluster resources in place.
- Backup & Restore: optionally back up AIStor data before deployment (useful for a fresh install onto a cluster that already holds data), and optionally restore from a backup after deployment.
- Global Configuration: the FQDN clients use to reach the platform, and the Storage Class for persistent volumes.
-
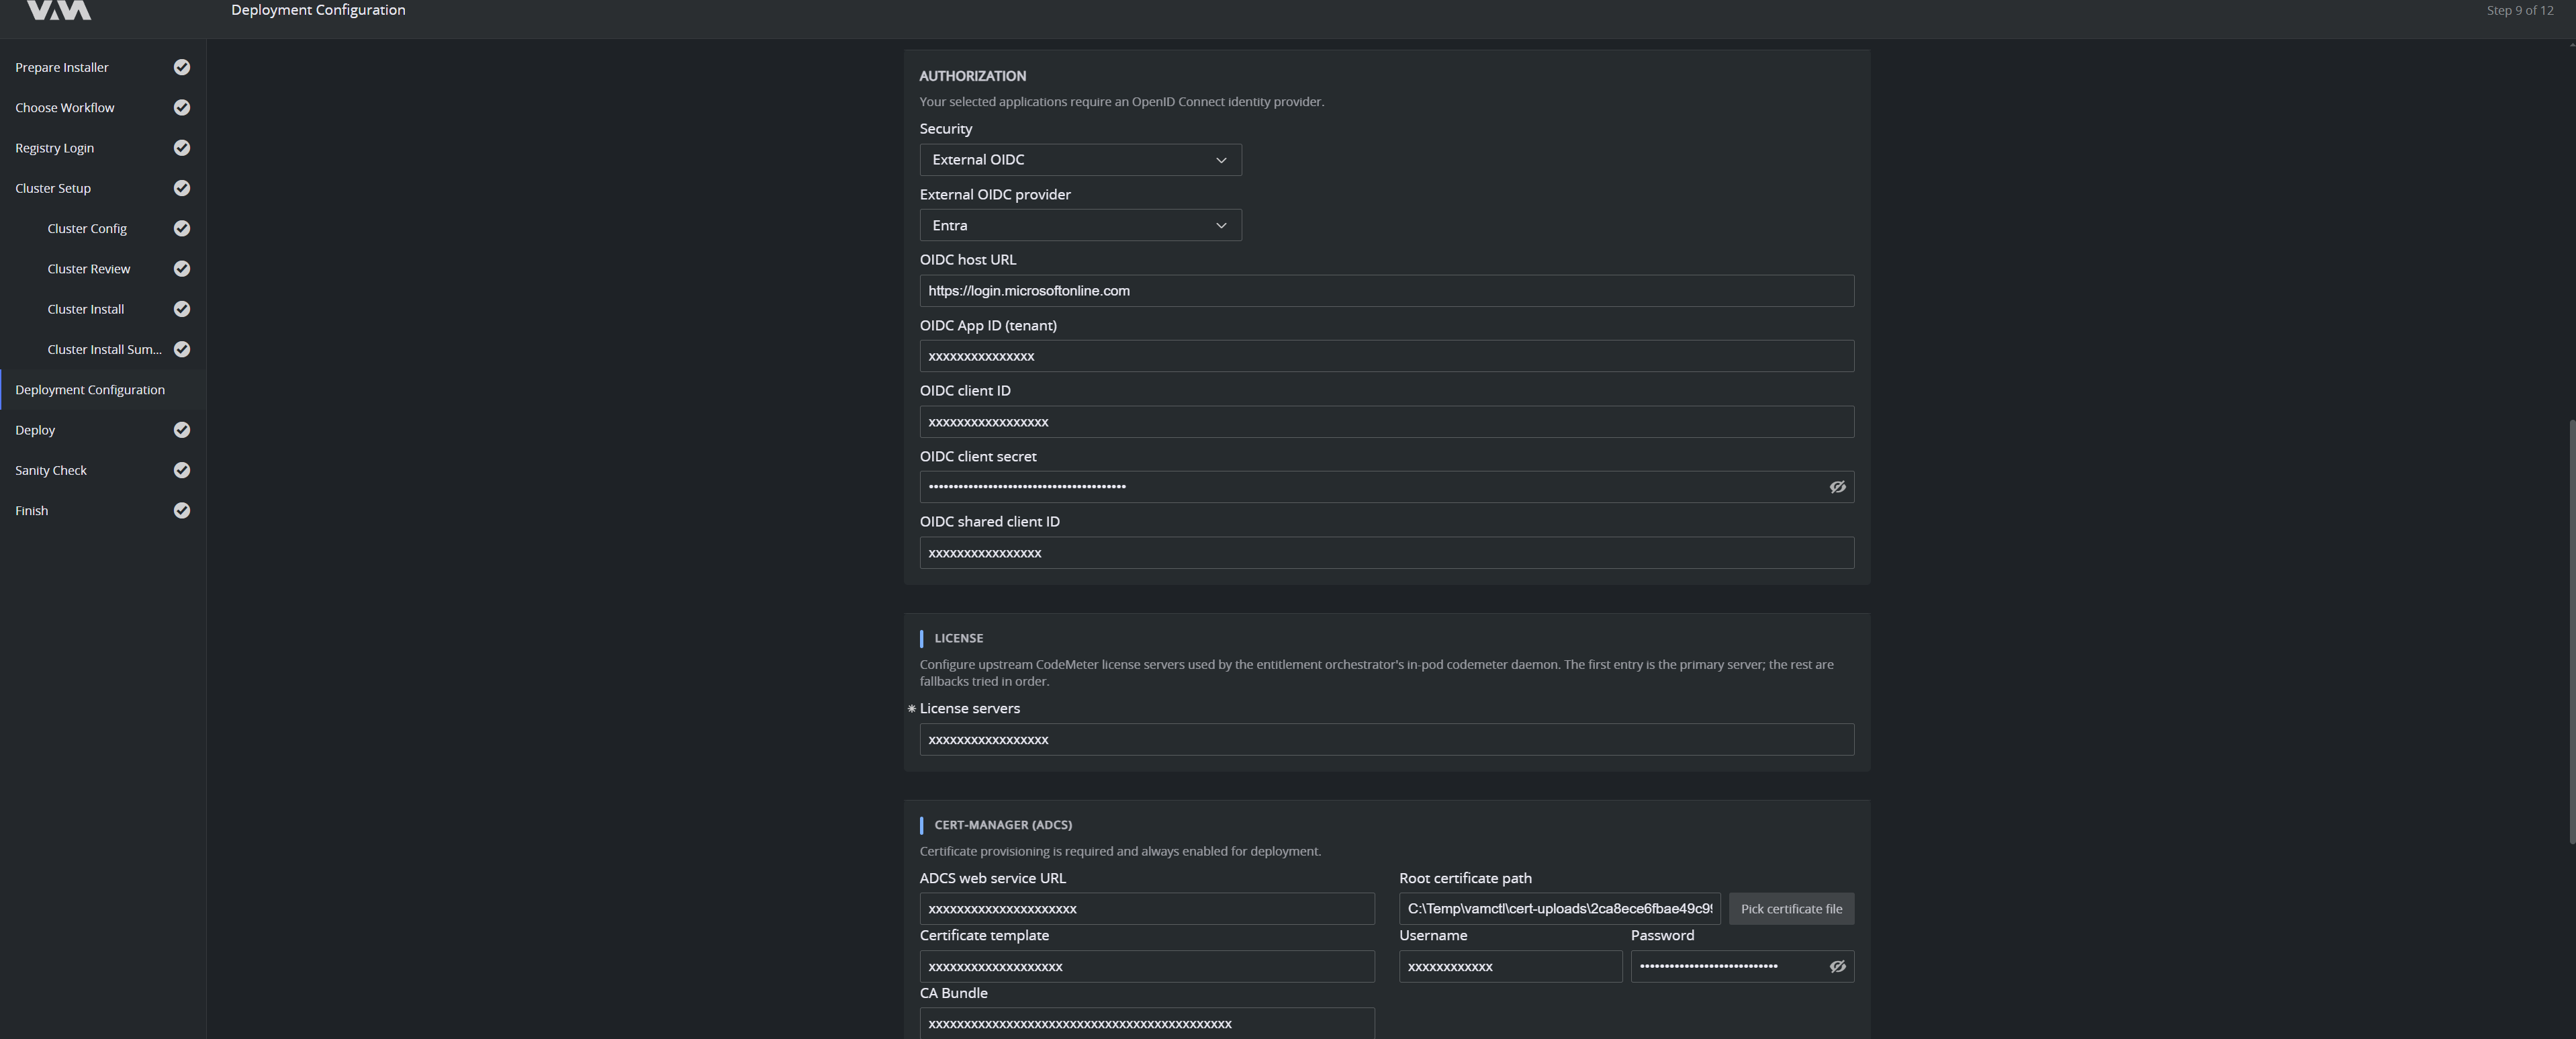
Authorization: the identity provider. Choose the Security mode and, for External OIDC, the provider and its OIDC host URL, application (tenant) ID, client ID, client secret and shared client ID. Take these values from Prerequisites.
-
License: the upstream CodeMeter license servers used by the entitlement orchestrator. The first entry is the primary server; the rest are tried in order as fallbacks.
-
Cert-Manager (ADCS): certificate provisioning is required and always enabled. Supply the ADCS web service URL, the root certificate path, the certificate template, the account credentials allowed to request certificates and the CA bundle.
-
Platform applications: VAM and the Configuration Service are always installed. Every other application is installed later from the Configuration Service.
-
Infrastructure & Platform Dependencies: the packages that are included automatically and deployed in the correct order, with their versions. Infrastructure packages (cert-manager, Traefik, storage) are always required.
The selector above the application list switches between the Registry (production) and Development registries. Development builds are unstable and are not intended for production installations. Point the installer at the production registry before installing a live environment.
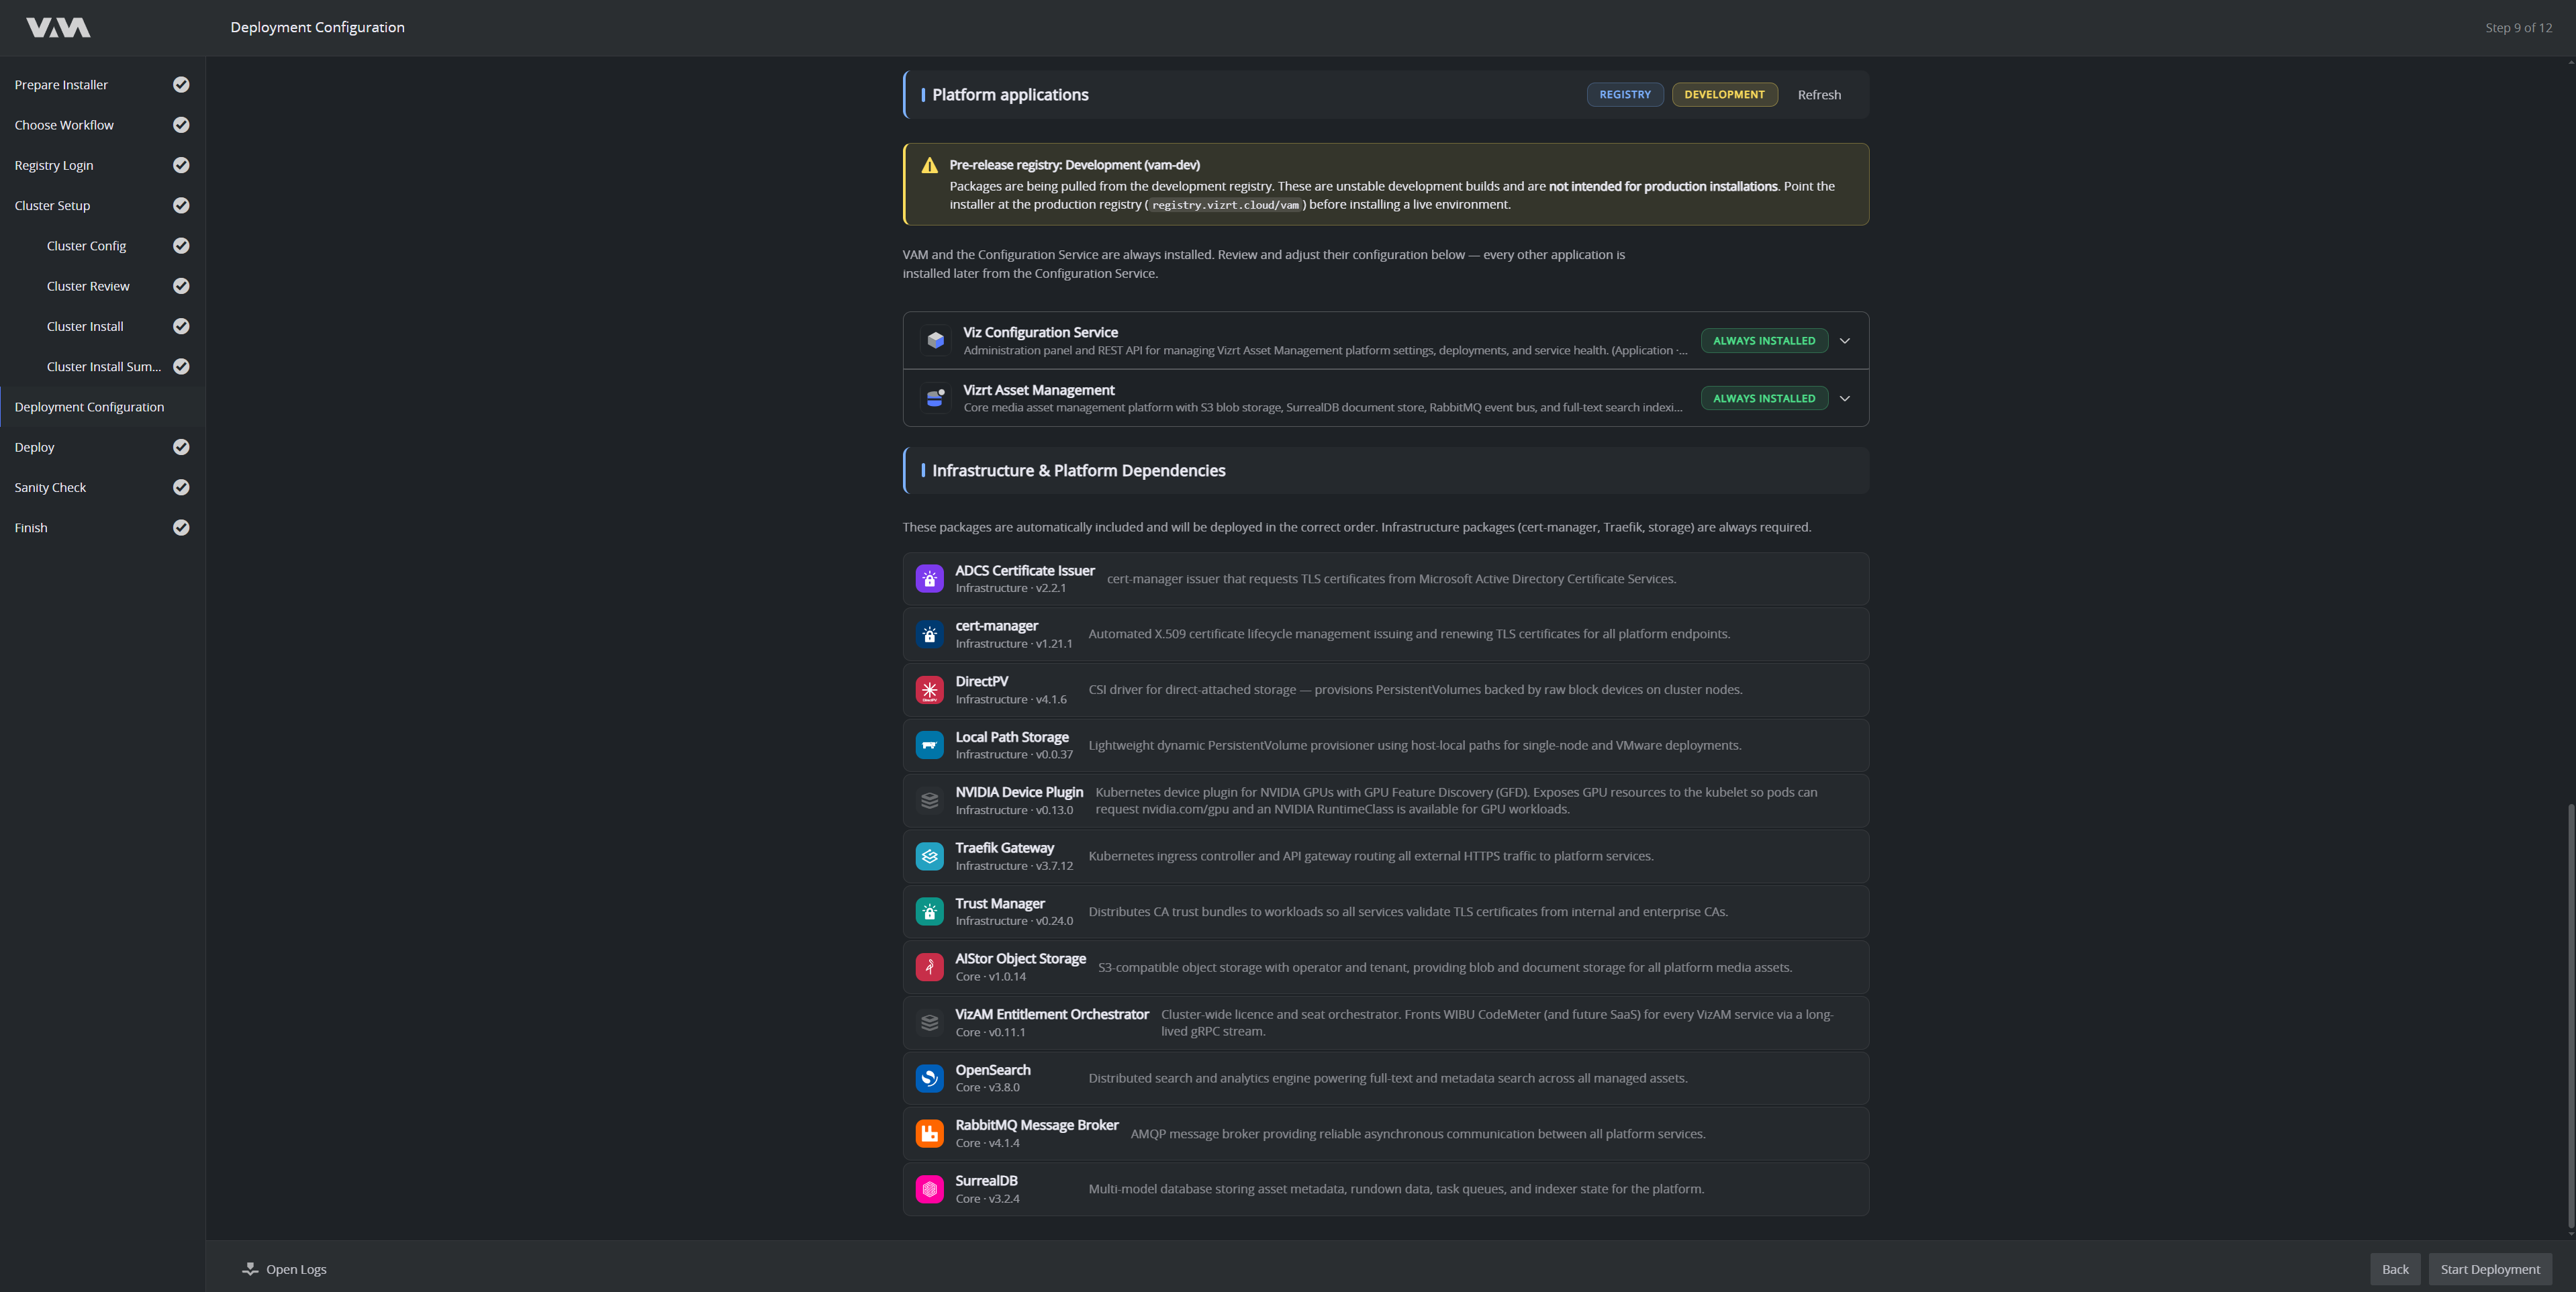
Click Start Deployment.
Deploy
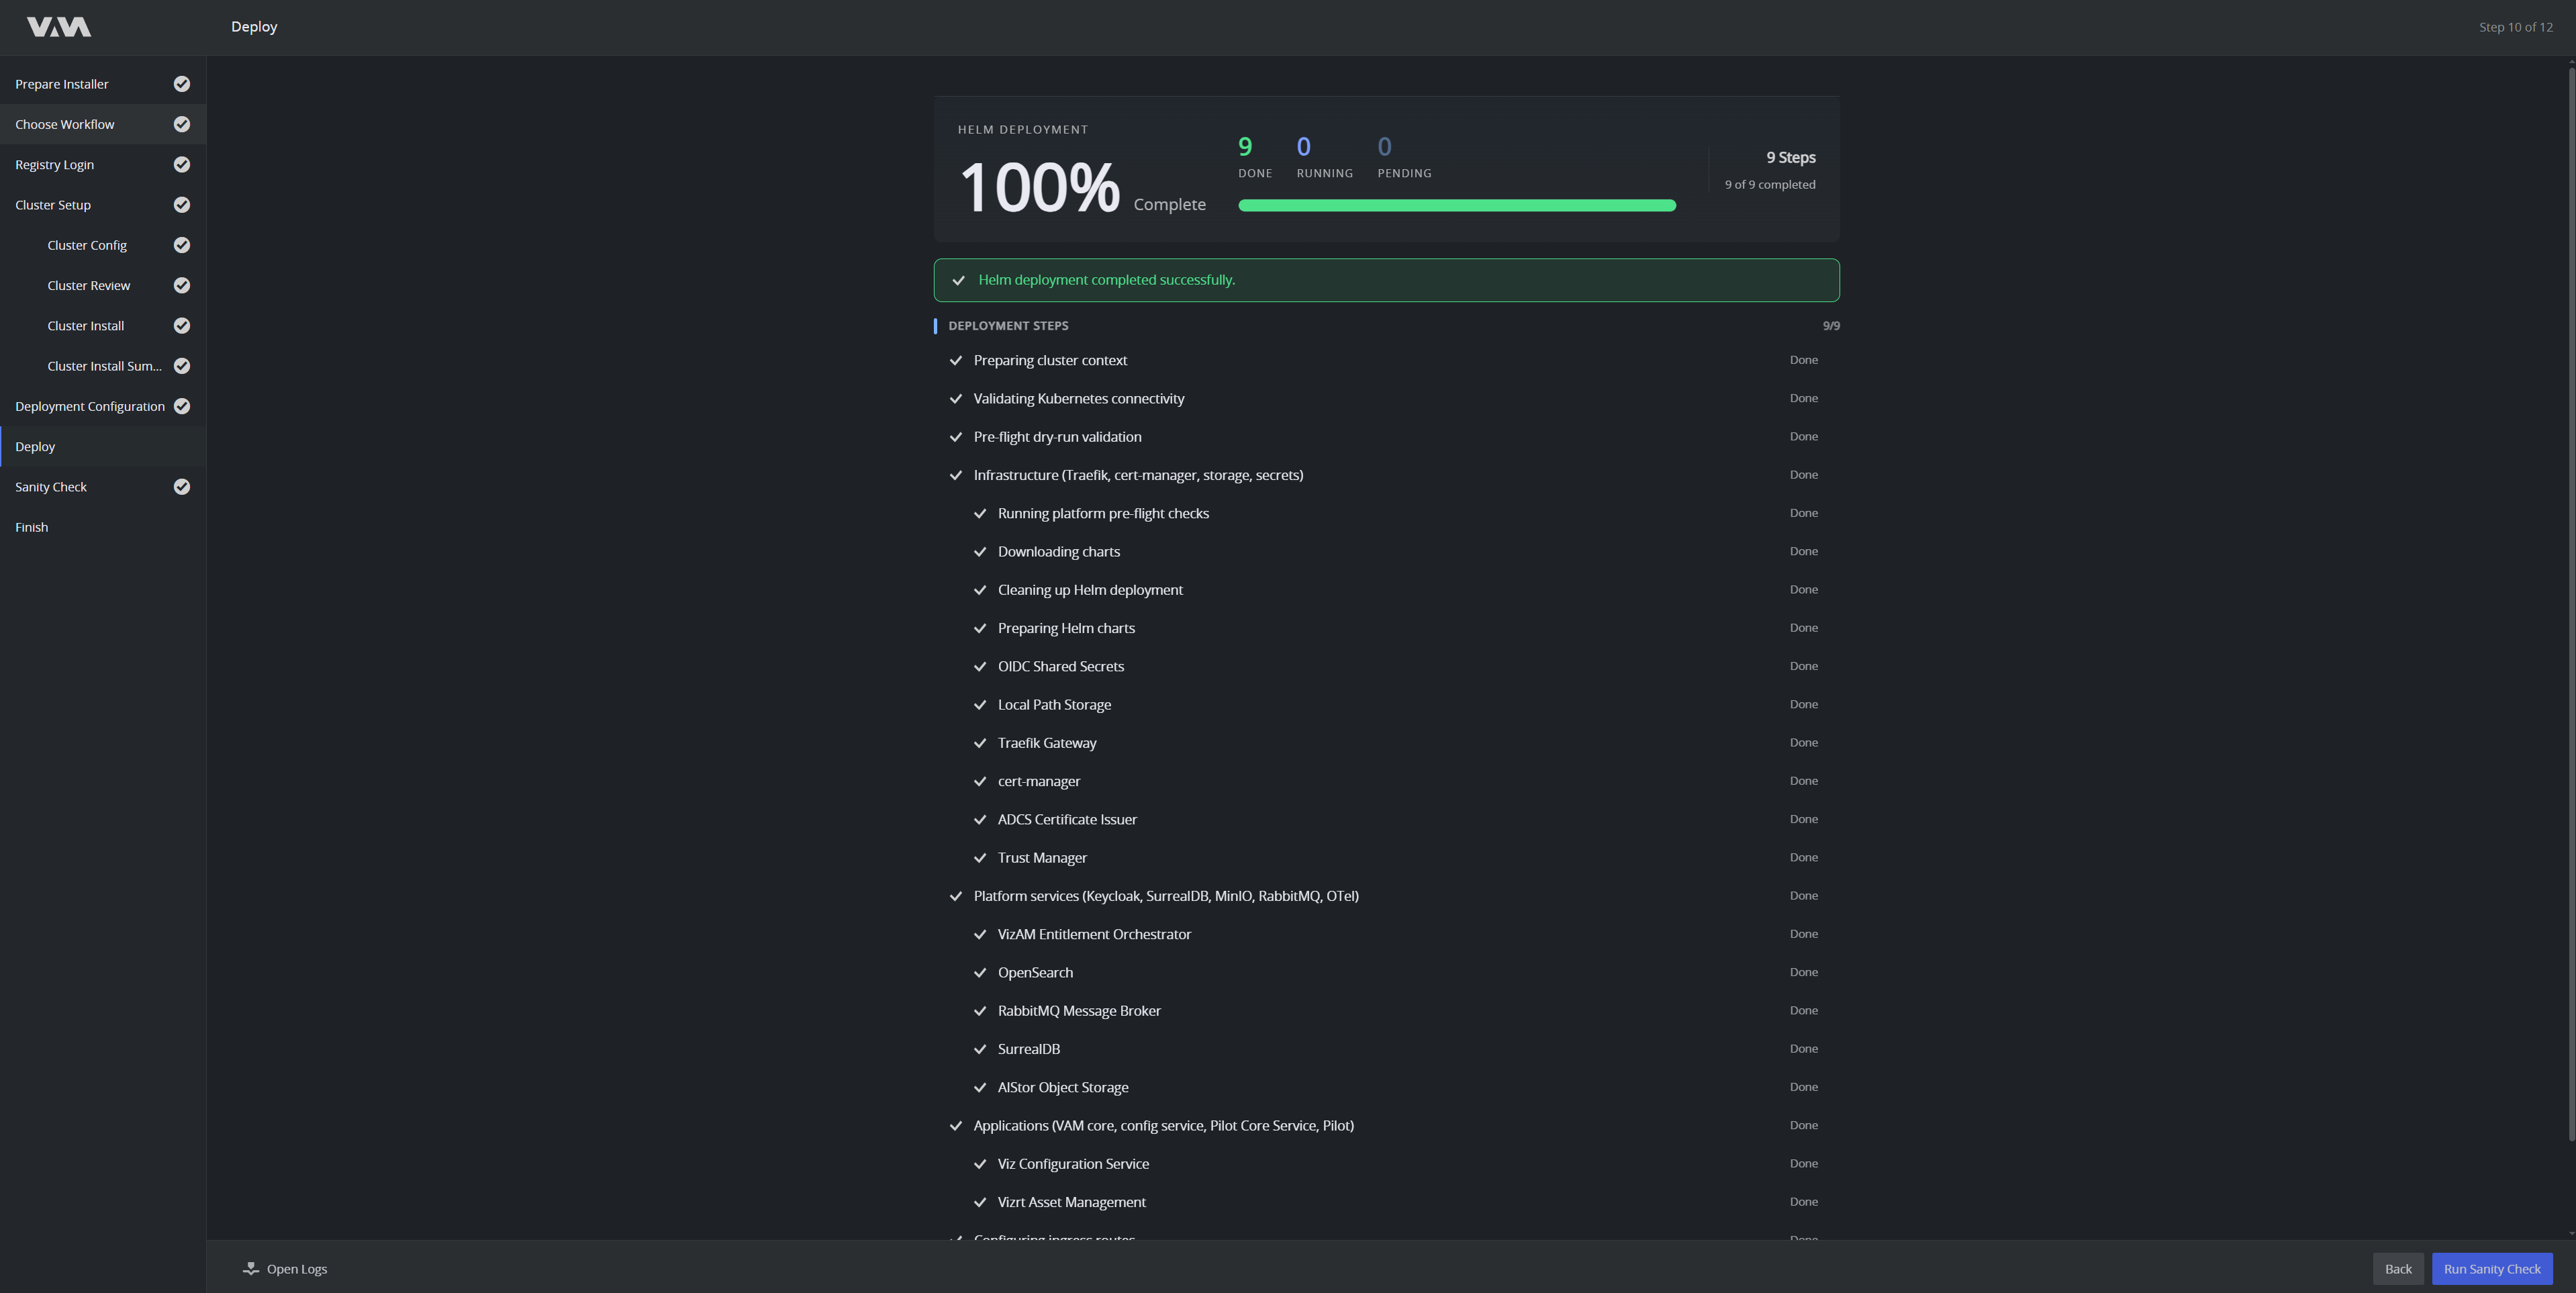
The installer deploys VAM to the cluster with Helm. The header shows overall progress and the done / running / pending counts; the Deployment steps list expands into the individual releases.
The stages are: preparing the cluster context, validating Kubernetes connectivity, a pre-flight dry-run validation, infrastructure (Traefik, cert-manager, storage, secrets), platform services (Keycloak, SurrealDB, MinIO, RabbitMQ, OTel), the applications themselves and finally the ingress routes.
This can take 15–30 minutes depending on your registry bandwidth and node hardware. When it reports Helm deployment completed successfully, click Run Sanity Check.
Sanity Check
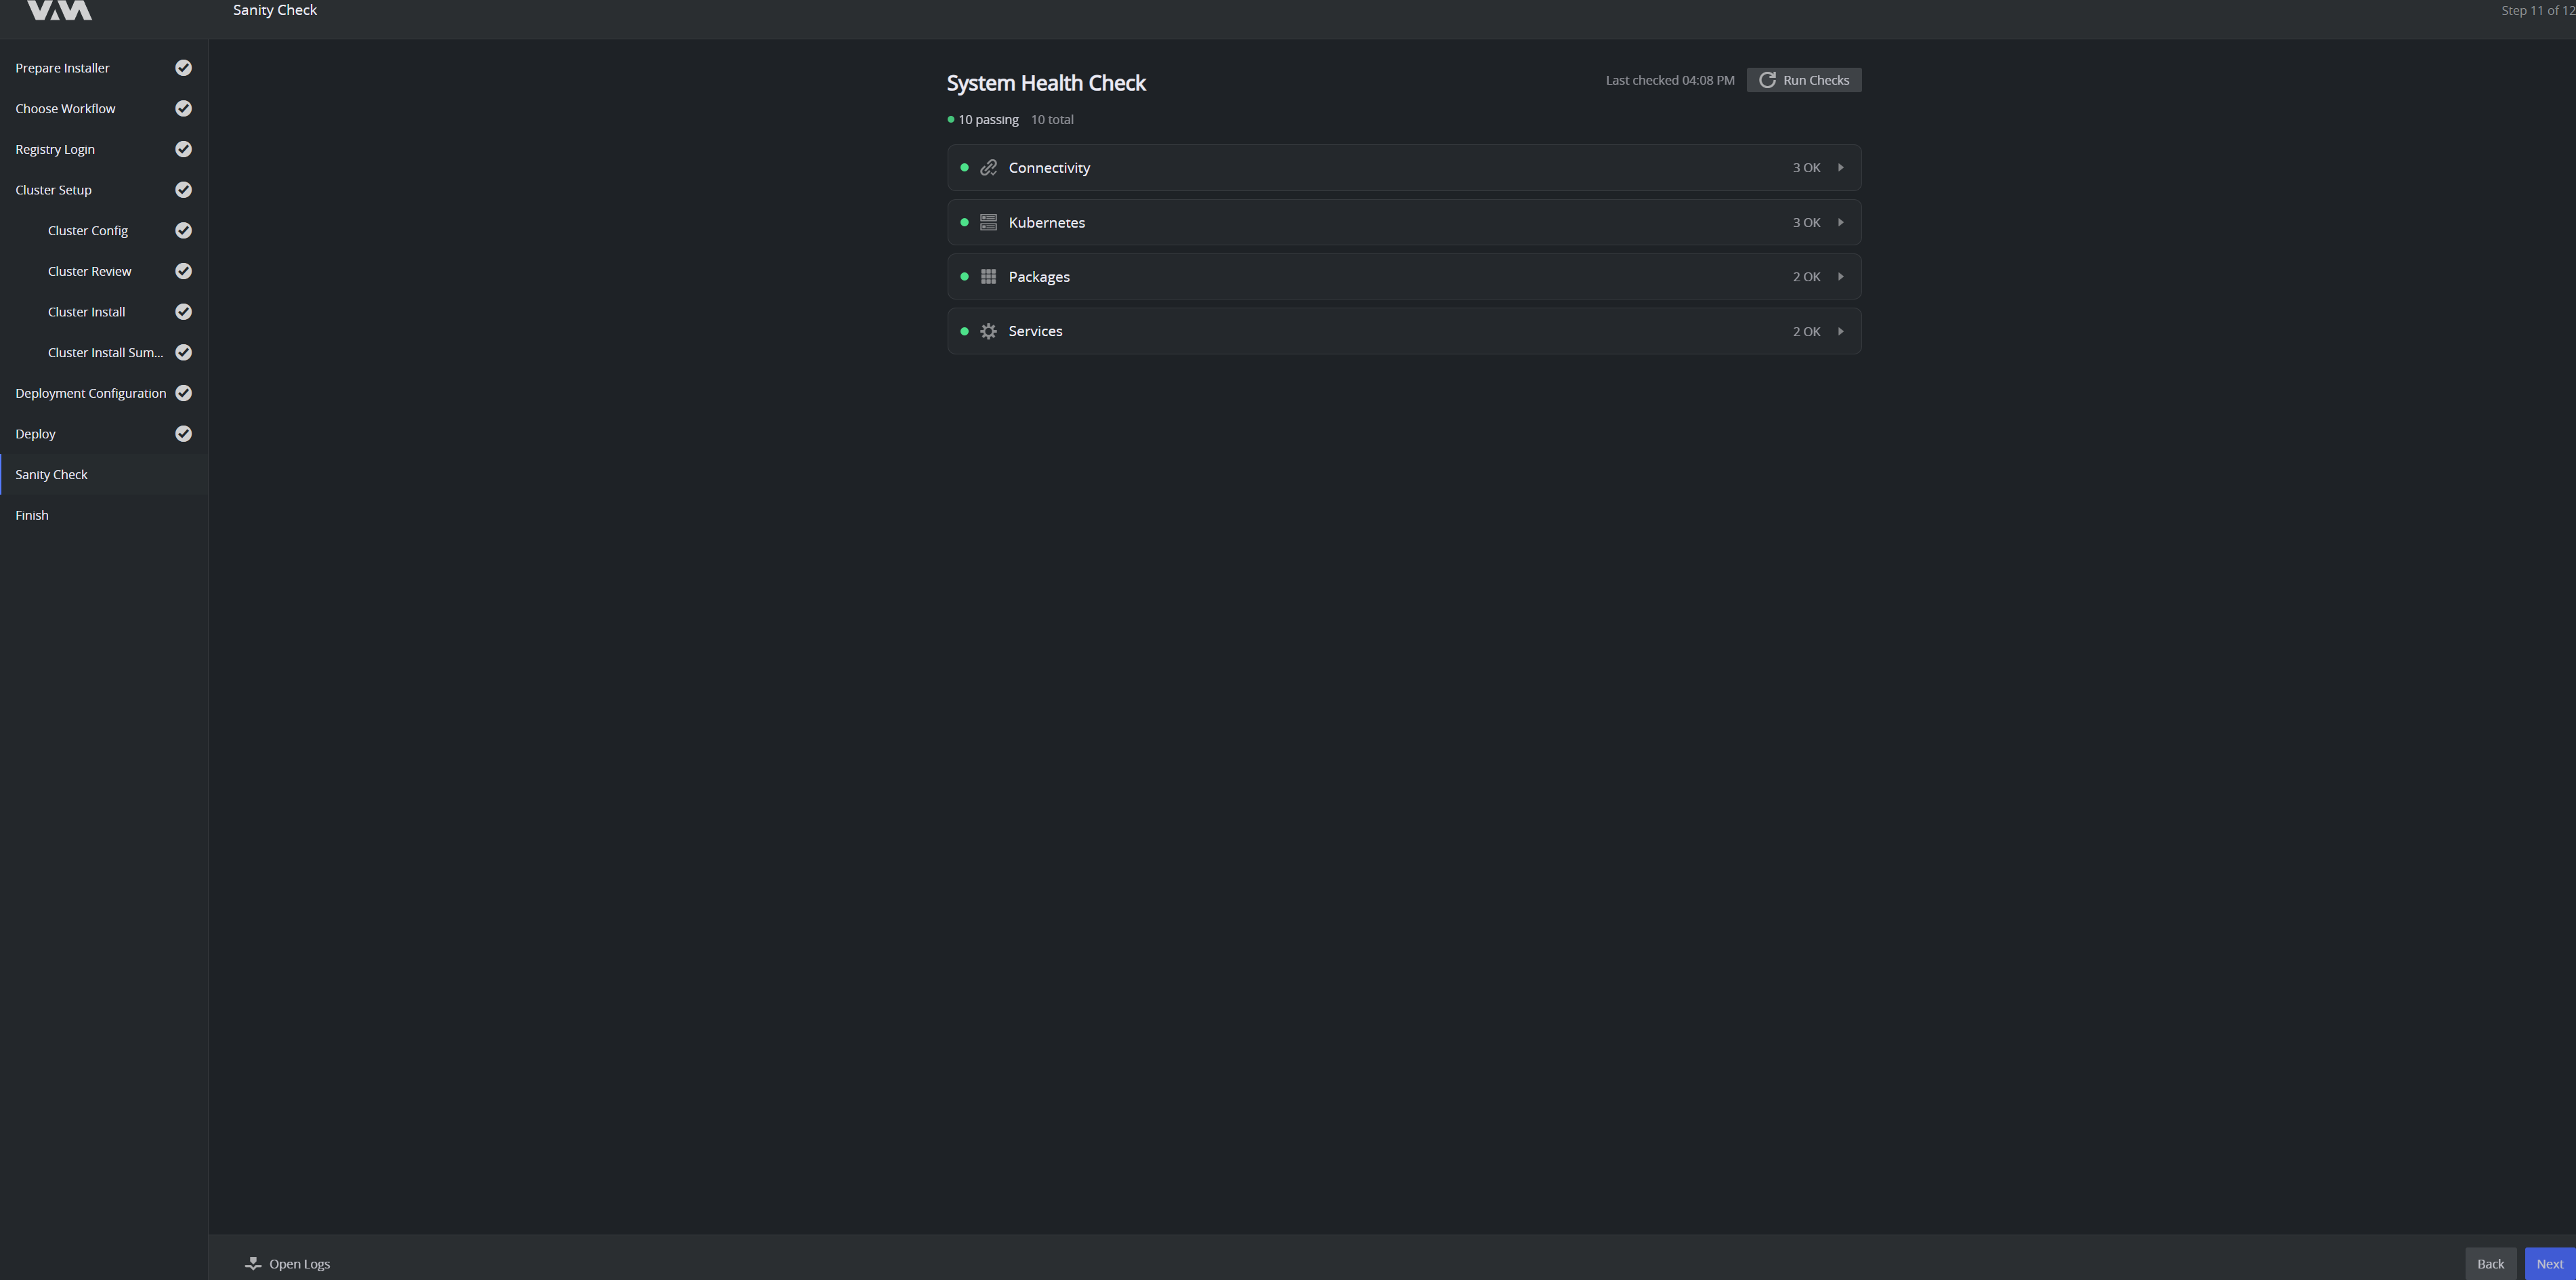
The System Health Check groups its results into Connectivity, Kubernetes, Packages and Services and reports how many checks pass out of the total. Expand a category to see the individual checks.
- All passing: click Next to finish.
- A failing category: expand it to read the diagnosis, fix the cause, then click Run Checks to test again.
Finish
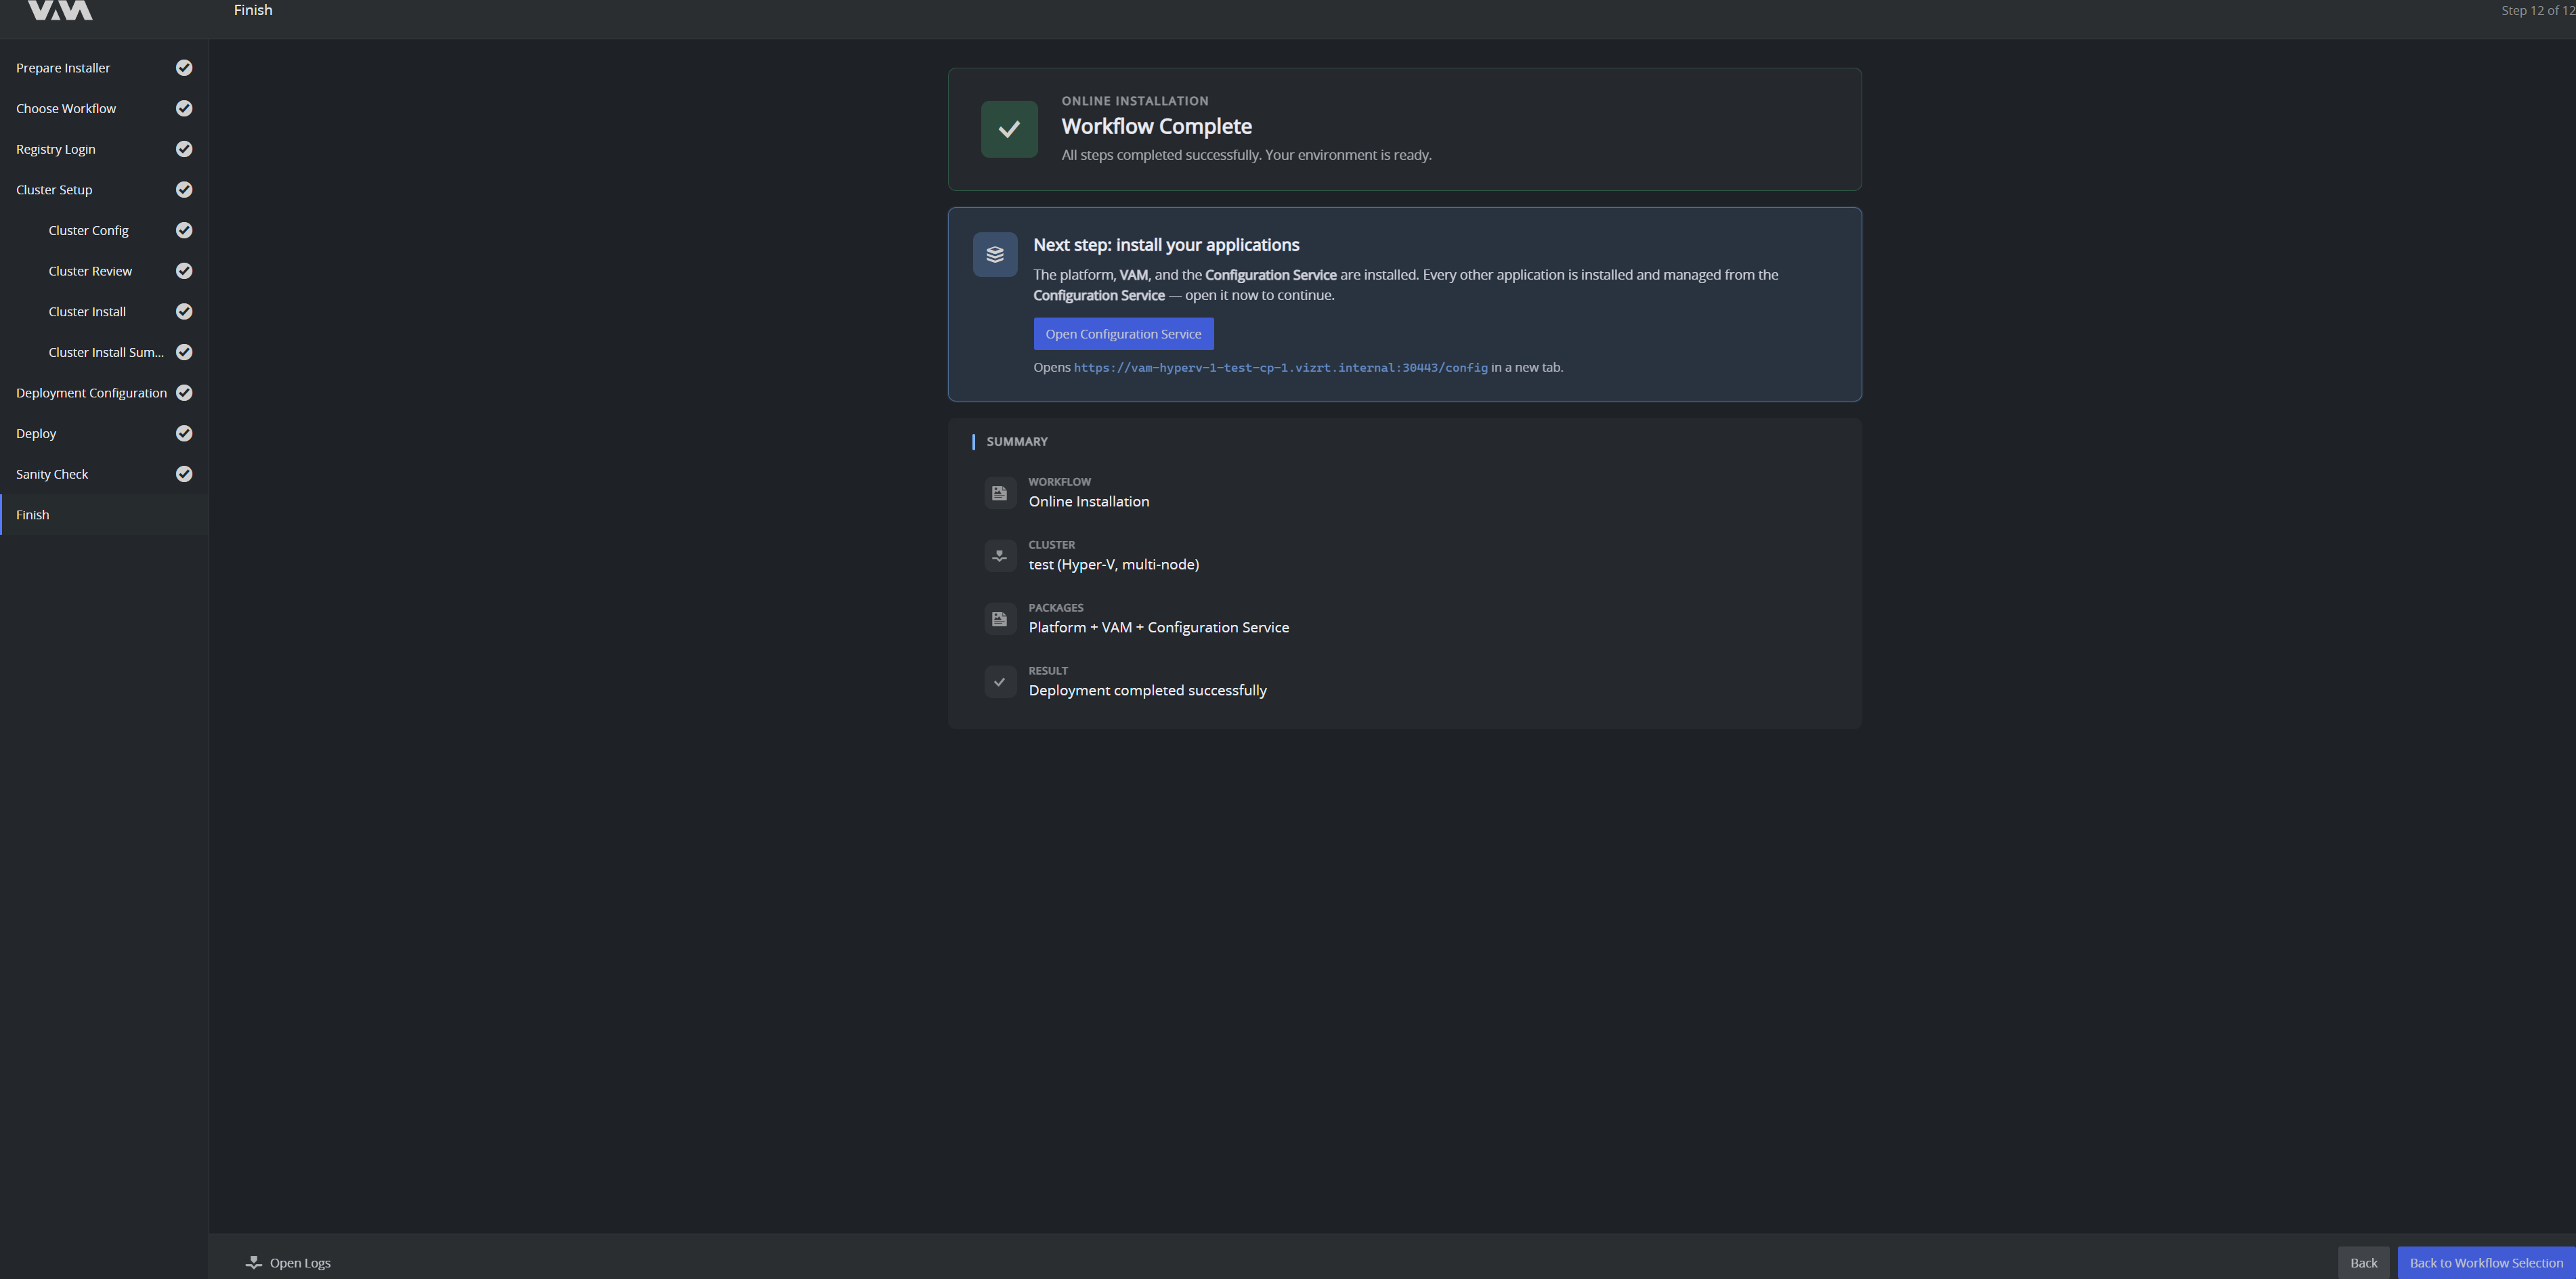
Workflow Complete confirms that every step succeeded and the environment is ready.
The platform, VAM and the Configuration Service are installed. Every other application is installed and managed from the Configuration Service, so the next step is to open it: click Open Configuration Service, which opens the URL shown beneath the button — the FQDN you set, on port 30443, at /config — in a new tab.
Summary records the workflow that ran, the cluster and its topology, the packages installed and the result.
Use Open Logs to save the install log if you need it for a support case, and Back to Workflow Selection to run another workflow, such as a backup.
Next Steps
- Post-install validation — recommended checks before you hand the installation over to users.
- Configuration Service → Signing in — first login walkthrough.
Resuming an Interrupted Install
If the installer was closed or the host rebooted, simply launch vamctl.exe again. The wizard resumes at the last completed step. If a long-running operation (cluster install or deployment) was in progress when interruption happened, the wizard offers to reattach to the running operation rather than restart it.