Start the Viz Virtual Studio
This section details how to start the Tracking Hub and the Studio Manager.
First start the Tracking Hub then start the Studio Manager:
To Start the Tracking Hub
-
Start the Tracking Hub:
-
<double-click> the icon on the desktop
 , or
, or -
<right-click> the desktop icon and select Open from the context menu, or
-
Use the Windows Start menu (example: Start menu -> All Programs -> VizTH -> VizTH1.x.x 32bit-> VizTH1.x.x)
-
-
The Tracking Hub starts as a console program:
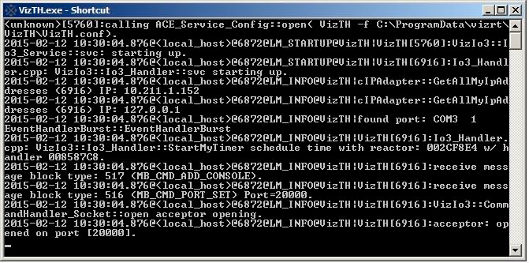
Note: The Tracking Hub will not load correctly if the configuration file
VizTH.conf,located atC:\ProgramData\vizrt\VizTH, is missing. -
If more than one network adapter is active on the computer when starting Tracking Hub for the first time, which network adapter is connected to the “tracking network” (that is, the network used by Tracking Hub to receive events), must be configured. By default, Tracking Hub will use the first network adapter found. To change the adapter in use by Tracking Hub, select VizTH Settings from the Tools menu in
Studio Manager(1), then selecting the desired network adapter (2).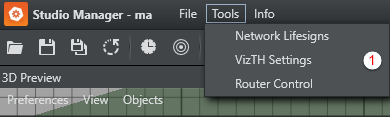
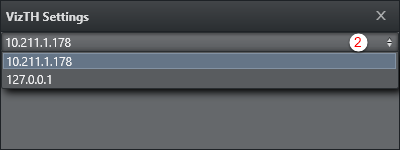
IMPORTANT! If changing the network adapter, Tracking Hub needs to be restarted for any such changes to take effect.
The network adapter IP address can also be configured manually through the following procedure:
-
Start the Tracking Hub and then immediately close it.
-
Go to the configuration folder (the default path is
C:\ProgramData\vizrt\VizTH\Cfg) and edit the fileBaseConfig.xml.Note: Note:
BaseConfig.xmlis a XML-formatted text-file. When editing the file, be sure to use a text editor such as Notepad(++) or similar, and save it as a text-formatted file. -
In the field
ActualNetworkAdapter="192.168.0.10", specify the actual IP-address for the network adapter the Tracking Hub is using.Tip: You can view the IP-addresses in use by the server by opening a command prompt and enter the command
ipconfig.
Alternatively, you can enter main*local_ip set adapter_ip in the Tracking Hub console window, where adapter_ip refers to the adapter’s actual IP address, as in the following example:
Example:
main*local_ip set 192.168.0.10
This needs to be done only once. After the command is executed the BaseConfig.xml is updated.
IMPORTANT! You can minimize the Tracking Hub console program, but it should be kept running at all time.
To Start the Studio Manager
-
Start the Studio Manager:
-
<double-click> the icon on the desktop
 , or
, or -
<right-click> the desktop icon and select Open from the context menu
-
-
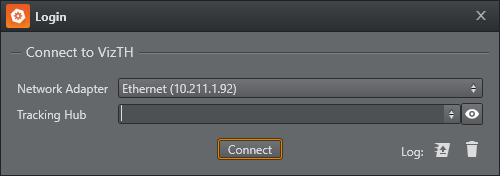
In the Tracking Hub login window enter the required details:
-
Network Adapter: Select a network adapter from the Network Adapter List
-
Tracking Hub: Select a Host from the drop-down list
Note: Under certain conditions, such as the server being located on a different network sub-net, the host will not appear in the list. The host name or IP address can then be entered manually.
-
-
Click Connect.