
Viz Mosart Administrator Guide
Version 5.1 | Published January 19, 2023 ©
Viz Engine as a Switcher
Engine Switcher Mode
With Viz Mosart in Engine Switcher mode, you can create an IP-based workflow which eliminates hardware studio switcher/mixers. In this mode:
-
Viz Engine performs the function of a switcher/mixer, switching IP inputs and all rendering of DVE effects (box effects, butterflies, picture in picture, etc.) and full screen/overlay graphics.
-
Engine Switcher works under exclusive control of Viz Mosart, but is not an integrated single unit. In Engine Switcher mode, Viz Engine and Viz Mosart run in their own environments.
Viz Mosart templates can then control a broad scope of traditional and unique switcher features. -
On the Viz Engine side, the solution uses Viz Engine DVE based-superchannels for live, graphics and clip playback, instead of texture based sources.
Superchannels can automatically swap sources in an A/B mode with animated transitions, providing further flexibility and gains in overall performance.Superchannels
Note: A superchannel is an abstraction on top of a Viz Engine media channel. Superchannels support various asset types like images, graphics, clips, streams, live content. Each superchannel has two sub channels, so content in each channel can be played out over an A/B workflow. One sub-channel (A) is active, while the second (B) is inactive. New content can be prepared on the inactive sub-channel, a transition effect can then run the transition from active to inactive sub-channel, switching their roles.
-
As standard, the Viz Engine processes the dirty feed.
Optionally, a second Viz Engine can be set up, for clean feed.
Note: For an updated version of this documentation, created after this software was distributed, please visit this page here at the Vizrt Documentation Center.
Features of the Viz Engine Switcher
-
Crosspoint set in preview or program (cameras, external sources, clips, full screen graphics).
-
Auto-trans: Instructs the switcher to perform the transition from preview to program. Viz Mosart switches to preview and sends the switcher the command to initiate the transition at a specified rate.
This is typically achieved through a mix with rate > 0, a wipe transition, or an effect transition (using effect scenes) specified on the template, in the story item given from the NRCS or from the Viz Mosart UI.Note: An effect scene is a scene loaded into the Viz Engine's front layer on top of the actual switcher scene. These scenes are typically used to animate on top of the actual switcher during a switch.
-
Key fill crosspoint set
The number of key buses corresponds to the number of superchannels (DVE box placeholders) supported in Viz Engine.
The delivered switcher scene contains 8 superchannels by default. You can add more superchannels, to a maximum of 16.Note:
-
While the theoretical amount of sources/superchannels can be up to 16, a high amount of sources loaded on air at the same time might lead to performance issues.
-
A key bus is represented with a superchannel. The number of superchannels is configured in VizEngineSwitcherConfig.xml.
-
-
Top Scene support
-
A top scene is a scene loaded into the Viz Engine front layer, on top of the actual switcher scene. This type of scene is typically used for opener or closer animations that cover the actual show.
Top scenes are called by adding a top scene attribute to the Viz Mosart template -
Load (cue) and play a top scene on the Viz Engine front layer.
-
Cue a scene on-air (using a break).
-
Takes a top scene on air.
-
-
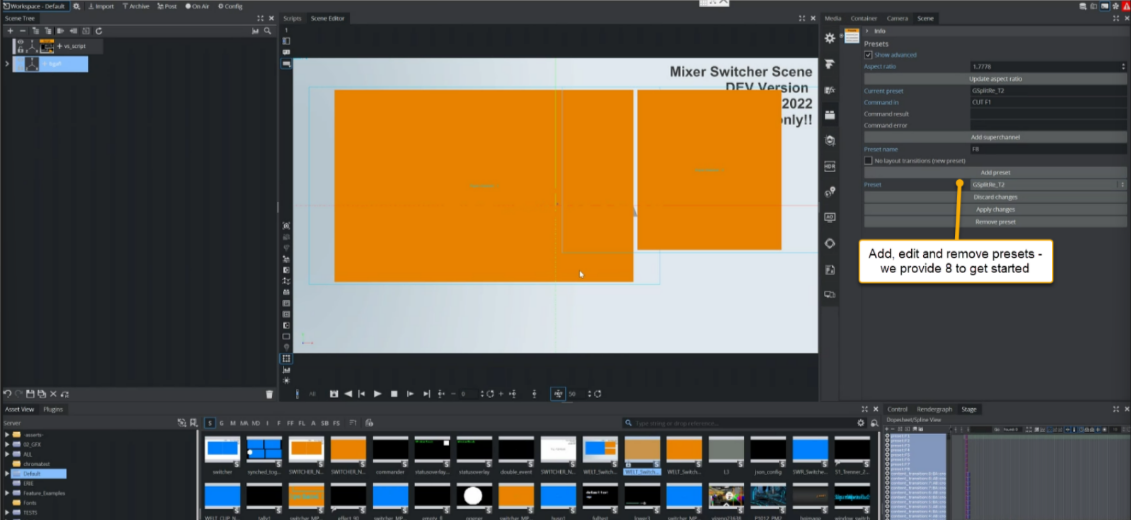
Preset support
-
The Mixer Engine layouts for BOX effects (split screens, picture-in-picture, etc.) are stored within the scene in the Presets plugin. A preset contains the transformation, alpha and cropping attributes for each Viz Engine superchannel and its subchannels.
-
Set a preset in preview by specifying the preset name and optionally providing content for the preset labels from a Viz Mosart template or from the NRCS.
-
Cue a preset on air.
-
Take a preset on air, either with hard cut or transition. The preset transition can be specified in the Viz Mosart template or from the NRCS.
-
Trigger the preset style through a keyboard shortcut.
-
Go to the previous preset style using a keyboard shortcut.
-
-
Clip functionality
-
Cueing clips in preview.
-
Cueing clips on air (using a Break).
-
Playing clips.
-
Scrubbing.
-
Pausing (using camera x AdlibPix scenarios).
-
Requirements and Limitations
Requirements
-
Viz Engine 5.0+
-
Mosart version 5.1+
Limitations
Viz Mosart 5.1 introduces this initial version of Viz Engine as a switcher. The feature set will be continually expanded in successive versions. Please note the current state of the product:
-
No M/Es (Mix/Effects) support other than PP (Program/Preset mixer section).
-
No support for macro recall.
-
No support for auxiliaries.
-
No enable/disable of downstream keyers.
-
No cueing of fullscreen graphics On Air.
-
No Transition Logic scenes.
-
Overlay graphics are not a standard part of the Engine Switcher workflow. These elements must be loaded on a separate Viz Engine instance/hardware.
-
Whilst both the clean and dirty feed can be enabled, the clean feed requires an optional, additional dual-channel setup.
-
No main and backup support for Viz Engine from within Viz Mosart.
-
Playing only one clip at a time, either via crosspoint (full screen) or via key fill within a DVE Box.
(Clips and GFX scenes are always bound to the main superchannel 1). -
A preview setup has to run on separate hardware.
This requires separate PGM and PRV Viz Engines. -
Viz Engine supports up to 16 superchannels. However this is a theoretical maximum, operations may be limited due to potential performance issues.
Installation
Sample Scenes
In addition to a standard Viz Mosart setup, Engine Switcher builds on Viz Engine scenes for template-driven operations in Viz Mosart.
To simplify the show design process, sample scenes are provided by Vizrt.
To obtain sample Engine Switcher scenes
-
Authenticate to Vizrt's FTP at https://download.vizrt.com/
-
Navigate to products/VizMosart/Engine Switcher Scenes
-
Download locally, then import the Switcher Scene to Viz Graphic Hub
-
Set the path to the Switcher Scene in VizEngineSwitcherConfig.xml
Note: For latest installer files and template samples, please refer to the latest version of this documentation here at the Vizrt Documentation Center.
Configuration
For first-time configuration, all the setup steps below must be followed:
-
Manual Configuration of the Vizrt Media Sequencer Engine (MSE)
and then to perform
AV Setup with Cross Point Naming and Mapping
When Viz Mosart instructs a standard video switcher to put something in preview or on-air, it is sufficient to configure AV Config file with a list of crosspoints that correspond to the video signal input configurations defined on the switcher.
In Engine Switcher mode, employing a Viz Engine as a video switcher, these standard rules no longer apply. There are no video signal inputs for the video server ports in Viz Engine.
Instead, the crosspoints on the video server ports in AV Automation must be configured to point directly to the port names configured on Viz Engine.
Defining Sources
-
Source ID from 1 - N.
-
CLIP X-points from 1-6 are mandatory and used for internal switching.
-
GFX X-points are mandatory for graphics.
Tip: The X-point name can either be
-
the source ID as defined on the Switcher side
or -
a Viz Mosart user-friendly name.
In this case, then source ID (as defined on the Switcher side) should be entered in the Mixer name column.
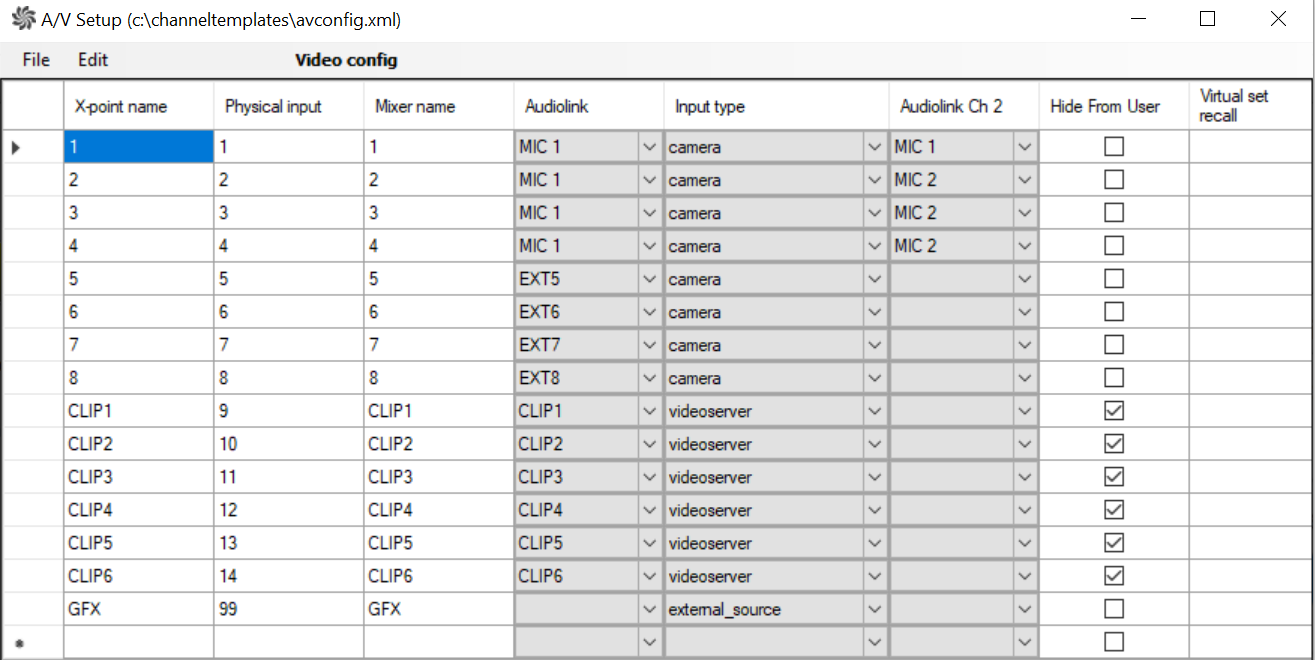
By configuring these crosspoints on the video server ports in AV Automation or referring to them in the templates, these definitions enable a standard execution of a clip in Viz Mosart.
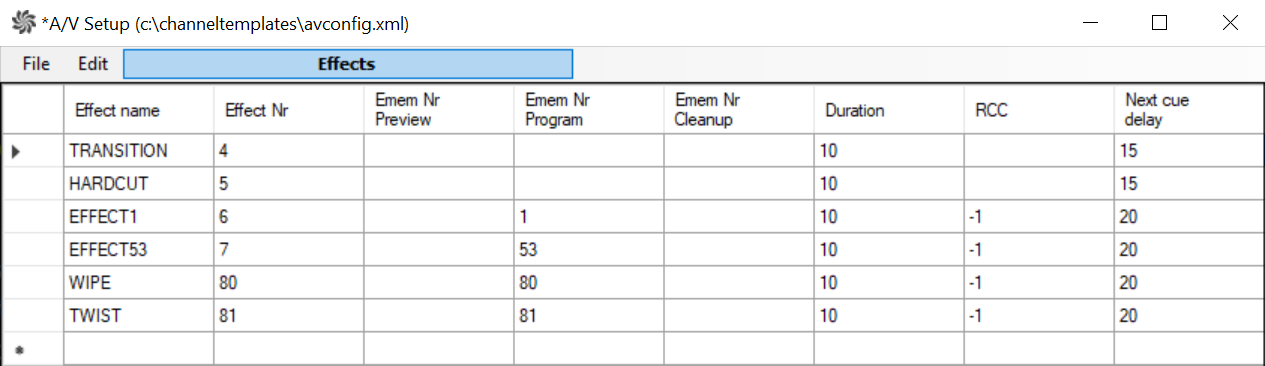
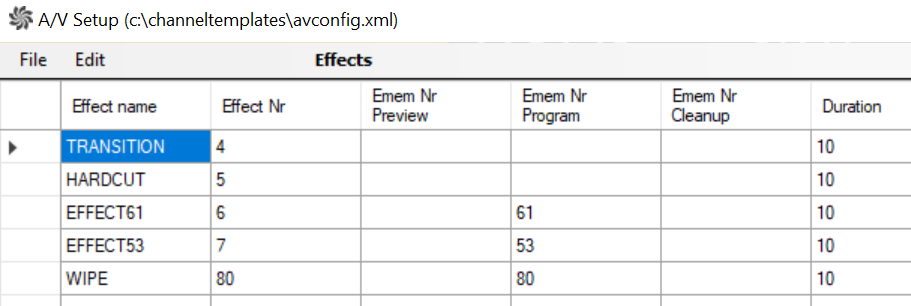
Effects
-
Effects need a unique Emen Nr. for calling a specific effect scene
-
Scenes are always prefixed with the string effect_x in the designated Graphic Hub effect scene folder.
x represents the Emen Nr. defined in the configuration. -
Effect IDs must not be higher than 80 since 80+ numbers are reserved for content transition effects within super channels.
Presets
Tip: The concept Presets, is introduced below.
-
In Viz Mosart, you see the preset names in the A/V Setup (AvConfig.xml) file.
-
Preset names correspond directly to the presets defined in the switcher scene:
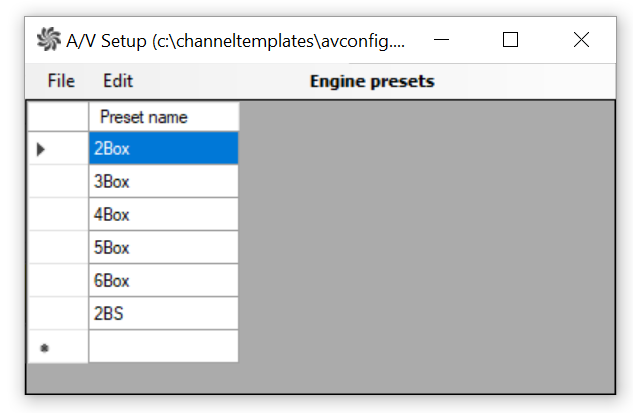
-
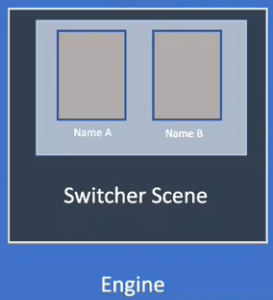
A Preset plugin, as it appears in a switcher scene:
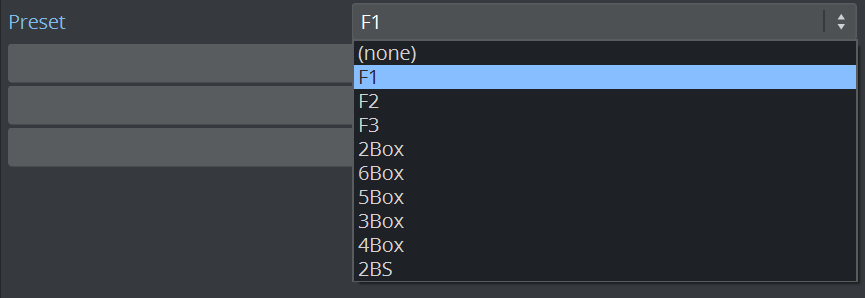
Note: F1, F2 etc are the default full screen options for each superchannel. F1 is mandatory.
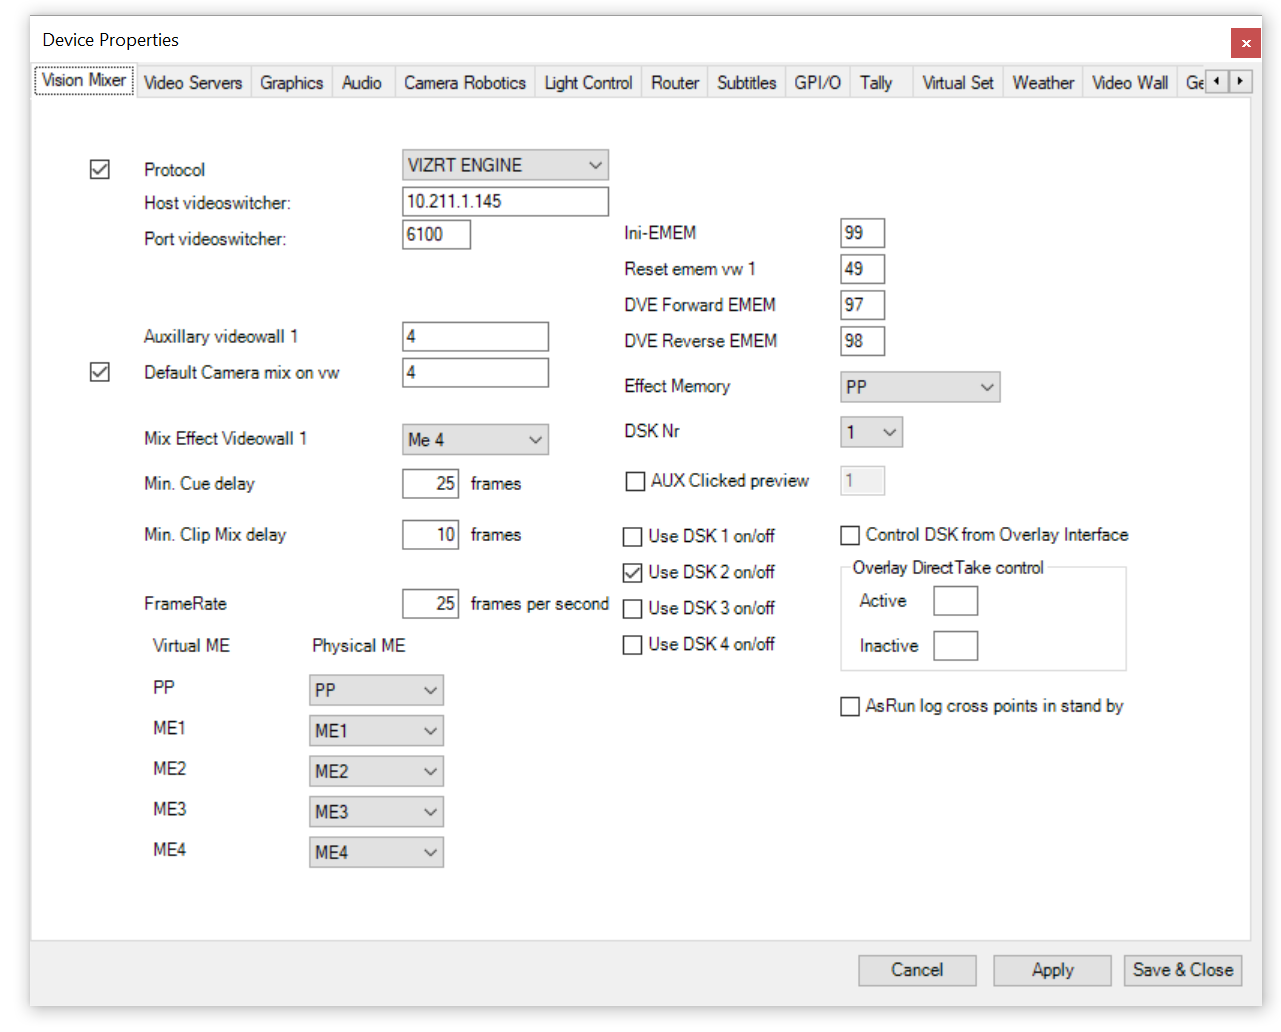
Video Switcher Setup
In a Viz Engine Switcher setup, there are no MEs, just PP.
-
Navigate to AV Automation > Devices > Properties > Vision Mixer tab.
-
From the Protocol drop-down menu, select VIZRT ENGINE.
-
In addition to the default values, enter the following:
-
Host videoswitcher: Location of the Viz Engine.
-
Port videoswitcher: default 6100.
-
Tick the box to the left of Protocol. This indicates that you want to control the vision switcher (mixer).
-
-
Click Save & Close.
-
From Mosart Installation folder/Mosart Server/Configuration Files copy VizEngineSwitcherConfig.xml file into your Mosart working folder (C:\channeltemplates or C:\ProgramData\Mosart Medialab\ConfigurationFiles) and configure:
-
ControlScenePat: the path to the Switcher Scene located in Viz Engine.
-
NumberOfKeyBuses: the number of superchannels defined in Viz Engine.
-
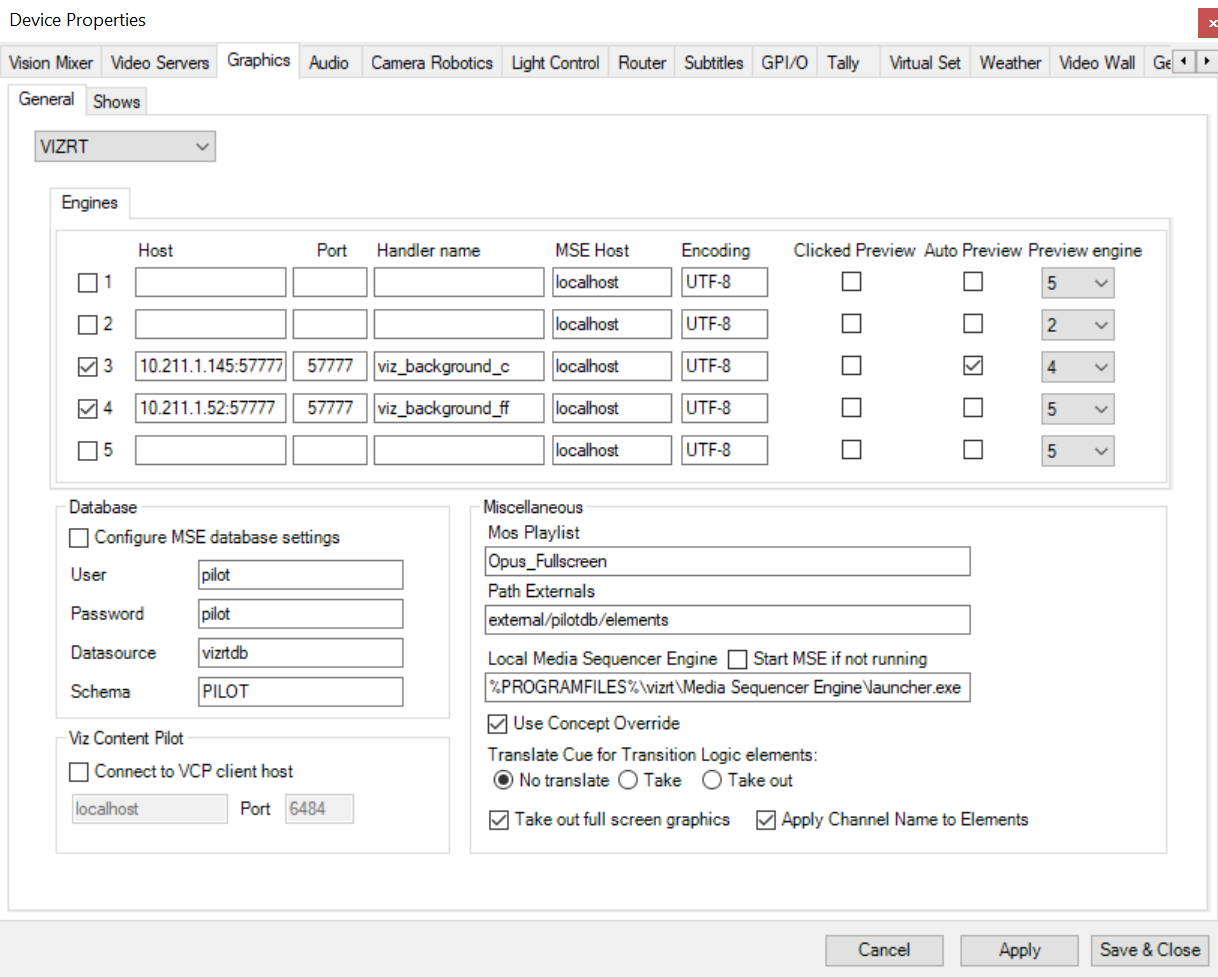
Graphics
-
Select the Graphics tab.
-
Add a Viz Engine entry for PGM.
Note: A second Viz Engine, running on separate hardware, can be added for optional PRV.
-
Enable the checkbox Auto Preview option and link it to the PGM engine. See Clean and Dirty-Feed Setup.
-
-
Add the designated 'superchannel' port to each Viz Engine (default is 57777).
-
Tick the Auto Preview box for the PGM Viz Engine.
-
Assign the identity of the PRV Viz Engine to it.
-
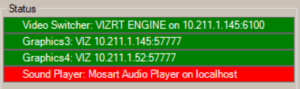
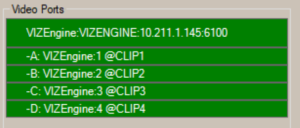
Follow the other guiding values as illustrated above, then click Save & Close.
These show up in AV Automation:
Video Server and Port Configurations
-
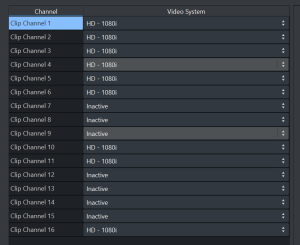
Select the Video Servers tab and add four server ports to create two clip server pairs:
-
A/B
-
C/D
-

These show up in AV Automation:
Viz Engine Configuration
Standard Viz Engine configurations
You will need to provide basic Viz Engine configurations that include definitions of:
-
Graphic Hub connection
-
Output format
-
Licenses
-
Amount of Inputs.
If these are not already in place, refer to the Viz Engine Administrator Guide.
Additional Viz Engine configurations for an Engine Switcher setup
-
Section Communication - Super channel Port
Set it to an available Port (for example, 57777)

-
Clip Channels
The Engine Mixer Workflow requires activation of the following clip channels:
-
Clip Channels 1-4 and 10-11 are needed for Full screen and Box clip playback.
-
Clip Channels 5-6 are used optionally for videowall integration playback (not included in default setup).
-
Clip Channel 16 is used for clips loaded in Top Scenes.
Switcher Scene Configuration
The Switcher Scene comes with a separate configuration file which has to be copied to C :\ProgramData\vizrt\VizEngine.
This file allows proper modification of switching behavior, delays and the addition of a separate Preview engine.
Manual Configuration of the Vizrt Media Sequencer Engine (MSE)
The MSE handlers that you use must be set to superchannel mode.
This is performed manually in the VDOM configuration file.
-
Navigate to http://localhost:8580/app/vdomconfig/vdomconfig.html, node /scheduler/<handler name>. For example, in the AV Automation screenshot above of the Graphics tab, the handler name is viz_background_c.
-
Add the following entries to both handlers:
<entry name="superchannel"/><ignore_cue_operation>no</ignore_cue_operation><ignore_out_operation>yes</ignore_out_operation>
Example of the VDOM File
<handler connected="yes" mode="enabled" status="good: Commands processed" type="viz" name="viz_background_c"> <entry name="encoding">UTF-8</entry> <entry name="state"> <entry name="last"> <entry name="element">/external/pilotdb/elements/406</entry> </entry> </entry> <entry name="renderer"> <entry name="10.211.1.145:57777"> <entry name="active"/> </entry> </entry> <superchannel/> <entry name="publishing_point_uri"/> <entry name="publishing_point_atom_id"/> <entry name="info"/> <entry name="superchannel"/> <ignore_cue_operation>no</ignore_cue_operation> <ignore_out_operation>yes</ignore_out_operation> <command_timeout>30.</command_timeout></handler>Template Design
A show with video switching performed by a Viz Engine-based Switcher, is controlled exactly like any standard video switcher-driven show, from a rundown with associated Viz Mosart templates.
Tip:
-
For an overview of template design with examples, please refer to the section Template Examples, section Switcher Plugin.
-
To download sample scenes, see To obtain sample Engine Switcher scene.
Introduction to Presets, Top scenes and Effects
Viz Engine Switcher operations depend on two distinct criteria that are controlled from the template. All settings are made during template design, as described in the section Template Editor.
The three unique concepts for Viz Engine Switcher operations are:
Presets
Info: The term preset originates from scene design in the Viz Engine. The composition of the scene is defined by x,y positions of a collection of 'windows' (two in the illustration below) in a Viz Engine super channel. These definitions describe:
-
The number of windows
-
Position of the windows
-
Size of each window.
Each composition, saved on the Viz Engine, is called a preset.
Note: Superchannel 1 is considered the main superchannel for fullscreen program switches. The preset "F1" is mandatory for this workflow and must not be altered.
Viz Mosart includes a sample Switcher Scene with eight presets.
-
Use Viz Artist to edit any preset.
For more details, refer to the Viz Artist user Guide. -
In Viz Mosart, you select the preset name from the list of preset names pre-configured in A/V Setup (AvConfig.xml) file.
-
Transition style
The transition style (hard-cut or animation), as well as several label values can be specified.
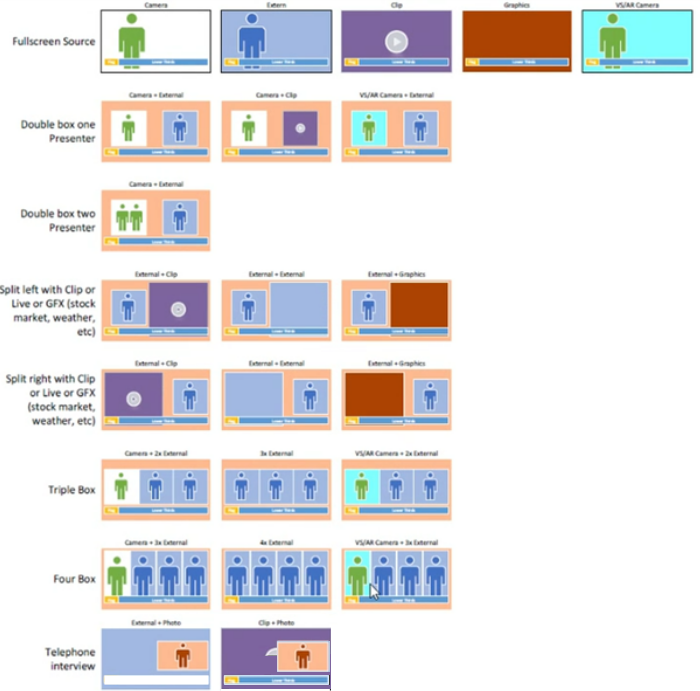
For example, for a DVE template (where Switcher plugin for the device is available), the user can select the layout and looks of the DVE effect by specifying a preset style, the preset transition and the DVE window labels, as required:
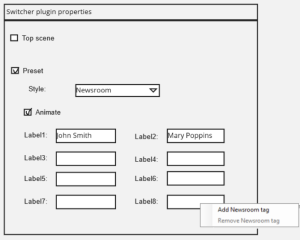
Static values can be specified directly on the template. Newsroom tags can also be configured, enabling control from within the NRCS.
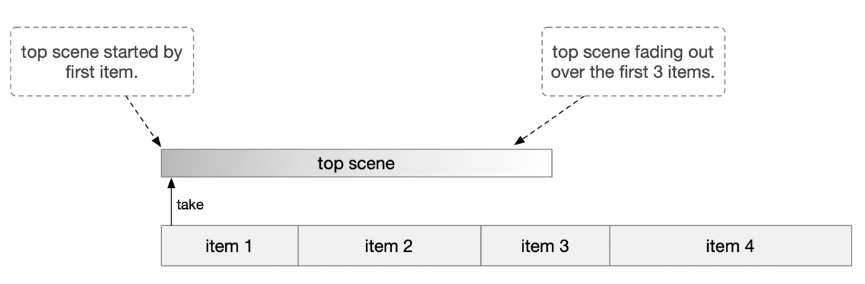
Top Scenes
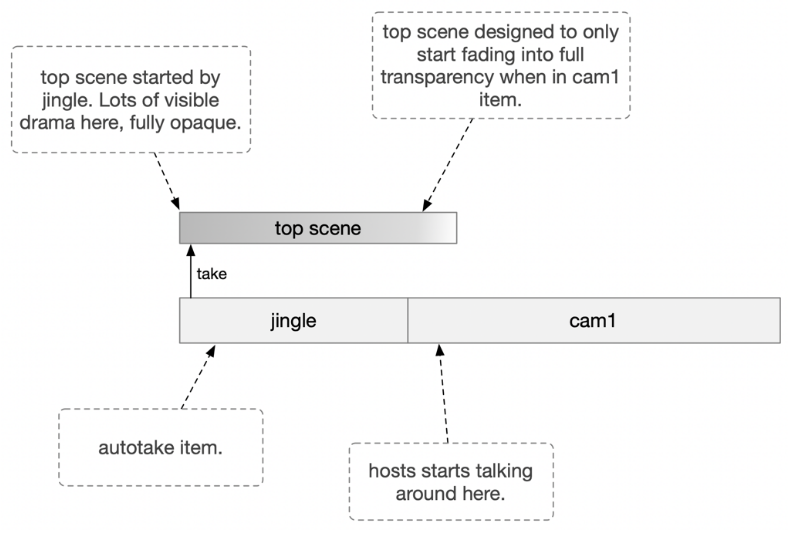
A typical use of top scenes is as an opener. For example, the top scene is played to introduce the 8 o’clock news show with many visual effects that fade to the following camera scene, and a news host taking over.
To Create a Template that Plays a Top Scene
-
Select an appropriate template. For example Graphic or Jingle, as corresponds to the operation that the Viz Engine switcher controls.
-
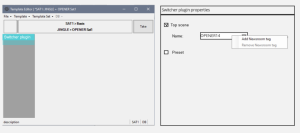
Enable Switcher plugin for the device.
-
Specify the top scene name from the list with the following options:
-
None (empty).
-
A list of top scene pre-configured in the A/V Setup.
-
Time-related Configurations
There are two time-related aspects involving top scenes (in a similar way as when handling clips):
-
The time it takes for the scene to load. This is handled automatically by Viz Mosart when cueing the story item.
-
The time it takes for the scene to run. This is controlled with the fixed duration and autotake configurations on the template.

-
Top scenes are started from within a story item and if long enough, they simply continue to play even when the item ends.
-
Top scenes ignore the story items boundaries so the take out of a story item should match the top scenes animation length.
-
Top scenes can be played on top of anything else.
To Create a Template that Plays a Top Scene (Viz Artist/Engine)
The sample script below (code block) performs this operation:
-
Initially the scene is fully opaque, covering the switcher completely.
-
On Take, an animation starts.
-
After a pre-defined time, the openers content disappears (animates or fades out).
The Engine Switcher workflow does not need to contain a script; it is purposefully designed for simplicity. A script can be added, to call the "clear_front_layer" routine of the switcher script which will force-remove the top scene from the front layer after the animation is finished.
Example Script
'------------------------------------------------------------------------------------------------------------------------sub OnInitParameters() RegisterPushButton("clear_front_layer", "Opener Close", 2)end sub'------------------------------------------------------------------------------------------------------------------------sub OnExecAction(buttonId As Integer) if buttonid = 1 then clear_front_layer()end Sub'------------------------------------------------------------------------------------------------------------------------sub clear_front_layer() dim commandStr as string = "RENDERER*MAIN_LAYER*SCRIPT INVOKE clear_front_layer" println 5, "--------------- TOP SCENE OUT ----------------" System.SendRemoteCommand("localhost", 6100, commandStr, 0)end sub'------------------------------------------------------------------------------------------------------------------------In this case a clear_front_layer button is added to the animation in the Stage

Effect Scenes
Effect Scenes are, similar to Top Scenes, loaded into the Switcher Engines Front layer on top of an upcoming switch between sources. These scenes are loaded automatically once a transition effect is assigned in Mosart. The scene names have to be added to AV configuration and are typically named "effect_<id>".
Example Effect
-
The scene is fully transparent at the beginning of its animation.
-
At Take, an animation starts to show content, animating to fully covering the scene underneath it (switcher).
-
After a predefined time, the animation reaches the autotransback script routine, which triggers the switch in the Switcher Scene.
-
The animation fades out, being fully transparent again.
Script
sub OnInitParameters() RegisterPushButton("autotransback", "Auto trans back", 1) RegisterPushButton("clear_front_layer", "Effect Close", 2)end subsub OnExecAction(buttonId As Integer) if buttonid = 1 then autotransback() if buttonid = 2 then clear_front_layer()end subsub autotransback() dim commandStr as string = "RENDERER*MAIN_LAYER" & "*SCRIPT INVOKE auto_trans" println 5, "--------------- TOP SCENE TRANS FROM FL SCENE ----------------" System.SendRemoteCommand("localhost", 6100, commandStr, 0)end subsub clear_front_layer() dim commandStr as string = "RENDERER*MAIN_LAYER*SCRIPT INVOKE clear_front_layer" println 5, "--------------- TOP SCENE OUT ----------------" System.SendRemoteCommand("localhost", 6100, commandStr, 0)end sub 
Note: Using effects scenes on a separate/external Viz Engine.
-
Edit the script to send the RemoteCommand for "autotransback" to the Engine Mixer. In this case the IP needs to be manually changed to the correct external one in the effect scene.
Keep in mind that using an external engine for triggering effect transition switches might lead to timing inaccuracies due to possible network delays.
Custom Content Transitions
This section describes the actions required in Viz Artist, when working with Engine Switcher-driven Viz Mosart templates.
Note: Content transitions are only used for full screen content transitions. Transitions in between Boxes / Splits are hard cut.
Preset Plugin
While the Preset Plugin does create a default content transition for a crossfade, additional transitions for changing content within super channels have to be created manually in Viz Artist.
Default crossfade transitions made by Preset Plugin:
-
A custom content transition is saved within a special director name which gets called by the Switcher from Viz Mosart.
This director can contain any type of animation needed for the transition to take place. -
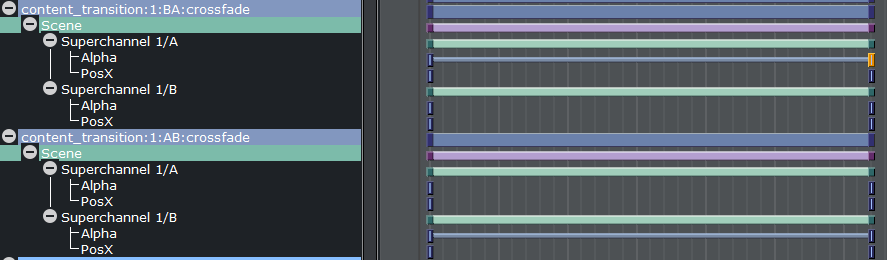
Typically a content transition director contains keyframes related to the Superchannels Sub-channels A and B.
-
Content transitions are built in 2 directions, meaning the is a seperate director used for a transition between A to B and vice versa.
To define a direction
-
The direction's name has to be defined in the following way:
content_transition:<ID>:<direction>:<transition_name>
-
ID - Superchannel ID
-
direction - "AB" or "BA"
-
transition_name - name the transition that is later going to be called in the UI (for example wipe)
-
Custom Effects
-
Custom effects scenes have to also be manually added to the Switcher's configuration file.
Note: Custom effects IDs start at 80.
To create an effect
-
In Viz Mosart Mosart AV Automation:
-
In the Viz Engine Engine Switcher Configuration
C:\ProgramData\vizrt\VizEngine\switcher_config.cfg#custom content transition effects<content_transitions>80:wipe,81:rotate,82:twist</content_transitions> -
The effect is now available for selection in Viz Mosart:
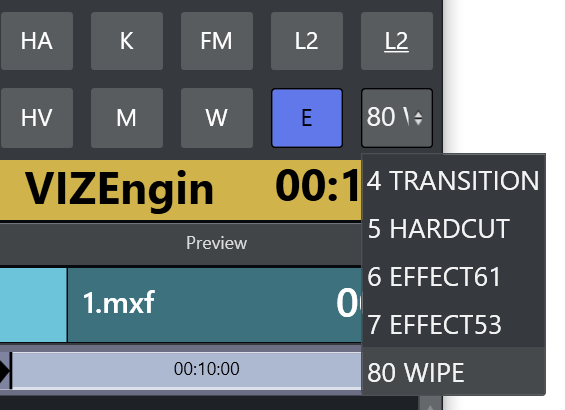
Example - Effect 80 - Wipe:
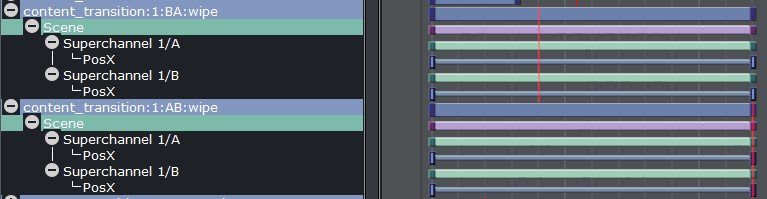
A typical wipe is set up by animating the sub-channel's X position from left to right, then having the other sub-channel follow.
Values:
(1) Direction AB (content_transition:1:AB:wipe):
-
Assuming sub-channel 1/A is visible and should fade out to the right
-
Keyframes for Pos X are set to
-
Superchannel 1/A:
-
Start : 0.0
-
End : 100.0
-
-
Sub-channel 1/B starts on left to 1/A and animates onto the screen
-
Superchannel 1/B:
-
Start : -100.0
-
End : 0.0
-
(2) Direction BA (content_transition:1:BA:wipe):
The roles are now switched, this means 1/B starts on the screen, animates to the right and 1/A now appears from the left.
-
Keyframes for Pos X are set to
-
Superchannel 1/A:
-
Start : -100.0
-
End : 0.0
-
-
Sub-channel 1/B starts on left to 1/A and animates onto the screen
-
Superchannel 1/B:
-
Start : 0.0
-
End : 100.0
-
Labels
Label names (newsroom tags) and their content, defined in a Viz Mosart template and filled out in the NCRS, are stored in a shared memory map when the story item containing the box template is cued.
This enables the designer to dynamically react to any label changes, either from a container script included in the Switcher scene's background or from another scene located on another Viz Engine within the network, when a new DVE box is cued.
The format of the received string will consist of pairs containing label name and the following label value while each pair will be divided by a "|" :
<label_name1>:<label_content1>|<label_name2>:<label_content2>|<label_name2>:<label_content3>|<label_name4>:<label_content4>...
Example of a container script
The default map name is called "MIXER_LABELS" and can be changed within the Engine Switcher Configuration File.
'------------------------------------------------------------------------------------------------------------------------ sub OnInit() VizCommunication.map.Registerchangedcallback("MIXER_LABELS")end subsub OnSharedMemoryVariableChanged(map As SharedMemory, mapKey As String) dim labels as String = VizCommunication.map["MIXER_LABELS"] 'parsing and reacting routines Parse_Labels(labels) Set_Labels()end subsub Parse_Labels(input as String) Dim params as Array[String] Dim content as Array[String] input.Split("|",params) For each param in params param.Split(":",content) labels[content[0]] = content[1] Nextend sub 'setting labels (container name equals label name)sub Set_Labels() dim label_keys as Array[String] labels.GetKeys(label_keys) for each key in label_keys This.FindSubContainer(key).Geometry.Text = labels[key] nextend sub'------------------------------------------------------------------------------------------------------------------------ Note: The actual toggle event of the next story item can be accessed by registering on the the <toggle_status> map defined in the Engine Switcher Configuration File.
This allows the designed to trigger animations related to an upcoming change of the layout.
Summary of Configuration Points
-
Viz Engine configuration
-
C:\ProgramData\vizrt\VizEngine\VizEngine-0.cfg
Tip: A copy of this config is included in this Administration Guide under Device Configuration Files > Engine Switcher Configuration File.
-
-
Switcher Scene configuration
-
C:\ProgramData\vizrt\VizEngine\switcher_config.cfg
-
-
Viz Media Sequence configuration
-
localhost:8580/app/vdomconfig/vdomconfig.html
-
-
Viz Mosart
-
localhost:8580/app/vdomconfig/vdomconfig.html
-
C:/channeltemplates
-
See Also