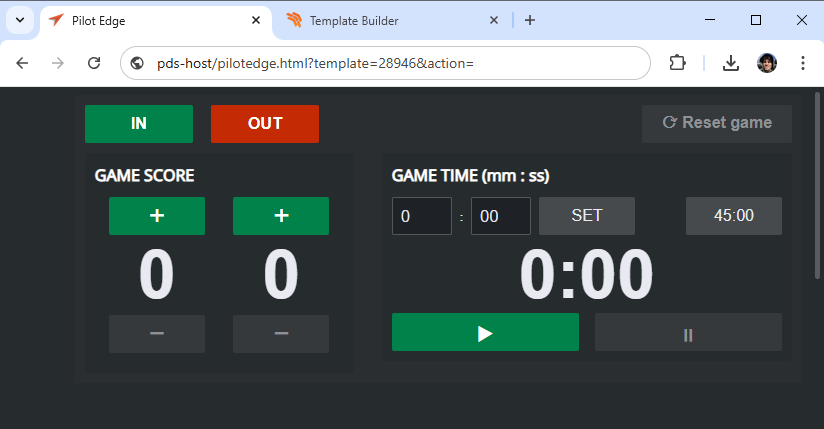
Action Panels are regular Viz Pilot Edge templates or data elements, but are designed to remain open in the client and function as control surfaces. In Viz Pilot Edge, add the URL parameter &action to open the template in action mode. This page walks through a practical approach to building an action panel template to control a typical clock-and-score panel.
This page contains the following topics:
Like all templates in Template Builder, Action Panels require an imported scene. However, if the panel's actions are not directly tied to the scene content, the scene can be a dummy scene containing only a ControlObject plugin.
When an Action Panel is created and a scene is imported, Template Builder automatically generates input fields for the controllable objects defined in the scene. These fields can then be used to drive scene playback from the template. For example, in a clock and score panel, you might expose the home and away team names as text fields. When this template is opened in Viz Pilot Edge, users can enter team names and save the template as a data element for a specific match. This way, action panels can be prefilled and reused with specific content.
It is important to emphasize that Action Panels are regular templates and data elements (all standard mechanisms to build templates in Template Builder apply).
Note: To host action panel templates or data elements in your own client, add the &action URL parameter to the Viz Pilot Edge URL.
See the section Working with Templates for details on template creation and editing.
Key Concepts
Template Builder provides several mechanisms that are especially useful when building an action panel template:
HTML fragments inside the template allow fully customized panel layouts:
Style the content using standard CSS.
Use
<button>elements with thevizrt-click-nameattribute to define click-event handlers in internal scripting.Use HTML form controls such as
<input>and<select>with thevizrt-input-nameattribute to enable two-way binding between control values in the HTML fragment, and corresponding fields in the template or thevizrt.$datamap used in internal scripting.
Internal script commands let you perform common actions programmatically:
Media Sequencer operations:
app.createMseConnection(...)creates a Media Sequencer object and lets you execute Media Sequencer commands such as"take","continue","update", or"out"for the current template or data element.Viz commands:
mse.sendVizCommand(...)sends Viz Engine commands (through Media Sequencer), such as setting shared memory variables, starting directors, or loading and updating scenes.User notifications:
app.notify(...)displays a warning, error, or info message to the user.
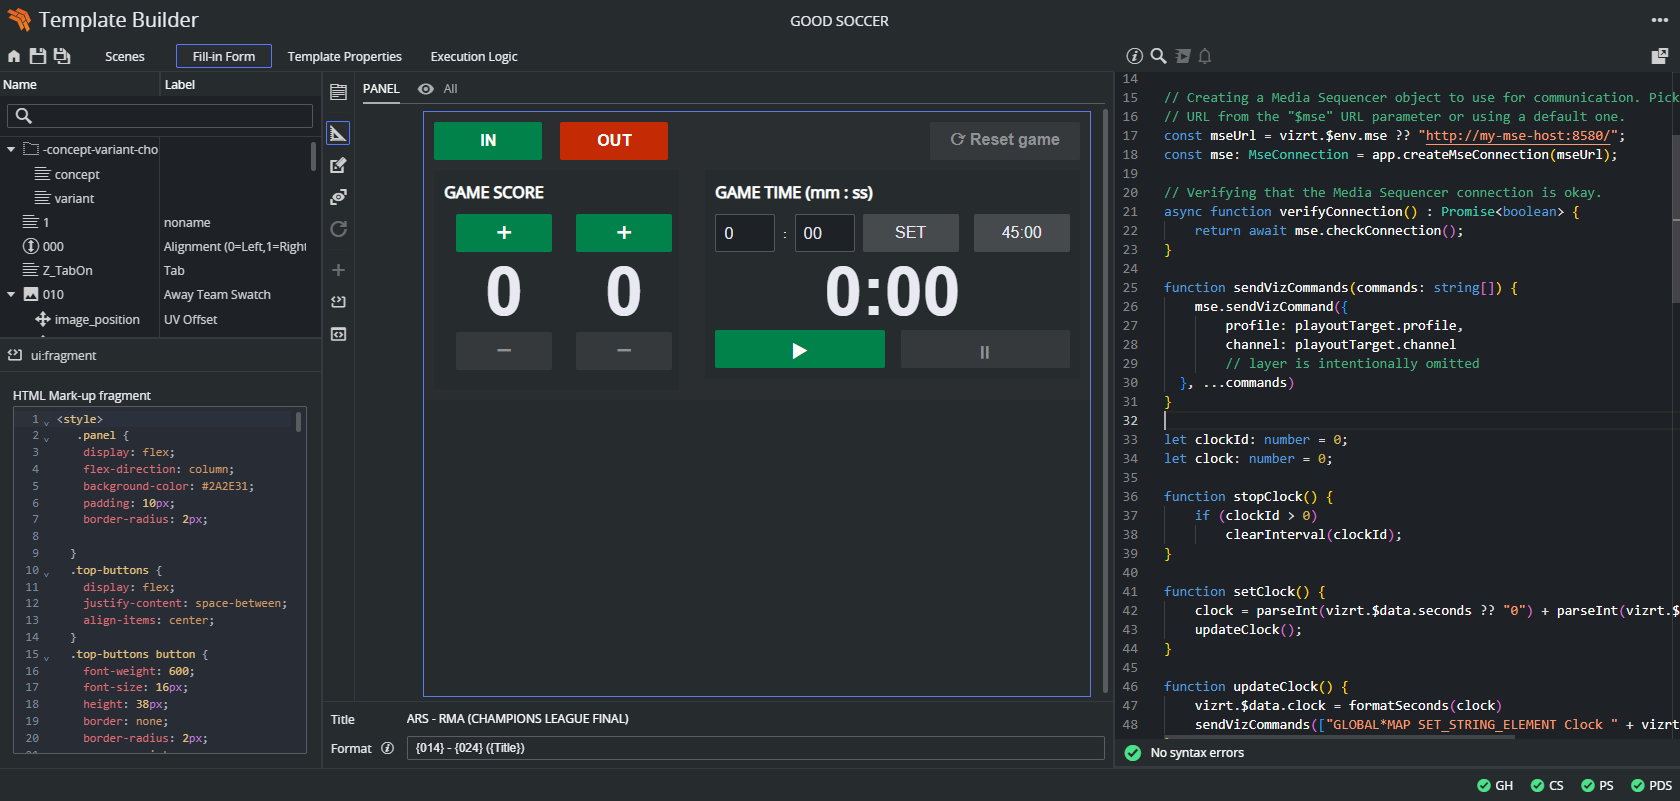
UI Design with HTML Fragments
The user interface of an action panel template can be built just like any ordinary template. However, a particularly powerful technique is using HTML fragments to customize the layout. In fact, the entire UI can be constructed within a single HTML fragment.
To get started:
Add a new tab in your template.
Add an HTML fragment to this tab and resize it to the desired size.
Use CSS for layout and visual styling, either inline or inside a
<style>tag within the fragment.
Enable User Interaction
There are two key mechanisms that enable interaction in the Action Panel UI:
1. Buttons
You can add <button> elements inside the HTML fragment to trigger scripted actions. Use the special attribute vizrt-click-name to identify which action should be triggered when a button is clicked.
<button vizrt-click-name="take">IN</button>In your internal script, the vizrt.onClick(name) handler receives the value of vizrt-click-name and can react accordingly:
vizrt.onClick = (name: string) => { switch(name) { case "take": mse.take(playoutTarget) break // more cases... }}Use case: You want the panel operator to manually trigger a "take" playout with a single button click.
2. HTML Form Controls with Bindings
To capture input from the user, use standard HTML form controls like <input> and <select>. These elements can be two-way bound to either:
A template field (linked to a control object in the scene).
A field in the
vizrt.$datamap (used in internal scripting).
Use the vizrt-input-name attribute to bind the control:
Example 1 - Bind to Field
<input vizrt-input-name="title" type="text" value="MATCH DAY">
This binds the value of the input box to the field “title” in the template.
Example 2 - Bind to Scripting
<input vizrt-input-name="$data.home_score" type="number" value="0">This example shows an input box where the user can type a numeric value, a two-way value bound to the value of the given key in the $data map in internal scripting: vizrt.$data.home_score. This variable can also be manipulated in the script, for instance increasing the score with 1, the new value is shown in the corresponding HTML form control.
Use case: You want the operator to input or adjust values like team names, scores, or time values, which the script can then access or modify.
Internal Scripting
Once the UI is in place, internal scripting provides the logic to execute actions in response to user input.
Trigger a Media Sequencer (MSE) Command
To create an object to perform Media Sequencer operations, use:
const mse: MseConnection = app.createMseConnection(mseUrl);Creating the object with an URL as parameter does not automatically connect to Media Sequencer. The object uses the Media Sequencer REST API, and does not have callback events.
The first operation to execute after creating this object, is to check whether the connection is valid. To do this, you may create a function:
// Verifying that the Media Sequencer connection is okay.async function verifyConnection() : Promise<boolean> { return await mse.checkConnection();}And call it as such:
if (!(await verifyConnection())) { app.notify("error", "Cannot connect to the Media Sequencer.");}If this operation returns true, you are ready to trigger playout commands on the current template or data element.
All commands have a PlayoutTarget object as a parameter. This object has the following members:
profile: The MSE profile to use.channel: The channel to play out on.layer(optional): Viz layer (one of,"MAIN","BACK","FRONT").
// Creating a default playout target.const defaultPlayoutTarget: PlayoutTarget<VizLayer> = { profile: "default", channel: "A", layer: "MAIN"};Use Environment Variables from URL Parameters
In the example above, the playout target and Media Sequencer URL is hard coded in scripting. These values can also be provided from environment variables specified in the Viz Pilot Edge URL parameters, for instance:
http://pds-host:8177/app/pilotedge/pilotedge.html?template=28935&$mse=http://custom-mse-host:8580/&$profile=myprofile1&$channel=B&action
Note: These $-prefixed parameters are only parsed by Viz Pilot Edge and Template Builder, and are not treated as regular query parameters in HTTP requests.
URL parameters starting with a dollar sign are treated as an environment variable. In scripting, the environment variables can be accessed through the vizrt.$env dictionary:
// Creating a Media Sequencer object to use for communication. Picking up the// URL from the "$mse" URL parameter or using a default one.const mseUrl = vizrt.$env.mse ?? "http://default-mse-host:8580/";const mse: MseConnection = app.createMseConnection(mseUrl);// Creating the playout target to use, based on URL parameters or the default target above.const playoutTarget: PlayoutTarget<VizLayer> = { profile: vizrt.$env.profile ?? defaultPlayoutTarget.profile, channel: vizrt.$env.channel ?? defaultPlayoutTarget.channel,};Send Viz Engine Commands
To send commands directly to Viz Engine (for example, set shared memory, update scenes), use mse.sendVizCommand (playoutTarget, commands). Commands is an array of strings containing the Viz Engine commands to send. The PlayoutTarget parameter is described above.
Note: When using mse.sendVizCommand(...), you must not include the layer property in the PlayoutTarget. If you do, Template Builder raises a compile-time error, because the layer must be specified explicitly in the command strings, not in the target.
Use case: You want to update a scene’s data or trigger a director without playing out a new template.
The commands array contains Viz command strings.
function sendVizCommands(commands: string[]) { mse.sendVizCommand({ profile: playoutTarget.profile, channel: playoutTarget.channel // layer is intentionally omitted }, ...commands)}function updateAwayScore() { sendVizCommands(["GLOBAL*MAP SET_STRING_ELEMENT Soccer_AwayTeamScore " + vizrt.$data.away_score])}Display a Message to the User
Use app.notify(...) to show non-blocking notifications (toast messages) in the UI:
app.notify("success", "Connected to the Media Sequencer. Good to go!");severity:“success", "info","warning", or"error".message: The text to display.

Host the Action Panel
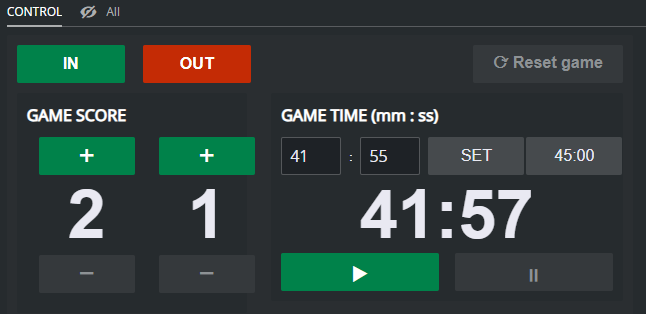
The Action Panel template can be tested from Template Builder and Viz Pilot Edge. When hosted in Viz Pilot Edge or custom web clients that embed Viz Pilot Edge, the template can be shown in "action mode" using the &action parameter, displaying only the Action Panel interface. This can be done by adding the URL parameter &action to the Viz Pilot Edge URL.
http://pds-host:8177/app/pilotedge/pilotedge.html?template=28580&action