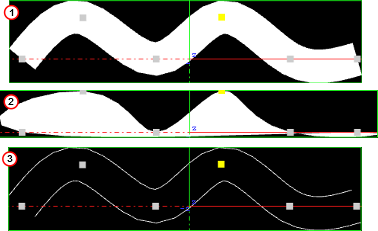
The 2D Ribbon plug-in is a curved strip. It is ideal to make customized curves to symbolize, for example, frontiers on a map or similar. The way the object is curved is easily edited in the 2D Ribbon property editor. It is possible to enable inter activity so that counterpoints of the ribbon can be dragged with the cursor.
Note: This plug-in is located in: Plugins -> Geom plug-ins -> Default
The 2D Ribbon can be used in Ribbon (1), Filled Area (2) or Double Outline (3) modes:
This page contains the following topics and procedures:
2D Ribbon Properties
The properties of the 2D Ribbon plug-in are different for each selected mode.
Ribbon Mode Properties
Use LOD: Enables or disables the dynamic Level of Detail (LOD)
Geo: TBA
Working Mode: Available modes are Ribbon, Filled Area and Double Outline. Default is the Ribbon mode.
Number of Control Points: Sets the number of control points along the ribbon (when Slave mode is set to
Off).Resolution: Defines the number of subdivisions to polygons between the control points.
Closed Curve: Creates a closed a curve like a circle. The forward end touches the backward end.
Constant Width:
Set to on: Any width modification is along all of the 2D Ribbon.
Set to off: Any width modification is around the nearest Control Point.
Note: Preserve Constant Width While Possible is not available when this is selected.
Add Caps: Shows the Begin and End cap parameters when set to
On. Removes the Begin and End caps when set toOff, even if they are set toOnin the two parameters:Begin Caps: Applies a cap at the start of the 2D Ribbon when set to
On. Also sets the resolution of the start cap.End Caps: Applies a cap at the end of the 2D Ribbon when set to
On. Also sets the resolution of the end cap.
Preserve Constant Width While Possible: Makes the 2D Ribbon try and maintain its set width when modified (available when Constant Width is set to
Off) when set toOn.Interactive Mode: Enables or disables the interactive mode of direction manipulation with the cursor:
Editing Range %: Sets the amount of effect the movement of one point (move with SHIFT) should have on the neighboring points.
Editing Mode: When moving a point, press SHIFT to move the other points simultaneously. How the points move depends on the editing mode that is chosen, Constant, Linear or Exponential.
Constant: The other points move their positions exactly equal to the one you move.
Linear: The other points move in a linear way, based on the distance from the point that is being moved.
Exponential: The other points move in an exponential way, based on the distance from the point it is being moved.
Reset Options: Sets the 2D Ribbon to initial values for the Control Points and ribbon size. Changed values of Ribbon Length and Ribbon Width take effect afterhas been clicked.
Reset: Resets all created curves but does not delete the existing control points.
Texture Options: Enables 2D Ribbon Texture options when set to
On:Texture Direction: Shows the texture in different directions. For example, if a pointer right-shows used as texture, the pointer shows to the right side if the Horizontal option is activated. Otherwise, to the left side if the
-Horizontal option is set. Same for the Vertical and -Vertical option. The rendered pointer shows to the top or to the bottom side.Texture Head Location: Moves the texture either to top or bottom direction.
Texture Length: Stretches the texture.
Use Texture Factor: Enables the texture factor parameter when set to
On.
Rotate Around X Axis: Rotates the created 2D Ribbon around the X axis when set to
On.Show Spline: Shows the spline of the 2D Ribbon when set to
On.Use Progressive Visualization: When set to
Onthe activated parameters affect the rendering:Progress Mode: Slices the curve in the x-direction by length or by the control point index. Select from two options, By Length and By Control Points.
Path Position: Limits the workspace so there are less control points to prepare.
Render Bumps: The curves are top-barbed which is useful for weather broadcasting.
Warm: Gives a rounded edge to the bumps.
Cold: Gives a sharper edge to the bumps.
Occluded: Gives alternating warm and cold bumps.
Slave Mode: Enables one ribbon to act as the master and the other as the slave. The slave ribbon uses the Number of Control Points and Resolution set for the master.
Show Control Points Values: Enables the manipulation of the Control Points in the render window. X, Y, and W values set the X/Y position and the width of the curve at the different Control Points. These values are typically be changed when edited directly in the Scene Editor.
Filled Area Mode Properties
For details see Ribbon Mode Properties.
Double Outline Mode Properties
For details see Ribbon Mode Properties.
To Create a 2D Ribbon
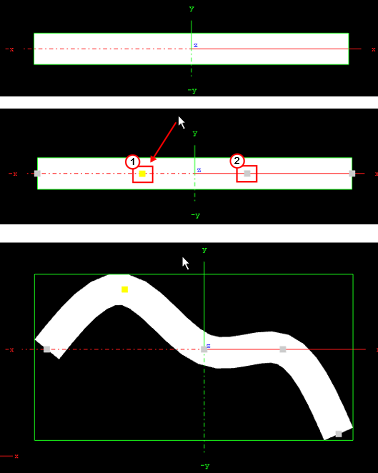
Add the 2D Ribbon plug-in to the Scene Tree.
Set Interactive Mode to
On.Set the Number of Control Points.
Note: This number can be changed at any time. New points are distributed along the already defined ribbon (2).
Open Reset Options:
Enter (estimate) the Ribbon Length and Ribbon Width (enter a new figure and press ENTER).
Clickto activate the settings.
Toggle the Constant Width, as required.
Position the 2D Ribbon in the Scene.
Note: If the 2D Ribbon is to be on some horizontal plane, it might be easier first to edit it in the default orientation, and afterwards rotate it to the right place. There is no problem to continue work on it after the rotation has been made, but because of the perspective, it might be less straightforward.
Click the (Events) button in the Scene Editor.
Modify the 2D Ribbon shape, either:
Use the mouse cursor to modify the Control Points. Click on or near the Control Point. The selected control point shows yellow (1).
Left button: Click and drag the nearest Control Point.
Right button: Modifies the 2D Ribbon width.
or
Set Show Control Points Values to on. Modify the Control Points as required.
Note: If the Container, which contains the 2D Ribbon plug-in, is selected, and Interactive Mode is set to On, one Control Point is always active.
Set the Resolution. For best performance set the resolution as low as possible, but high enough to guarantee a smooth enough look in the corners of the 2D Ribbon, and also a smooth enough mapping of the image/texture on the 2D Ribbon.
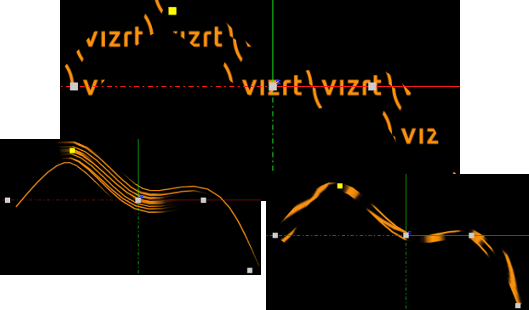
Choose an image and drag it on the 2D Ribbon. Open the Image texture editor and set:
Mapping to Vertex
Wrap to Clamp
Map the image more accurately on the 2D Ribbon. Set Texture Options to
On:Set the Texture Length as required.
Set the Texture Direction as required.
Set the Texture Head Location to see the texture flowing along the 2D Ribbon.
This is a good point to review again all set parameters.
Define an animation, if required. Typically with the 2D Ribbon the animation is just on the Texture Head Location.
IMPORTANT! While defining an animation on the parameters of a 2D Ribbon, make sure that the right window is open in Viz Artist. Without it the changes that are made with the cursor do not take effect, with regard to the animation.
2D Ribbon Tips
It is sometimes useful to work with 2D Ribbon with use LOD set to on.
If you have a texture with alpha, to see it correctly set the image to off with the small enable/disable button near the image icon.
When finished with the creation of a 2D Ribbon, make sure that Interactive Mode is set to
Off.When the 2D Ribbon Interactive mode is set to on, and the Scene Editor is active, it is not possible to select another object with the cursor in the Scene Editor. To select another object make sure that Interactive mode is set to off and the Scene Editor is inactive.
Animation on the 2D Ribbon is quite heavy on performance. Try to keep the number of Control Points and Polygons as low as possible.
When a texture is used with a 2D Ribbon, make sure that, along the flow direction, on the texture edges there is a clean line with alpha equal to
0. If not there is a wake of the image edges in front or behind it.Do not change the number of Control Point along an animation. It is possible, if necessary, to change the resolution number.
While defining an animation, make sure to remove from it, if necessary, the toggle values of Show Control Points, Interactive Mode and so on.
2D Ribbon Known Limitations
When you have in the scene a 2D Ribbon, by choosing an object in the Viz Artist Scene Editor, the Viz Artist user interface is not updated automatically.
While copying a 2D Ribbon, to make it work in the interactive mode, it is necessary to save the scene first.
If the texture coordinates on a Control Point are close to or outside the [0,1] range, artifacts may show. Keep it within the [0,1] range.
See Also
Create Animations section of the Viz Artist User Guide


