You can re-route a template to an alternative end point, through an accessory, often to a new crosspoint.
Note: Template Router is the new name for what was previously called Wall Manager. This is a pure name change, the functionality has not changed.
Working with Template Router Buttons
Example Workflow
As an example, you can create a template router keyboard button that re-routes any template that is dragged onto it, to a screen in the studio (This is achieved by defining the crosspoint for the studio screen in to the button).
An operator can then drag a template (for example a PACKAGE) on to the new template router button. The template is then merged with the Accessory template (here a studio screen) that is allocated to the button. The original package content displays on the screen.
Creating a Template Router Button
To Create a Template Router Button
From Viz Mosart main menu, select Tools > Keyboard shortcuts.
Choose which keyboard button (for example F8, or as in this example, R) to work with.
Click the blue arrow (in this example, next to ACCESSORY).
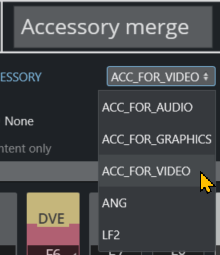
Select the option Template Router Button > Accessory merge.
Attach an Accessory template from the drop-down list of alternatives.
Click Save.
For further details about Accessory templates in the section Template Router.
Note: The section Template Router also describes how you can modify button placement inside the Template Router canvas.

