Singal-R
When running Viz Arc, a SignalR Hub waits for incoming connections internally. The Viz Arc In-App Web API portcan be configured, see Communication under the General Settings. The hub where the various methods can be invoked by clients is called VizArcHub.
Information: To use an external application running a SignalR client, please use a .NET 8.0 based project.
The server supports the following methods
setStringVariable (string varName, string value)
setJSONVariable (string varName, string json)
Those two methods allow clients to set simple variable names with either a string value or a JSON string. Viz Arc scripts is notified of variable changes and can process their value. The following code sample shows client setting variables in Viz Arc:
C# Client Sample
using Microsoft.AspNetCore.SignalR.Client;// connects to VizArcHub on localhost and default port 5004 HubConnection connection = new HubConnectionBuilder() .WithUrl("http://127.0.0.1:5004/signalr/VizArcHub") .Build();// connectawait connection.StartAsync();// set some DataMap variableawait connection.InvokeAsync("setStringVariable", "hello", "world!");In any Viz Arc script, the values above can be read, as in the following simple sample:
Viz Arc Script
Global.OnInit = function () { Console.WriteLine( "data " + GetData("hello")) Console.WriteLine( "json " + GetData("jsonData").ToString()) Console.WriteLine( "name is " + GetData("jsonData").Name.ToString()) // subscribe to all DataMap variable changes SubscribeDataMap("")} Global.OnDataMapValueChanged = function (varName) { Console.WriteLine( varName + " changed to "+ GetData(varName).ToString()) if( varName == "jsonData" ) Console.WriteLine( "nams is " + GetData("jsonData").Name.ToString())}The method GetData returns the currently set value of the variable.
MQTT Broker
When the MQTT broker port is configured, an internal MQTT broker starts on Viz Arc startup. All topic changes are transmitted to the DataMap using the MQTT topic as the key and the topic's payload as value.
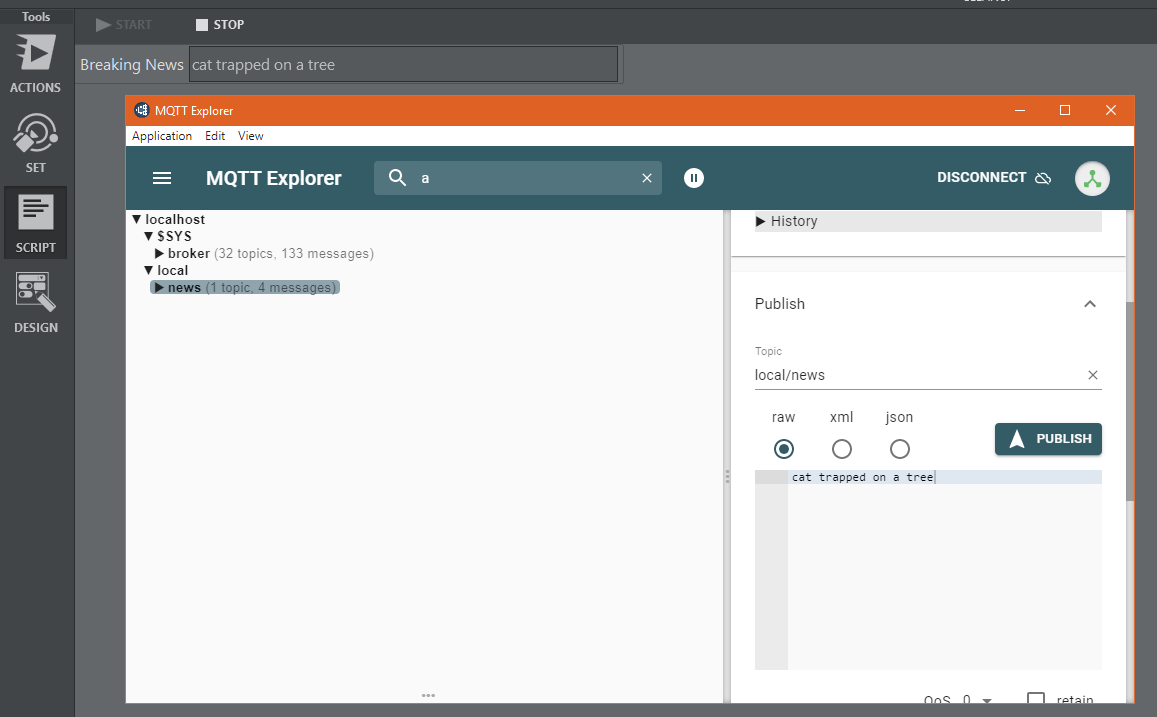
To test the integration you can wither use the MQTT Explorer (this tool can be useful to monitor Viz Arc's MQTT broker as well) or a .NET core project using the following C# code:
Sample C# Snippet for Publishing a MQTT Topic to Viz Arc
// using nuget package MQTTnet.AspNetCore and MQTTnet.Extensions.ManagedClient using MQTTnet;using MQTTnet.Client;using MQTTnet.Client.Options;// ...var factory = new MqttFactory();IMqttClient mqttClient = factory.CreateMqttClient(); // create MQTT clientvar options = new MqttClientOptionsBuilder().WithTcpServer("localhost", 1883).Build(); // create connection optionsvar connResult = mqttClient.ConnectAsync(options, CancellationToken.None).Result; // connect to VizArc's MQTT brokervar message = new MqttApplicationMessageBuilder().WithAtLeastOnceQoS().WithTopic("local/news/breaking").WithPayload("breaking news").Build(); // create messagevar result = mqttClient.PublishAsync(message, CancellationToken.None).Result; // publish the messageViz Arc JavaScript Sample to Receive and Read MQTT Topics through the DataMap
var listenTopic = "local/news/breaking"Global.OnInit = function (){ SubscribeDataMap(listenTopic)}Global.OnDataMapValueChanged = function (varName){ if( varName == listenTopic ) news.Value = GetData(listenTopic)}The script above listens to changes on the "local/news/breaking" topic and updates a text box accordingly.
TCP Server
Viz Arc starts up a TCP server which can be used to set and get DataMap variables. The port of the server can be configured, see General Settings.
You can set DataMap variables using a command string from a Viz Engine script:
Set DataMap
System.TcpSendAsync("resultSetDM", "localhost", 9204, "ARC*DATAHUB SET key|someValue 1.0 1.0 1.0", 1000)The command above sets the variable key to the value someValue 1.0 1.0 1.0. The | character separates the key from the value. This value can then be further processed in Viz Arc.
To read back a value from the DataMap in Viz Arc you can use the GET command like in the sample below.
Get DataMap
Dim ret = System.TcpSend("localhost", 9204, "ARC*DATAHUB GET key", 1000)The Viz Engine script variable ret contains the value of key.
You can execute an action using a command string from a Viz Engine script:
Execute Action
System.TcpSendAsync("resultSetActionName", "localhost", 9204, "ARC*ACTION EXECUTE loadSceneA", 1000)System.TcpSendAsync("resultSetActionGUID", "localhost", 9204, "ARC*ACTION EXECUTE 49c525fa-0ce8-46e1-bae4-acfb4abdb629", 1000)The commands above search for actions loadSceneA by name and 49c525fa-0ce8-46e1-bae4-acfb4abdb629 by GUID and execute them if they can be found in the current project.
UDP Server
Viz Arc starts up an internal UDP server used to set DataMap variables. The port of the server can be configured, see General Settings (default 9304).
The syntax to be used when updating or setting a DataMap variable is simple:
key|value\0
The pipe symbol | is used to separate the key from the value. A message is terminated with the character \0.
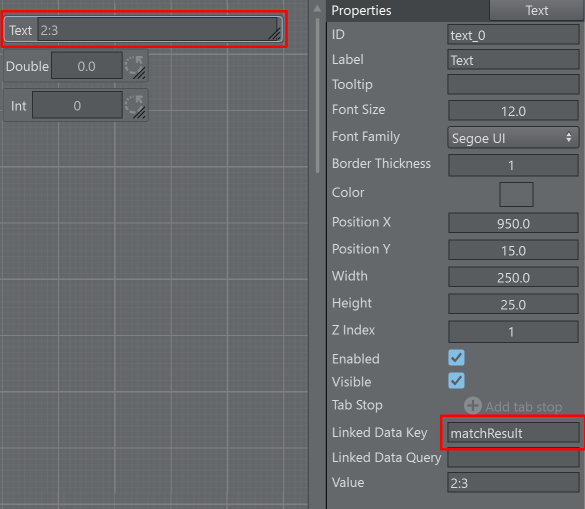
DataMap Linking
Some scripting UI components like Text, Int or Double have the properties Linked Data Key and Linked Data Query.
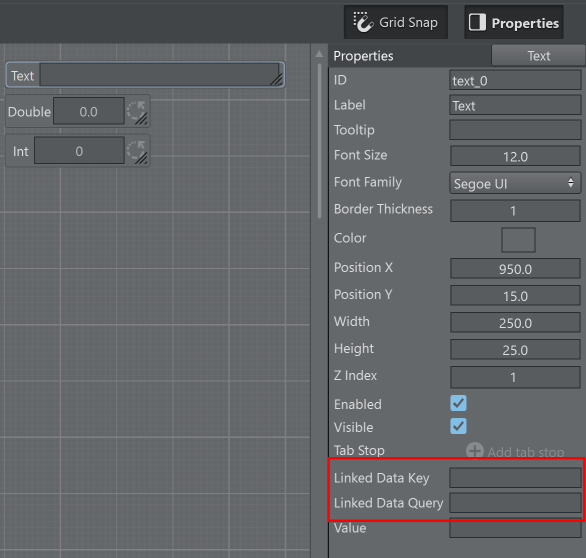
The Data Key entry can accept any key name used in a DataMap entry. As an example add a key matchResult using the web UI to insert key/value pairs on Viz Arc.
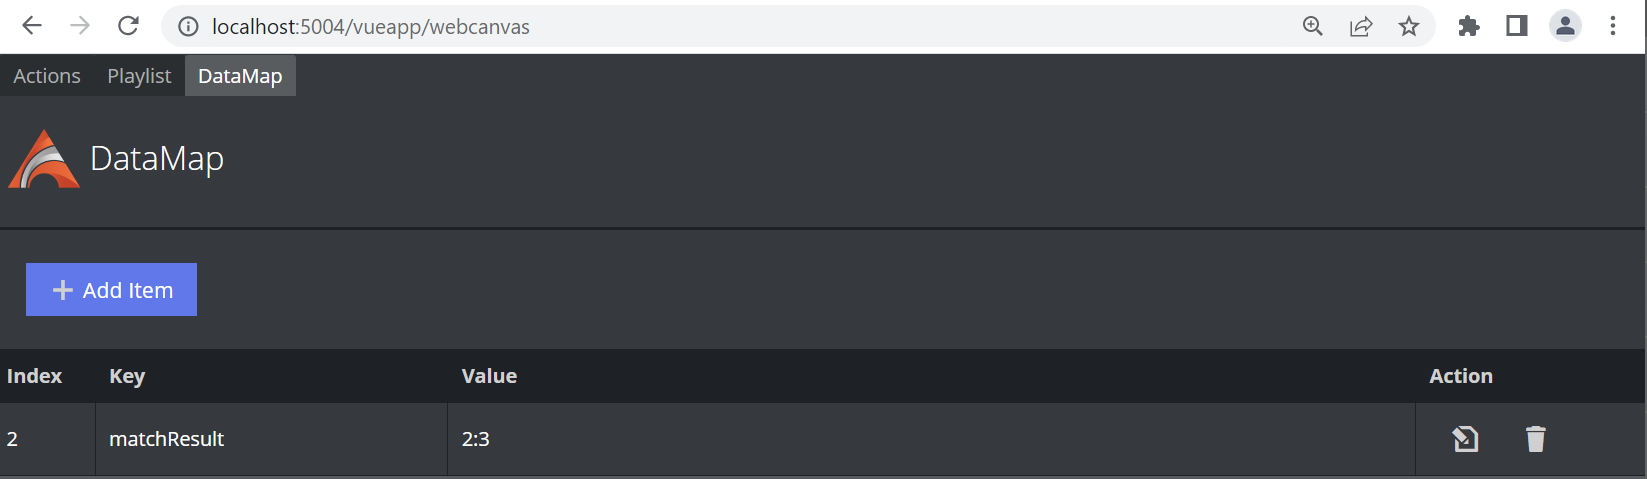
Enter matchResult as Linekd Data Key and the text value updates to the previously entered data.
For more complex data structures such as .json strings, the Linked Data Query can be used.
JSON Sample Data
[ { "matchID":4242, "Home":"City A", "Away":"City B", "HomeScore":4, "AwayScore":2 }, { "matchID":4243, "Home":"FC A", "Away":"FC B", "HomeScore":0, "AwayScore":1 }]The DataMap after adding the above .json using the matches key.
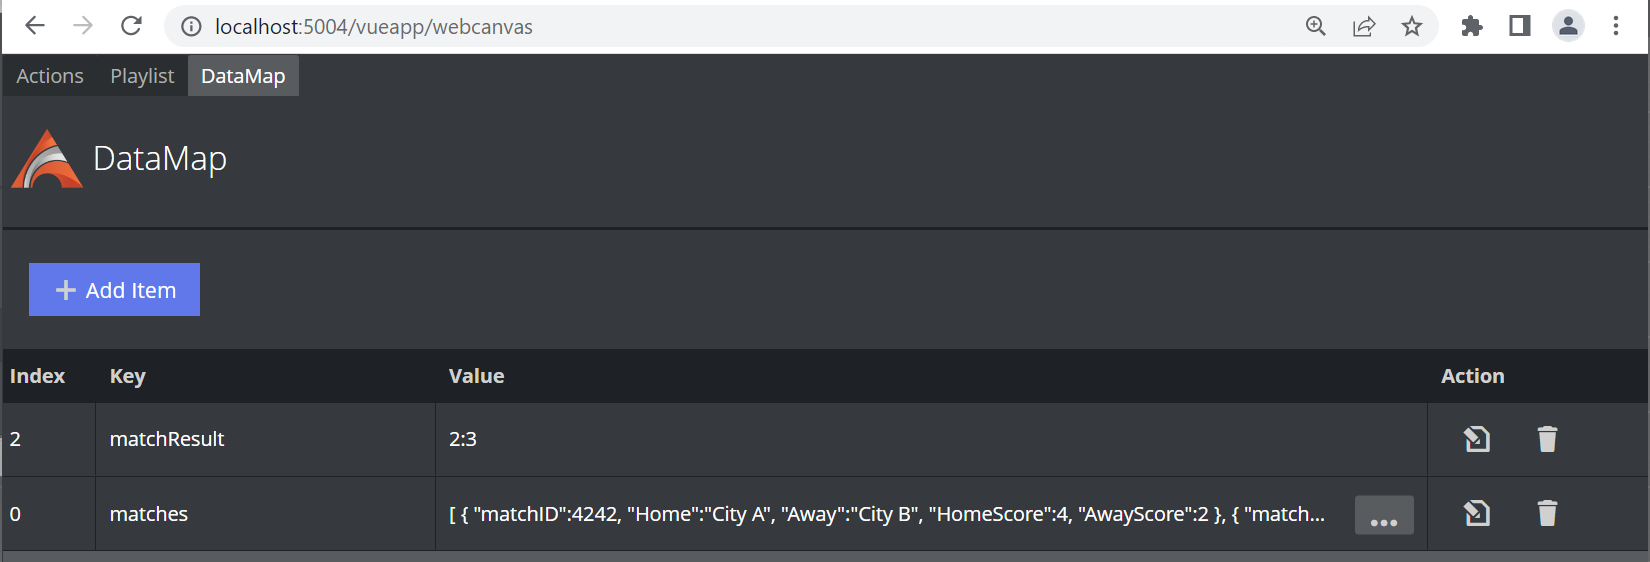
Enter a JSONPath string $[0].HomeScore to get the home score of the first .json array element.
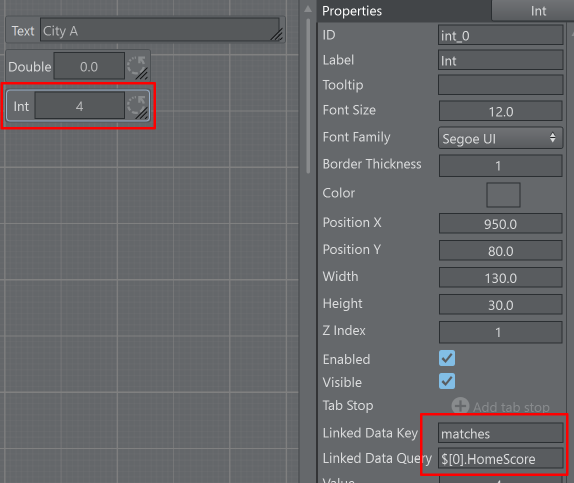
Instead of using constant values for indexing the .json array a variable can be used instead. A variable must be enclosed in % character and should be the ID of an existing scripting UI element.
$[%dropdown_0%].HomeScore gets resolved to $[1].HomeScore as the dropdown value of the dropdonw_0 component is 1.
In order to force an evaluation of the expression of the Linked Data Query, use the function UpdatateDataLink available on all scripting parameters.
The following sample forces a re-evaluation of the Linked Data Query on parameter int_0 whenever the value of the dropdown dropdown_0 changes.
Global.OnParameterChanged = function (id){ if( id == "dropdown_0" ) int_0.UpdateDataLink()}Dropdowns
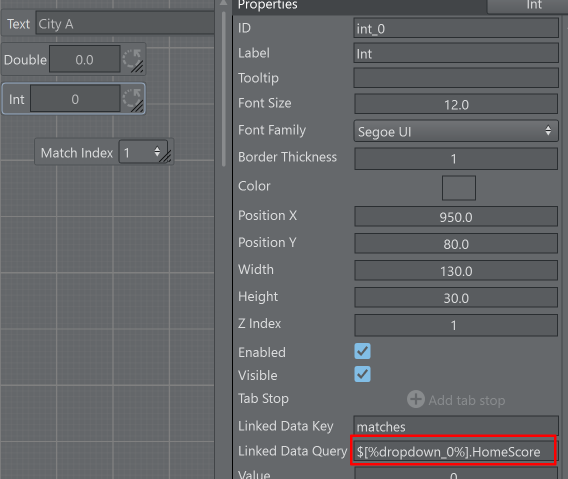
Dropdowns can be populated using Queries that return arrays, for example:
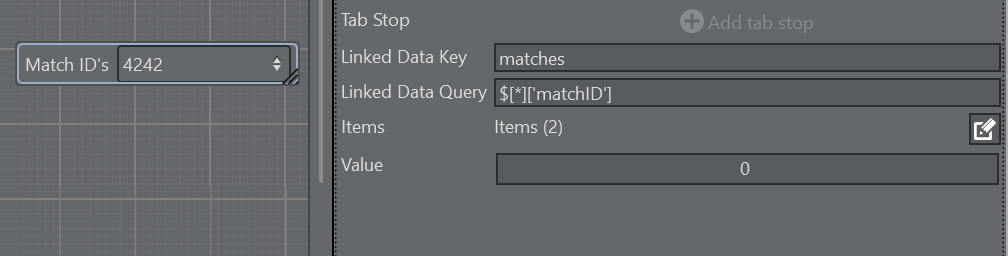
In this case the query $[*]['matchID'] selects the matchID’s of all array elements.
Tables
Tables can be populated in a similar manner as dropdowns:
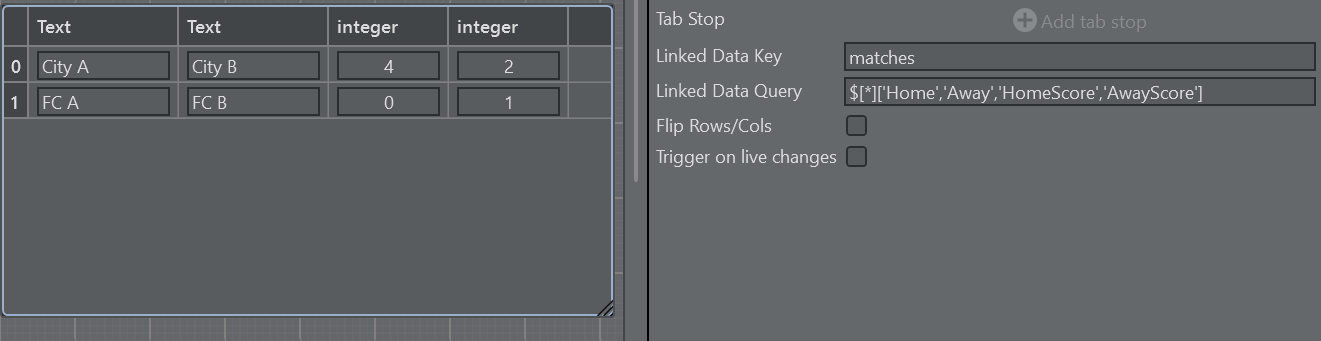
The query $[*]['Home','Away','HomeScore','AwayScore'] returns an array containing the four selected members Home, Away, HomeScore and AwayScore in this order. The calculated array looks like:
["City A", "City B", 4, 2, "FC A", "FC B", 0, 1]It is important to note that the Table needs to have the matching columns in place, in this sample the table has been prepared to have the first two columns to be strings and the last two columns to be integer types.
The table is then populated row by row trying to match the resulting array of the query.
To learn more about the JSONPath syntax, please refer to https://goessner.net/articles/JsonPath/.
DataMap Websocket
A client can connect to Viz Arc's DataHub socket on the endpoint ws://hostname:5004/api/v1/ws, where hostname is the host name where Viz Arc is running. You can subscribe to DataMap variable changes by sending a JSON string like in the following examples.
To register to changes of someDataKey send a JSON setting like this through the websocket:
{ "type" : "DataMapSubscribe", "value" : "someDataKey"}To register to all changes of all keys use an empty string as value.
{ "type" :"DataMapSubscribe", "value" :""}Whenever a DataMap variable changes you receive a JSON answer on the websocket like this:
{"type":"DataMap","value":{"key":"someDataKey","value":"Hello World some data"}}Excel and CSV integration
The File Parameter script element has a couple of properties which allow you to watch an Excel or .csv file and load it whenever there are changes to the contents of the file. It can load the raw contents of the file or the containing table can be converted into a JSON format. The data is stored in both cases into the DataMap.
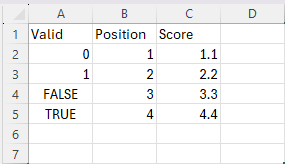
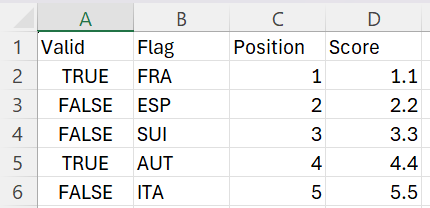
Starting from a Excel Sheet, define for example column headers Valid, Position and Score and enter some rows with values.
Add in a template or the global script a File Parameter and a Table UI element. Select an Excel or .csv file and check the flag Has Column Header to indicate that the first row contains the headers. Check the Watch File option to update the data anytime the file is saved to disk. Specify a variable key of your choice in Data Map Name.
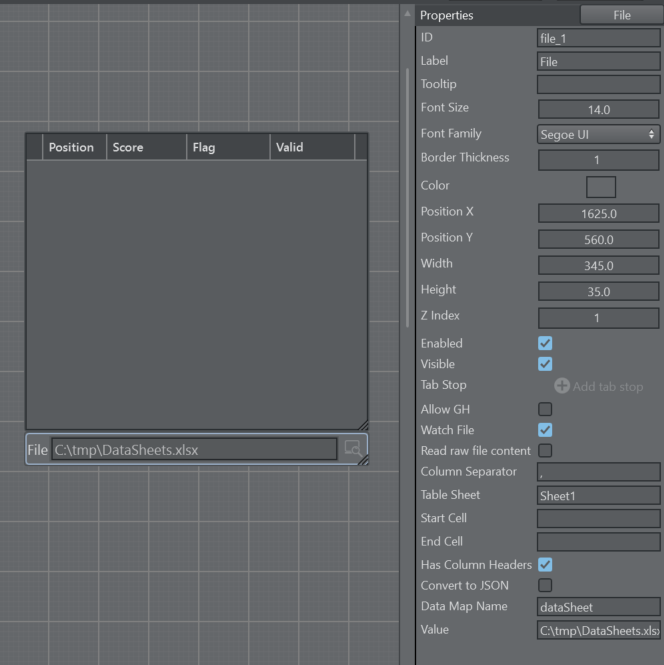
Read raw file content: Reads the plain file content without processing it.
Column Separator: Defines the column separator for .csv files. Autodetects the separator when blank.
Table Sheet: Specifies the Excel sheet to read. You can use the string name of the table or the index of the sheet (starting from 1). If the field is left empty, the first sheet is read.
Start Cell: Specifies a row/column offset using Excel style syntax where the table content starts (for example, C2 would start to read from row 2 and column 3). If left empty, row/column is 1.
End Cell: Specifies a row/column offset using Excel style syntax where the table content ends (for example, limit the table to cell F9 would mean to crop the data at column 6 and row 9). Auto-detects the row and column count when empty.
Has Column Header: Specifies whether the the table contains header information in the first row. Uncheck if the table does not contain header information.
Convert to JSON: Converts the table into a JSON format. The above example would be converted into this:
[{"Valid":0,"Position":1,"Score":1.1},{"Valid":1,"Position":2,"Score":2.2},{"Valid":false,"Position":3,"Score":3.3},{"Valid":true,"Position":4,"Score":4.4}]
Create a Table parameter and check the flag Match Linked Header Columns in order to match the column header names of the file with the column names of the scripting table. Otherwise, the columns are matched in order. Check the option Match Linked Data Rows to match the number of rows of the data sheet with the number of rows in the script table. Check the Match Linked Data Columns flag to create automatically the columns as they are in the excel sheet. This will not work when Match Header Columns is enabled. Specify the same DataMap key that has been previously specified in the File Parameter in Linked Data Key.
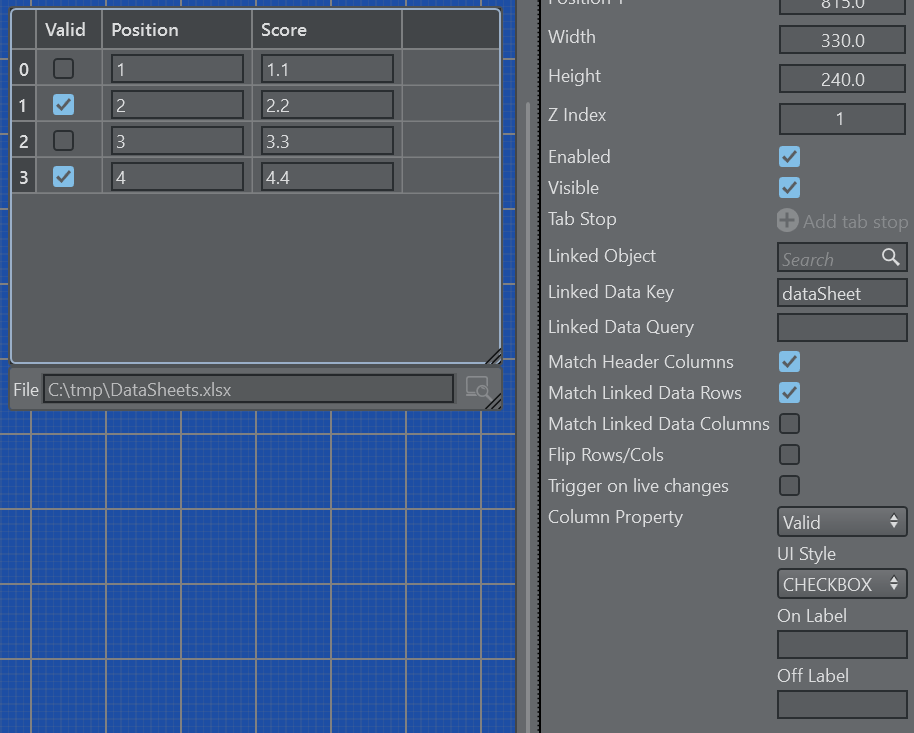
When you choose to convert the table into a JSON, you can use the Linked Data Query e.g. for a DropDown component to populate those elements with a column of a table:
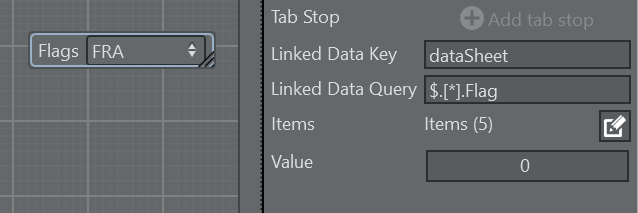
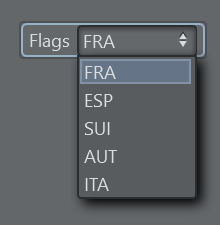
Using a query like $.[*].Flag as Linked Data Query populates the DropDown with a list of Flags specified in the Excel sheet.
On the DataMap an additional key is generated with a postfix _LASTUPDATED containing a Date and Time string indicating the time when the data has been last read.

The date string can be easily converted to a Date object within a Javascript script:
let dt = new Date(GetData("dataSheet_LASTUPDATED")) // create a date objectConsole.WriteLine("updated sheet at: " + dt.getHours() + ":" + dt.getMinutes() + ":" + dt.getSeconds() )