In this section you can find short examples of how to use the scripting functionality.
Fields
Setting Default Values on Data Element Creation
vizrt.onCreate = () => { vizrt.fields.$headline.value = "Enter headline" vizrt.fields.$showLogo.value = true vizrt.fields.$headline.decoration.maxlength = 60}Conditionally Hide Fields based on a Boolean
vizrt.fields.$showSubtitle.onChanged = show => { vizrt.fields.$subTitle.hidden = !show}Accessing Tables
The following example shows how to populate a list or table of Formula 1 drivers when the user clicks a button named "fetch".
// Drivers list, usually fetched from an external resourceconst drivers = [ { name: "Lewis Hamilton", wins: "105" }, { name: "Michael Schumacher", wins: "91" }, { name: "Max Verstappen", wins: "68" }, { name: "Sebastian Vettel", wins: "53" }, { name: "Alain Prost", wins: "51" }, { name: "Ayrton Senna", wins: "41" }, { name: "Fernando Alonso", wins: "32" }];// Helper: extract last name, lowercase, and add .jpgfunction getImageFileName(name: string): string { const parts = name.trim().split(" "); const lastName = parts[parts.length - 1].toLowerCase(); return `${lastName}.jpg`;}vizrt.onClick = (name: string) => { if (name === "fetch") { // Reference to the list/table field in the payload const list = vizrt.fields.$list.value; // Base path for image assets const baseUrl = "http://myserver.com/imageshare/"; // Iterate and populate the rows drivers.forEach((driver, i) => { if (!list[i]) return; // Safety if fewer rows exist const imageFile = getImageFileName(driver.name); list[i].$name.value = driver.name; list[i].$number.value = driver.wins; list[i].$image.value = createImageAsset(baseUrl + imageFile); }); }};Dynamic Drop-down and ControlOMO
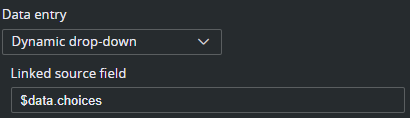
This example shows how to fill a dynamic drop-down (a drop-down that can change run-time) with options, controlling a ControlOMO field in the template.
const select = [ { label: "Image and text", value: 0 }, { label: "Text", value: 1 }, { label: "Bullets", value: 2 }, { label: "Image and bullets", value: 9.0 }];vizrt.$data["choices"] = JSON.stringify(select)In the template, Data Entry for the ControlOMO field must be set to Dynamic drop-down and the Linked source field should be $data.choices.
React to Field Changes and Update other Fields
This example shows how to listen to user input (onChanged) and programmatically modify other fields, including dynamically controlling visibility via the hidden property.
// React when the user edits the headline fieldvizrt.fields.$headline.onChanged = value => { // Automatically update another field vizrt.fields.$slug.value = value?.toUpperCase() ?? "" // Show/hide a field based on input vizrt.fields.$subtitle.hidden = !value}Note: Field names that contain dashes (-) cannot be accessed using dot notation in TypeScript. Instead, use bracket notation: vizrt.fields["$01-week"].
When defining new fields, it is recommended to use camelCase or underscores (for example, 01thisIsMyField or 01_week). This allows the fields to be accessed using standard dot notation, which is more concise and readable.
Validate Before Save
vizrt.onBeforeSave = () => { const headline = vizrt.fields.$headline.value if (!headline || headline.trim().length === 0) { vizrt.fields.$headline.error = "Headline cannot be empty" app.notify("error", "Please fill in the headline before saving.") return false } vizrt.fields.$headline.error = "" return true}Control Playout through MSE
const mse = app.createMseConnection("http://mse-server:8580")vizrt.onClick = name => { const target = { profile: "STUDIO_A", channel: "GFX", layer: "MAIN" as const } switch (name) { case "take": mse.take(target) break case "update": mse.update(target) break case "out": mse.out(target) break }}Working with MOS Metadata
These patterns show how scripts can both consume metadata from the newsroom system and inject structured data back into the MOS item, enabling tighter integration between templates and editorial workflows.
Create MOS Metadata
This shows how to initialize MOS metadata, when a new Data Element is created, including automation-related properties, such as continueCount.
vizrt.onCreate = () => { // Standard MOS fields vizrt.$pilot.mos.slug = "BREAKING-NEWS" vizrt.$pilot.mos.description = "Breaking news lower third" // Control automation behavior vizrt.$pilot.mos.continueCount = 1 // Optional: initialize Mosart timing if (vizrt.$pilot.mos.mosart) { vizrt.$pilot.mos.mosart.inMode = "auto" vizrt.$pilot.mos.mosart.outMode = "auto" }}Read Custom MOS External Metadata (MEM) from NRCS
This example reads a custom MEM block provided by the NRCS, parses the XML payload and uses it to populate template fields.
vizrt.onLoad = () => { const schema = "http://example.com/schemas/suggested-headlines" const block = vizrt.$pilot.mos.mem.get(schema) if (!block) return try {// Example MEM block:// <mosExternalMetadata>// <mosSchema>http://example.com/schemas/suggested-headlines</mosSchema>// <mosScope>PLAYLIST</mosScope>// <mosPayload>// <headlines>// <headline>Main headline</headline>// <headline>Alternative headline</headline>// </headlines>// </mosPayload>// </mosExternalMetadata> const parser = new DOMParser() const xml = parser.parseFromString(block.payload, "application/xml") const headlines = Array.from(xml.getElementsByTagName("headline")) .map(node => node.textContent) .filter(Boolean) // Use the first suggested headline if (headlines.length > 0) { vizrt.fields.$headline.value = headlines[0]! } } catch (e) { console.error("Failed to parse MEM block", e) }}Create a Custom MOS External Metadata (MEM) Block
This example creates (or updates) a custom MEM block that can be consumed by the NRCS, or downstream systems. The payload can contain any agreed XML structure, such as playout instructions or editorial metadata.
vizrt.onAfterSave = () => { const schema = "http://example.com/schemas/graphics-instructions" const payload = ` <instructions> <take mode="auto" /> <duration seconds="10" /> <transition type="fade" /> </instructions> `.trim() vizrt.$pilot.mos.mem.set({ schema, payload, scope: "PLAYLIST", })}The resulting MOS XML is:
<mosExternalMetadata> <mosSchema>http://example.com/schemas/graphics-instructions</mosSchema> <mosScope>PLAYLIST</mosScope> <mosPayload> <instructions> <take mode="auto"/> <duration seconds="10"/> <transition type="fade"/> </instructions> </mosPayload></mosExternalMetadata>Handle Errors in Asynchronous Operations
fetch("https://api.example.com/config") .then(res => res.json()) .then(config => { vizrt.fields.$headline.value = config.defaultHeadline }) .catch(e => reportErrors(() => { throw e }, "load remote config"), )Script Unit with Click Handler
The following example demonstrates how to use a script unit to add individual click handlers for buttons in HTML fragments. The exported method onClick replaces the usual pattern with something simpler and modular.
vizrt.onClick = (name) => { switch (name) { case "BtnA": ... case "BtnB": ... }}This method allows you to register individual click handlers by name, without writing a large switch block. Each call to onClick(name, callback) stores a callback in a map and installs a global vizrt.onClick dispatcher that forwards the event to the correct callback. It also returns a dispose function so you can unregister the handler.
The unit and the usage of this module may look like this in the template:
const onClickMap: Record<string, () => void> = {}/** * A better vizrt.onClick to avoid switch statements... * It returns a dispose function when it's no longer needed * @param name the vizrt-click-name to register * @param callback The callback to call when clicked * @returns a dispose function to stop updating */export const onClick = (name: string, callback: () => void) => { onClickMap[name] = callback vizrt.onClick = (name) => onClickMap[name]?.() //console.log("from onClick") return () => delete onClickMap[name]}First add a new HTML fragment to the template and create a button with a click name:
<button vizrt-click-name="my-button">MY BUTTON</button>Then, in scripting, the handler for this button is expressed as follows:
import { onClick } from "@unit/global-onclick"const dispose = onClick("my-button", () => { app.notify("info", "The button was clicked!");});You can later call the dispose() method if you need to disconnect the click handler.
Fetch Data from REST Service
In this example, the script automatically fills the title field by fetching data from a REST endpoint. It demonstrates how to use the standard fetch API and update fields based on an external response.
vizrt.onLoad = () => { fetch("https://api.example.com/data") .then(response => response.json()) .then(data => { // Assume the response contains: { "title": "Some headline" } vizrt.fields.$title.value = data.title ?? "" }) .catch(error => { console.error("Failed to fetch title:", error) app.notify("error", "Could not load title from service") })}Accessing Views (Tabs)
Templates can expose multiple views (tabs) to organize content or configurations. From scripting, it is possible to:
Iterate over available views.
Check which view is active.
Activate a view programmatically.
React when the user changes the selected view.
Note: The special All tab is a UI concept only. It is not included in the views API and cannot be activated from scripting.
// Activate a viewvizrt.views[1].activate();// Check which view is activeconst activeView = vizrt.views.find(view => view.isActive);if (activeView) { console.log("Active view:", activeView.title);}// Listen for activationvizrt.onViewActivated((selected, old) => { if (selected === undefined) { console.log("All tab selected"); } else { console.log("Active view:", vizrt.views[selected].title); }});// Change the decorative title of a viewvizrt.views[0].title = "Overview - Q1";Working with ViewItems
Each view exposes a collection of items representing fields and UI elements (fragments/iframes). These can be inspected, repositioned and conditionally hidden at runtime to create more dynamic layouts.
A ViewItem is either:
a field item (
type: "field-item") identified by itspath, ora UI item (
type: "ui-item") identified by itsname.
All items share a common API for layout via position and setPosition().
Example: reposition and hide items
const items = vizrt.views[0].items;// Move a field item (identified by field path)const headline = items.find( item => item.type === "field-item" && item.path === "headline");headline?.setPosition({ x: 0, y: 0, width: 12, height: 2});// Hide the headline if neededif (headline) { headline.hidden = true;}// Move a UI fragment (identified by name)const fragment = items.find( item => item.type === "ui-item" && item.name === "fragment");fragment?.setPosition({ x: 6, y: 0, width: 5, height: 14});Notes
setPosition()accepts a partial rectangle, this way, you are able to only update what you need:headline?.setPosition({ y:2});Layout changes are applied in a single update per call.
Use
typeto distinguish between field items and UI items.Field items use
path, UI items usenamefor identification.hiddencan be used to programmatically show/hide items. If a field has a hidden-expression, that logic overrides thehiddenproperty.
This allows scripts to dynamically rearrange and control visibility of the UI, based on user input or context.