Note: More samples can be found at /app/templatebuilder/samples/html_panels/README.html.
- Hello World
- Connecting to the Fields
- Jump to Preview Point
- The Loaded and Created States in Initialize
- Storing Element Data
- Connecting a Custom HTML Template to a Viz Pilot Template - Advanced
- Creating a List of Functions Where You Can Bind Fields
- Redesigning Concept/Variant Fields
- Visibility and Read-Only
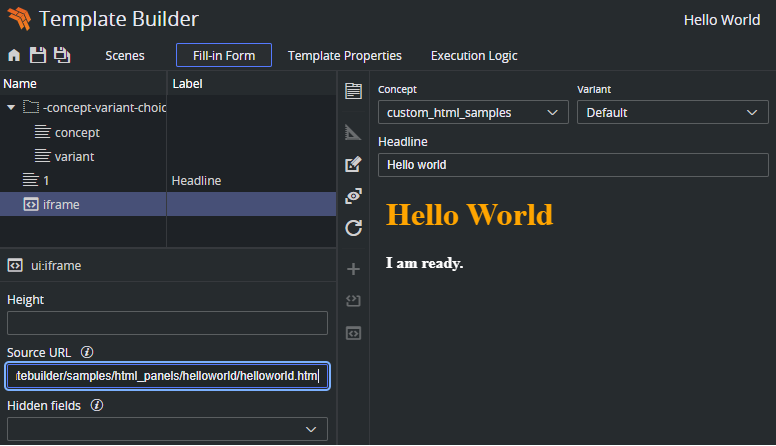
Hello World
Info: See samples/html_panels/helloworld/helloworld.html.
The example below uses a template that shows the message Hello world when opened in a browser.
<html><head> <script src="../payloadhosting.js"></script></head><body onload="vizrt.payloadhosting.initialize(callback)"> <h1 style="color: orange;">Hello World</h1> <div style="color: white;" id="hello"><div> <script> function callback(_initType, data) { document.getElementById("hello").innerHTML = "<b>I am ready.</b>"; } </script></body></html>When the HTML page is loaded, the
initializefunction is called with a given callback.When Template Builder or Viz Pilot Edge has loaded the payload and the data model is ready, the callback is called.
Connecting to the Fields
Following the example above, we can establish a two-way communication, or bind fields, between the HTML template and the opened pilot template. This provides a simple way of setting up a binding field. Add a new field to the template:
Make sure your template has a field called “1”, that is, right-click in the HTML panel field, choose Add field before/after and select Single-line text.
Assign the ID 1.
This <div> must be added to the <body> block:
<div> <label style="color: orange;" for="field_1">My input field:</label> <input name="field_1" type="text" id="field_1"></div>Saving the HTML file and clicking Refresh HTML panels reloads the custom HTML template with the changes just made. A bi-directional connection between the custom template and pilot template has now been established. If you now type inside either the template or the field with ID 1, both fields are updated at the same time.
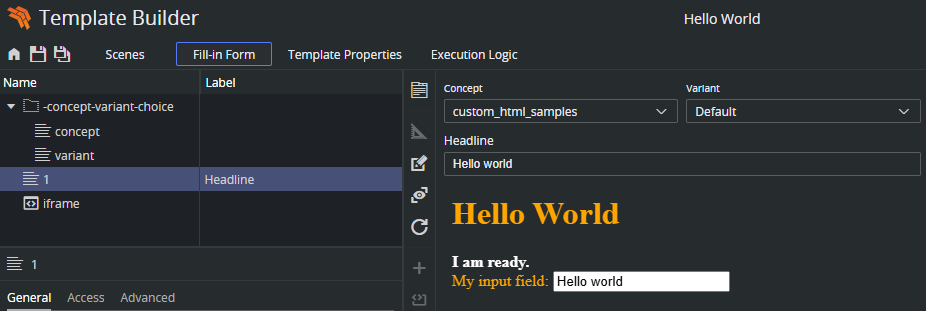
Note: This way of binding fields works for any HTML fields that have value support, typically <input> types and <textarea>.
The JavaScript file automatically seeks input elements in the HTML that match the ID of fields inside the template. Adding the id="field_1" to the <input> element inside the HTML template is all that is needed for the two-way communication to be set up since a field with ID 50 was added above. An unlimited number of these binding fields can be established in the exact same way, since they are mapped via ID.
Tip: Use the Hidden fields setting inside the HTML panel settings to prevent two editors for the same field being visible at the same time.
Jump to Preview Point
Info: See samples/html_panels/jump_preview/jump_preview.html.
From custom HTML panels and full HTML templates, it is possible to force the preview to refresh by jumping to a given preview point. In payloadhosting.js this is done by the method:
vizrt.payloadhosting.jumpToPreviewPoint(preview)The preview parameter is a string with the name of the stop point or tag in the scene. Usually, the default preview point is called “pilot1”, and if an empty string is given to the function, preview jumps to this point.
The Loaded and Created States in Initialize
When setting up the connection between the custom HTML template and Viz Pilot Edge, the vizrt.payloadhosting.initialize() method needs to be called. In the callback function given in the parameter to this method, the payload is loaded ready to be accessed by custom HTML scripting. It is useful to know whether the recently opened payload is a newly created data element, or a reopened data element. This is given in the state parameter given to the callback. This is an example of the usage of initialize states:
<html><body onload="vizrt.payloadhosting.initialize(callback)"> <script src="./payloadhosting.js"></script> <pre id="logs"></pre> <script> function callback(state, elementData) { document.querySelector("#logs").innerText += "Payload ready: " + state } </script></body></html>In Template Builder the state is undefined as these events/states do not apply to templates in Template Builder, they only apply to payloads of data elements.
In Viz Pilot Edge, the state is created for newly created data elements, and loaded for re-opened data elements.
Storing Element Data
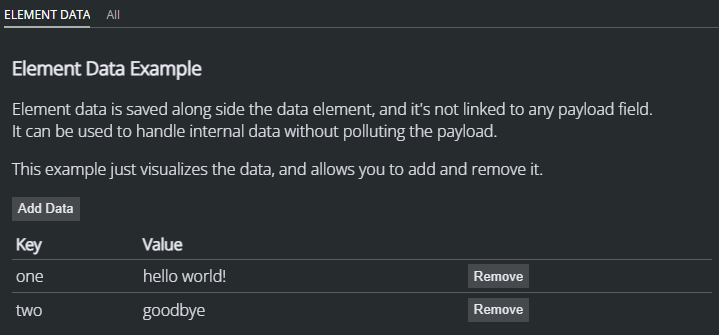
Info: See /samples/html_panels/element_data/element_data.html.
Occasionally, custom HTML templates need to store auxiliary data that should remain private to the data element and not be included in the payload itself. This might involve UI states that need to be reinstated when the data element is reopened. This data is not sent to the preview server or the playout system.
A special associated data object is stored in the database, alongside the data element and can be accessed using the initialize callback:
<html><body onload="vizrt.payloadhosting.initialize(callback)"> <script src="./payloadhosting.js"></script> <pre id="logs"></pre> <script> function callback(state, elementData) { document.querySelector("#logs").innerText += "My custom data: " + elementData.mykey } </script></body></html>The elementData parameter is a standard JavaScript object with string properties used as key-value pairs. This allows flexible storage and retrieval of custom data tied to the data element.
Setting Element Data
To assign values to this data object, use the following method:
vizrt.payloadhosting.setElementData("mykey", "myvalue")Connecting a Custom HTML Template to a Viz Pilot Template - Advanced
The example below goes into more detail than Connecting a Custom HTML Template to a Viz Pilot Template, and uses more scripting, to give you 100% control over the template. The three files mentioned in the Setup a Simple Custom HTML Template example are also used here.
Creating a List of Functions Where You Can Bind Fields
By adding the following above the document.ready() function in the customTemplate_sample.js file:
// Will be called when the field with id "50" changesfunction on50Changed(value) { }And the following inside the $(document).ready function:
var pl = vizrt.payloadhosting;pl.initialize();pl.setFieldValueCallbacks({ "50": on50Changed });You set up a way for a custom JavaScript function to be called upon detecting a change. When field_50 receives a change from the host, the function is called with its new value as a parameter.
Some changes are made to the HTML file below to demonstrate that we can use custom HTML/JavaScript to do something with these values.
Inside the HTML file, the entire body is replaced with:
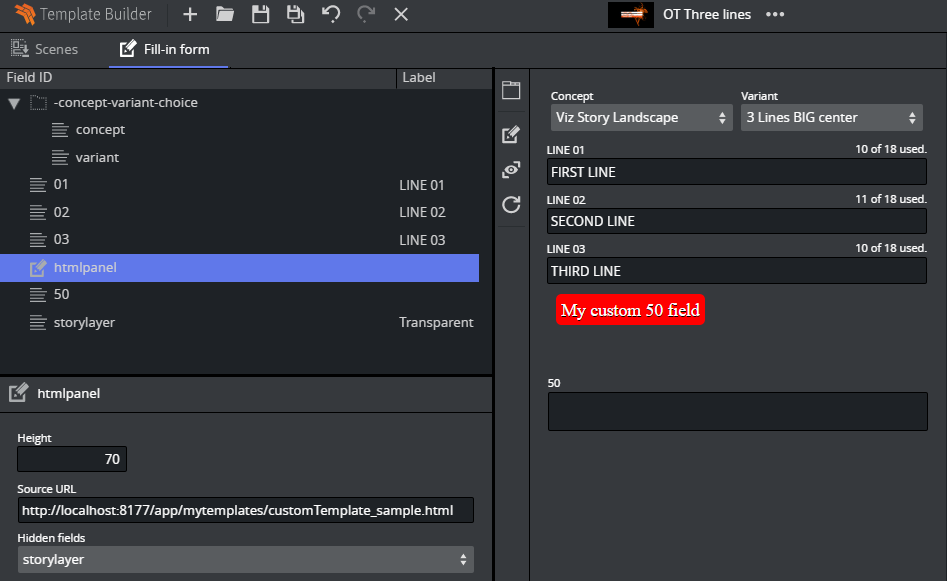
<body> <span id="myfield" class="sample red">My custom 50 field</body>To add some CSS to style the text, add the style tag after the closing </head> tag and before the <body> tag:
<style> .sample { padding:5px; color:white; border-radius:5px; text-shadow:0 1px 0 black; background:red; } .green { background:green; }</style>This provides the following output in Template Builder:
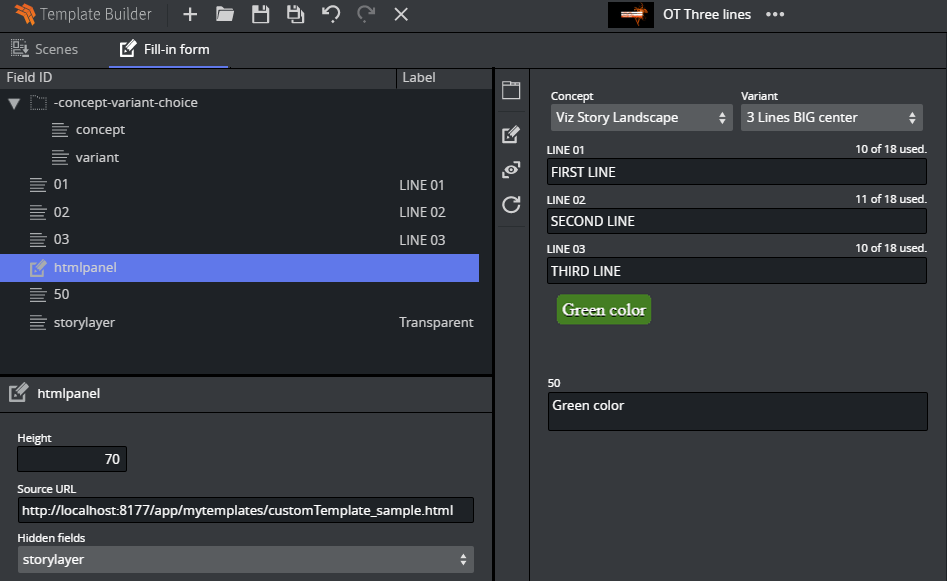
Adding a bit more custom logic, making the background color green when there is a text value that is longer than five or shorter than 20 characters. The function is expanded by adding the following function:
function on50Changed(value) { var myField = $("#myfield"); myField.text(value); if (value.length > 5 && value.length < 20) { myField.addClass("green"); } else { myField.removeClass("green"); }}After refreshing the HTML panel, the background color should change to green dynamically when typing.
Redesigning Concept/Variant Fields
This example shows how to present the concepts and variants in a template in a different way.
The full HTML / JavaScript code is available at http://<pilotdataserverhost>:8177/app/templatebuilder/samples/html_panels/concept_variant.
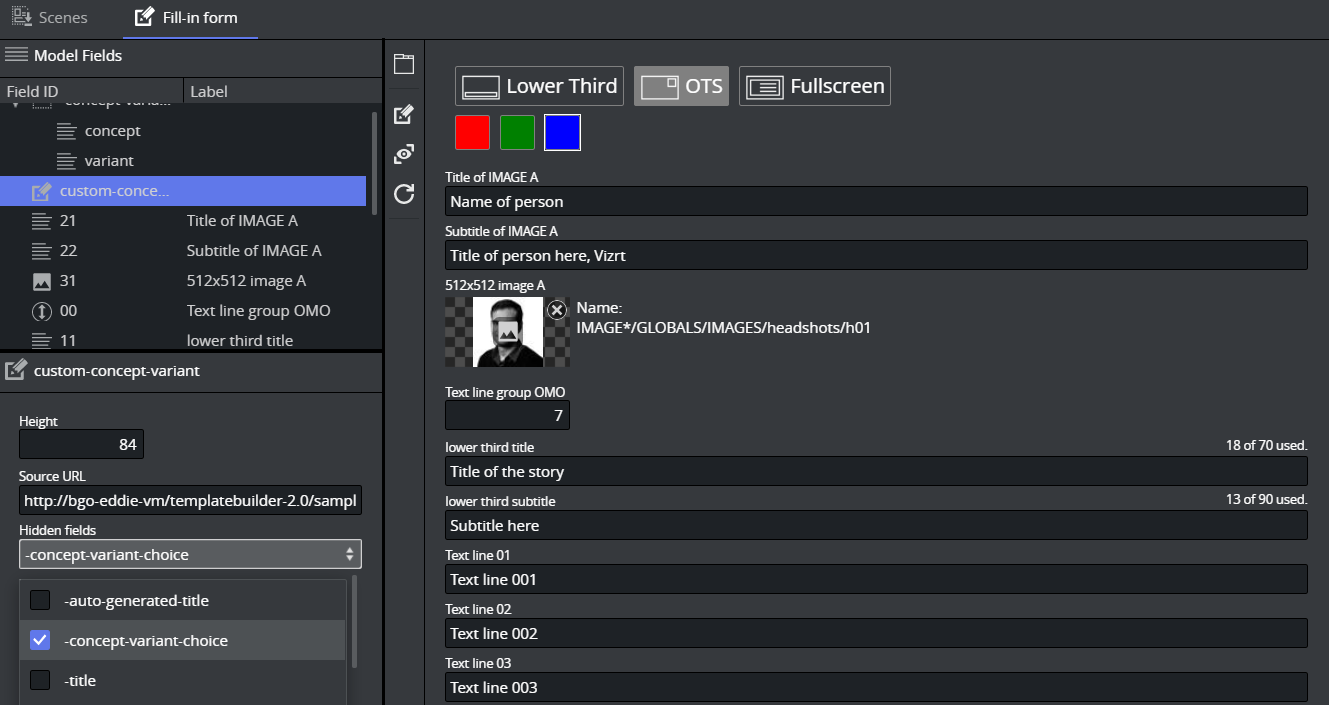
Consider a template with concepts Fullscreen, Lower Third, OTS and variants Red, Green, Blue available as drop-down lists in the Fill In Form:

The field -concept-variant-choice actually contains 2 subfields, concept and variant.
You can access their value using slash "/" to navigate in the list. For example, to access the concept use -concept-variant-choice/concept.
By setting up the HTML panel hosted at http://<pilotdataserverhost>:8177/app/templatebuilder/samples/html_panels/concept_variant, the concepts and variants are now presented as buttons.
This example has mutual binding support for both concept and variant. Clicking on the new buttons updates the original drop-downs and vice versa:

The drop-down lists are no longer needed and can be set as a Hidden field in the HTML panel properties window:
Visibility and Read-Only
It is possible to dynamically set visibility and read-only attributes, so you can filter the auto-generated form based on the custom HTML template. In the following example, the 31 image field should only be visible when the Fullscreen or OTS concept is active:
Note: Visibility and read-only properties of fields can also be controlled from the Read-only and Hidden-expressions in the field properties.

In the JavaScript used in the example, there is a function called updateActiveConcept which is called when the concept changes.
Adding the following line inside the updateActiveConcept method block, it checks which concept is chosen. If it isn't Lower Third, it displays the field with ID 31 in the Fill In Form:
pl.setFieldVisibility("31", conceptValue != "Lower Third");If you now click on the Lower Third, the image field with ID 31 disappears, but is displayed if the OTS or Fullscreen concept is selected.
Sub Fields
Sub fields can be addressed by using a " / ", which is read as field/subfield.
When using duplets or triplets, the example below shows how you are able to control the value of image_scaling by using 1/image_scaling.
vizrt.payloadhosting.setFieldText("1/image_scaling", "1 2 3") A fieldPath is a string that describes the location of a field in the payload.
Top-level field:
"myList"(ifmyListis a list field).Nested field:
"container/myList"(ifmyListis insidecontainer).List item reference:
"myList/#0"(first item inmyList).Field inside a list item:
"myList/#2/name"(thenamefield inside the third item ofmyList).