This page provides help for troubleshooting the following scenarios:
- Unable to Connect to GH ImEx Agent Service
- Cluster Configuration Report Errors
- Status Box Displays an Error
- Status Box Displays a Warning
- Media Staging Status Shows an Error
- Media Staging Status Shows a Warning
- Known Limitations, Problems and Workarounds
- ImEx Agent behind HTTPS Reverse Proxy
- Limitations
- Prerequisites
- Step 1: Generate or Convert the TLS Certificate
- Step 2: Install Caddy with replace-response Module
- Step 3: Create the Caddyfile
- Step 4: Test Caddy Configuration
- Step 5: Register Caddy as a Windows Service
- Step 6: Open the Firewall Port
- Step 7: Verify the Setup
- Troubleshooting
- Uninstalling
- See Also
- ImEx Agent behind HTTPS Reverse Proxy
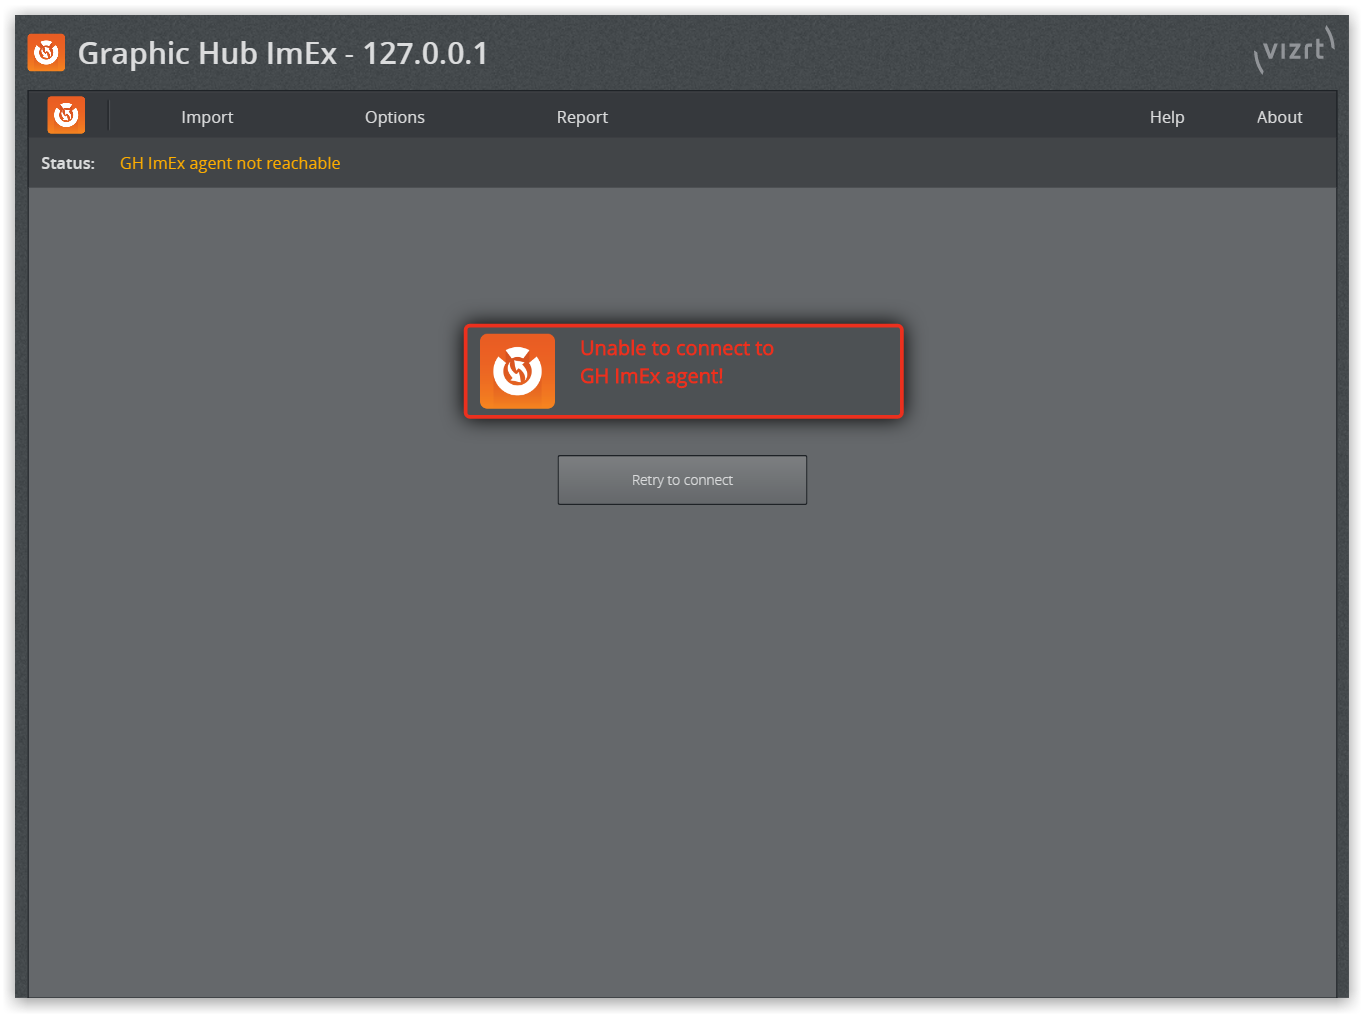
Unable to Connect to GH ImEx Agent Service
This indicates that the GH ImEx Agent HTTP server is not accessible or that the service is not running.
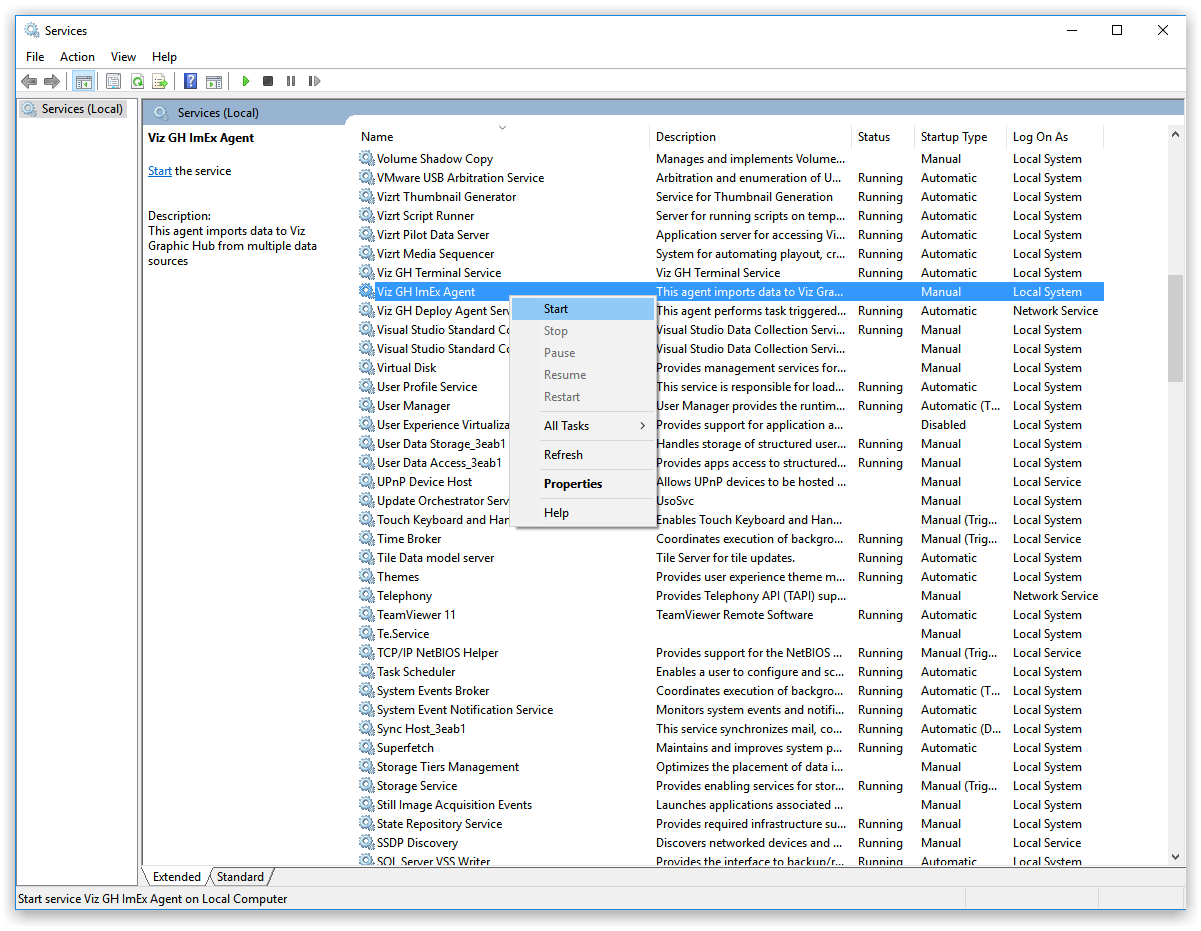
Press WINDOWS + R.
A Run window opens in the bottom left corner.
Enter
services.mscand click OK. An overview of services opens.Check whether the Viz GH ImEx Agent service is in Running status.
If the service is not running, right click the Viz GH ImEx Agent service and select Start or Restart .
In the ImEx Agent web interface, click Retry to connect or refresh the page in the browser.
Cluster Configuration Report Errors
Check Graphic Hub REST and ImEx configuration. Change to use Hostnames instead of IP Addresses.
When configuring, the Cluster has to be running and Main and Replication have to be reachable from GH REST Host and ImEx Host.
When either the Main or Replication server in a cluster is down, the UI reports an error even if ImEx is importing just fine. Make sure the cluster is running properly!
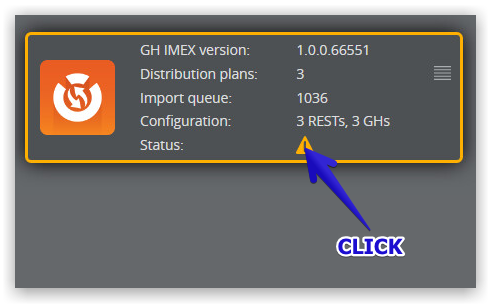
Status Box Displays an Error
Click on the error icon to get forwarded the page where you can investigate the error.

In this example, we are taken to the GH REST hosts overview page. Hover the mouse over the error to display more information, for example, Request failed: Status='502'.
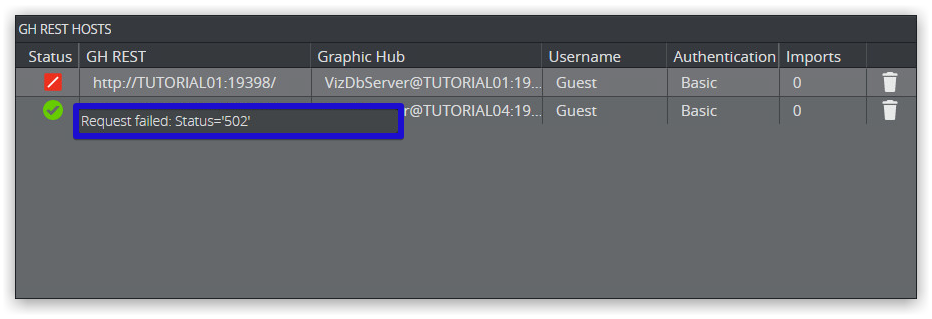
The status code 502 Bad Gateway is returned because the Graphic Hub or REST host used in a Distribution plan is either not running or reachable.
Status Box Displays a Warning
Click on the warning icon to get forwarded the page where you can investigate the warning.
In this example we are taken to the GH REST hosts overview page. Hover the mouse over the error to display more information, for example, GH-Rest not reachable.
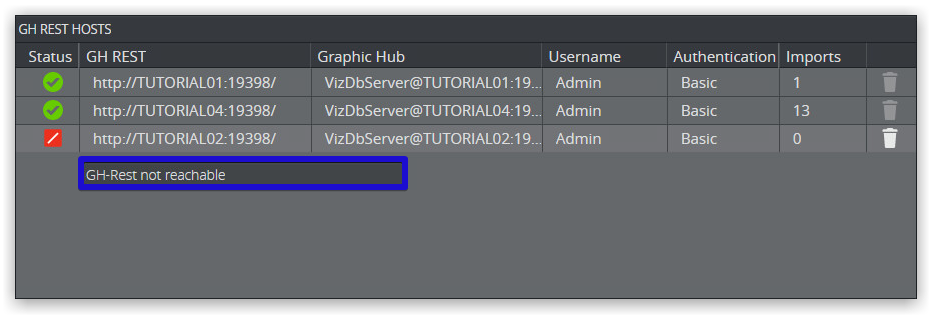
Note: ImEx displays a warning although GH REST is not reachable. This is proper behavior, because the given host (here, http://TUTORIAL02:19398) is not referenced by any import jobs, as you can tell from the enabled trash can icon.
Media Staging Status Shows an Error
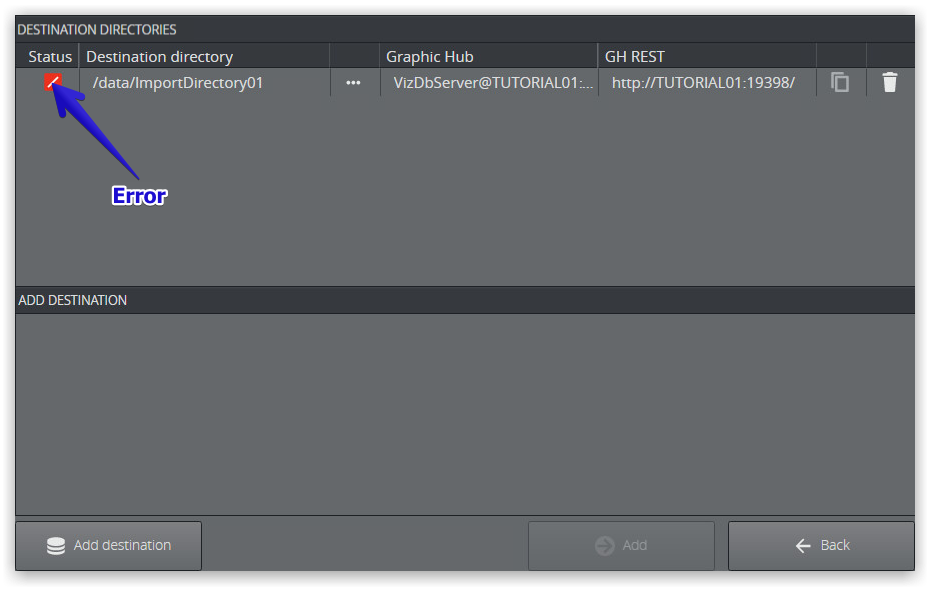
Hover over the error icon to get further information:
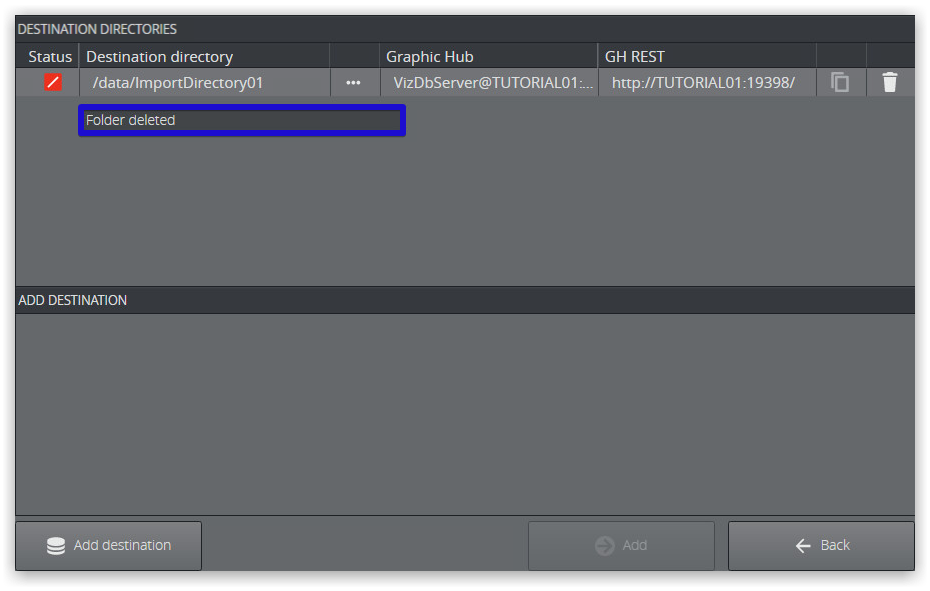
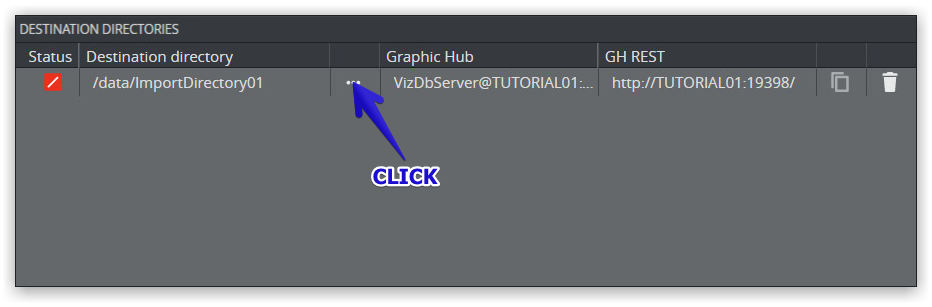
In this example, the destination directory /data/ImportDirectory01 has been deleted. To resolve the error, select an existing folder by clicking the browse (...) icon.
Selecting an existing folder/project resolves the error:

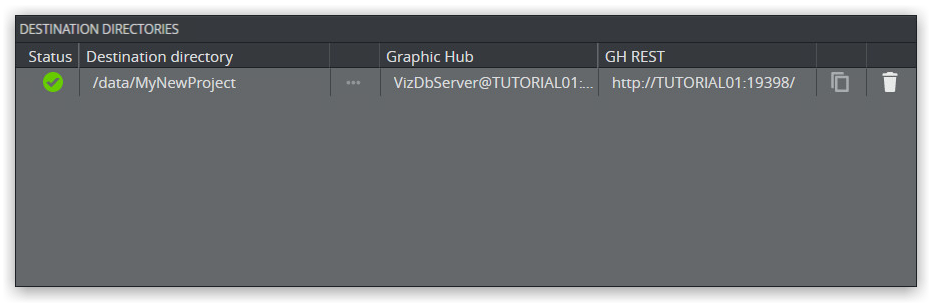
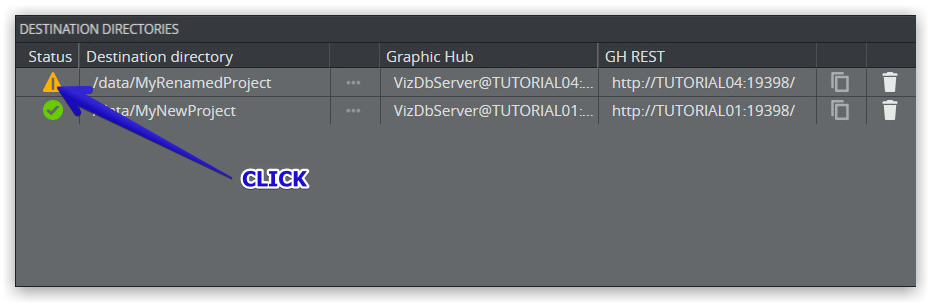
Media Staging Status Shows a Warning
Hover over the warning icon to get further information:

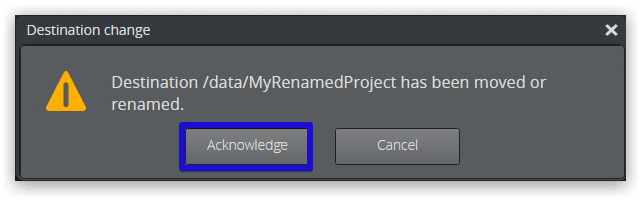
In this example, the current folder has been renamed.
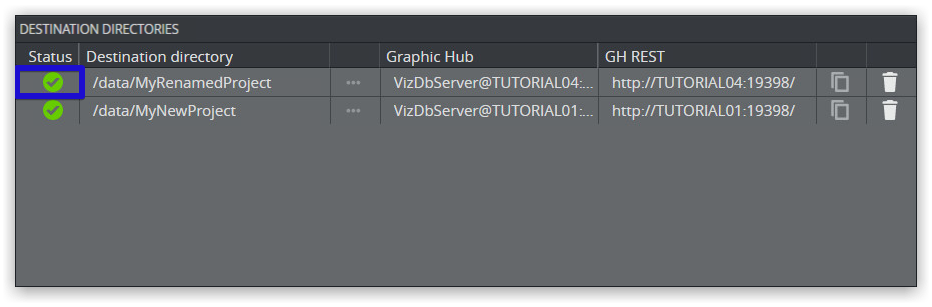
To remove the warning, click the warning icon and Acknowledge to remove the warning.
Known Limitations, Problems and Workarounds
ImEx Agent behind HTTPS Reverse Proxy
The Graphic Hub ImEx Agent does not support HTTPS natively. All URLs returned by the agent (service document, RESTVOS feeds, Image Library API) use http:// regardless of how clients connect. This means that when a client connects over HTTPS through a reverse proxy, the links in the responses still point to http://, which causes mixed content warnings or broken functionality.
This section describes how to set up Caddy as a TLS-terminating reverse proxy in front of the ImEx Agent on Windows. The setup rewrites the http:// links in API responses to https:// so that clients receive correct URLs.
Limitations
This workaround only supports root-mounted deployments. Subpath hosting (for example, https://server/imex/) is not possible because the Image Library frontend uses absolute paths starting with /imagelibrary/.
The Caddy
replace-responsemodule performs string replacement in response bodies. It does not modify response headers or redirect targets. Absolute redirects from the ImEx Agent (for example, the service document root redirect) are also rewritten because they contain the matched string in the response body.The Image Library WebSocket connection works without extra configuration because it uses the browser's
window.location.origin, which already points to the HTTPS address.
Prerequisites
Graphic Hub ImEx Agent installed and running on its default port (
19390).A TLS certificate and private key in PEM format for the server's FQDN.
OpenSSL for Windows (required for certificate format conversion). Download from https://slproweb.com/products/Win32OpenSSL.html
Step 1: Generate or Convert the TLS Certificate
Caddy requires PEM files: a certificate file and an unencrypted private key file.
Option A: Request a Certificate from your Enterprise CA
If a corporate Certificate Authority is available (for example, Active Directory Certificate Services), request a certificate for the server's FQDN through your standard process. The certificate must include the FQDN as the Subject or as a Subject Alternative Name (SAN).
Export the certificate as a .pfx file, then convert it to .pem format for Caddy:
openssl pkcs12 -in myserver.pfx -nokeys -out myserver-servercert.pem -passin pass:YOURPASSWORDopenssl pkcs12 -in myserver.pfx -nocerts -out myserver-serverkey.pem -passin pass:YOURPASSWORD -nodesThe -nodes flag exports the key without encryption, which Caddy requires.
On Windows with Active Directory Certificate Services, you can also request directly via PowerShell (run as Administrator):
$fqdn = "myserver.example.com"$cert = Get-Certificate -Template "WebServer" -SubjectName "CN=$fqdn" -DnsName $fqdn -CertStoreLocation Cert:\LocalMachine\My$pw = ConvertTo-SecureString -String "TempExportPassword" -Force -AsPlainTextExport-PfxCertificate -Cert $cert.Certificate -FilePath "$fqdn.pfx" -Password $pwRemove-Item -Path "Cert:\LocalMachine\My\$($cert.Certificate.Thumbprint)" -ForceThen convert the .pfx file to .pem as shown above.
Option B: Generate a Self-signed Certificate (testing only)
For testing without a CA, use OpenSSL to create a self-signed certificate:
openssl req -x509 -newkey rsa:4096 -keyout myserver-serverkey.pem -out myserver-servercert.pem -days 365 -nodes -subj "/CN=myserver.example.com"The -nodes flag creates an unencrypted private key. Replace myserver.example.com with the server's FQDN.
To include Subject Alternative Names (for example, for multiple hostnames):
openssl req -x509 -newkey rsa:4096 -keyout myserver-serverkey.pem -out myserver-servercert.pem -days 365 -nodes -subj "/CN=myserver.example.com" -addext "subjectAltName=DNS:myserver.example.com,DNS:myserver-alias.example.com"Warning: Self-signed certificates cause browser security warnings and should not be used in production.
Option C: Convert an Existing PFX to Caddy Format
If you already have a .pfx certificate from another source:
openssl pkcs12 -in myserver.pfx -nokeys -out myserver-servercert.pem -passin pass:YOURPASSWORDopenssl pkcs12 -in myserver.pfx -nocerts -out myserver-serverkey.pem -passin pass:YOURPASSWORD -nodesIf prompted for the PFX password interactively, omit the -passin pass:... option.
This produces two files:
File | Purpose |
|---|---|
myserver-servercert.pem | Certificate for Caddy |
myserver-serverkey.pem | Private key (unencrypted) for Caddy |
Verify the Certificate
openssl x509 -in myserver-servercert.pem -noout -subject -dates -ext subjectAltNameThis shows the subject, validity period, and SANs. Verify that the subject or SAN matches the FQDN used in the Caddyfile.
Step 2: Install Caddy with replace-response Module
Caddy does not include the replace-response module by default. Download a custom build:
Select your platform (Windows amd64).
Under "Add Packages", search for and add:
github.com/caddyserver/replace-response.Download the custom build.
Create the directory (for example, D:\caddy) and place caddy.exe there.
Copy the certificate files to D:\caddy:
myserver-servercert.pem
myserver-serverkey.pem
Step 3: Create the Caddyfile
Create D:\caddy\Caddyfile with the following content. Replace myserver.example.com with the server's FQDN and adjust the port numbers if needed.
{ auto_https off order replace after reverse_proxy}myserver.example.com:19290 { tls D:\caddy\myserver-servercert.pem D:\caddy\myserver-serverkey.pem reverse_proxy localhost:19390 { header_up Host {host} header_down Location "http://myserver.example.com" "https://myserver.example.com:19290" } replace { "http://myserver.example.com" "https://myserver.example.com:19290" }}How this works:
auto_https offdisables Caddy's automatic certificate management (we provide our own certificate).order replace after reverse_proxyensures body replacement runs after the response is received from the ImEx Agent.tlspoints to the PEM certificate and key files.header_up Host {host}passes only the hostname (without port) to the ImEx Agent. This causes the agent to generate URLs like http://myserver.example.com/... (without port number).header_downperforms a search-and-replace on theLocationresponse header sent by the backend, ensuring that any redirects are updated from the internal HTTP URL to the public-facing HTTPS address and port.replacerewrites every occurrence of http://myserver.example.com in the response body to https://myserver.example.com:19290. Because the hostname pattern does not appear in the Image Library's JavaScript or CSS files, only the API responses (XML feeds, service document) are affected.The ImEx Agent does not compress HTTP responses, so body replacement always works without disabling compression.
Step 4: Test Caddy Configuration
Test the configuration before registering it as a service:
D:\caddy\caddy.exe run --config D:\caddy\CaddyfileIn a browser, open https://myserver.example.com:19290/. You should see the ImEx Agent service document with all links using https://. Open https://myserver.example.com:19290/imagelibrary/index.html to verify the Image Library loads correctly.
Press CTRL + C to stop the test.
Step 5: Register Caddy as a Windows Service
sc.exe create caddy start= auto binPath= "D:\caddy\caddy.exe run --config D:\caddy\Caddyfile" DisplayName= "Caddy Reverse Proxy"sc.exe description caddy "TLS termination proxy for ImEx Agent"sc.exe start caddyStep 6: Open the Firewall Port
New-NetFirewallRule -DisplayName "Caddy HTTPS (ImEx)" -Direction Inbound -LocalPort 19290 -Protocol TCP -Action Allow -Profile Domain,PrivateStep 7: Verify the Setup
Check the ImEx Agent service document:
# Should return XML with https:// linksInvoke-WebRequest -Uri "https://myserver.example.com:19290/" -UseBasicParsing | Select-Object -ExpandProperty ContentCheck the Image Library:
Open https://myserver.example.com:19290/imagelibrary/index.html#/ in a browser.
Check the RESTVOS search provider:
Invoke-WebRequest -Uri "https://myserver.example.com:19290/restvos/service" -UseBasicParsing | Select-Object -ExpandProperty ContentTroubleshooting
Caddy fails to start with "address already in use": Another process is using port 19290. Check with netstat -ano | findstr 19290 and change the port in the Caddyfile.
Certificate errors in the browser: Verify the certificate subject matches the FQDN used in the URL. Test with:
openssl s_client -connect myserver.example.com:19290 -servername myserver.example.comImage Library loads but shows no content: Check the browser console (F12) for mixed content warnings. All API calls should use https://. If they still use http://, the replace rule in the Caddyfile may not match the hostname exactly. The hostname in the replace rule must match what the ImEx Agent returns, which depends on the Host header it receives.
Links in XML responses still show http://: The replace-response module may not be included in the Caddy build. Verify with D:\caddy\caddy.exe list-modules | findstr replace.
Service document root (/) returns a redirect loop: The ImEx Agent returns a 302 redirect with an absolute URL when / is accessed with Accept: text/html. This redirect URL is rewritten by the replace rule and should work correctly. If it loops, verify that the FQDN in the replace rule matches exactly.
Uninstalling
sc.exe stop caddysc.exe delete caddyRemove-NetFirewallRule -DisplayName "Caddy HTTPS (ImEx)"See Also
SSL in REST TLS configuration for Graphic Hub REST
Caddy replace-response module: https://caddyserver.com/download?package=github.com%2Fcaddyserver%2Freplace-response
OpenSSL for Windows: https://slproweb.com/products/Win32OpenSSL.html