The Media Sequencer Configuration window is used to enable the Director to connect to other devices; for example, a newsroom integration with connections to Viz Gateway, a connection to the Viz Pilot database, a GPI configuration of a GPI card on the Media Sequencer, etc.
To open the Media Sequencer Configuration window in Director, go to Main menu > Tools > Media Sequencer Configuration.
This section contains the following topics:
Database Tab
Main menu > Tools > Media Sequencer Configuration > Database
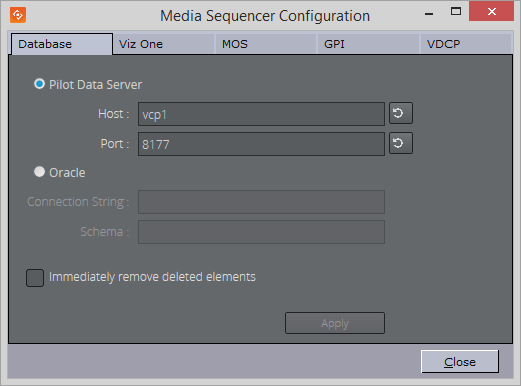
The Database tab sets the database connection for the Media Sequencer. If it was added during Viz Pilot System Installation, the information is made available in this window. However, it must still be manually applied.
Media Sequencer Configuration
In Media Sequencer 4.0 or later, the Database tab allows you to configure whether Media Sequencer will fetch data elements directly from an Oracle database or via a Pilot Data Server.
Note:
If Director is connected to a Graphic Hub, Media Sequencer must connect to a Pilot Data Server that is connected to the same Graphic Hub as Director.
If Director is connected to an Oracle database, Media Sequencer must connect to the same schema on the Oracle database, or connect to a Pilot Data Server that is connected to the same schema.
Properties and Parameters
Pilot Data Server: Connect to the database through a Pilot Data Server. Enter the hostname and port of the Pilot Data Server.
Oracle: Connect to an Oracle database directly.
Connection String: The connection string for Oracle, for example
pilot/pilot@<hostname>/<SID>.Schema: The name of the Oracle schema, for example
PILOT.
Immediately remove deleted elements: Elements that are deleted from the database will be removed from Media Sequencer.
Applying the Viz Pilot Database Settings
Select the Media Sequencer Configuration option from the Tools menu.
Select the Database tab, and enter the database settings.
Click Apply.
Viz One Tab
Main menu > Tools > Media Sequencer Configuration > Viz One
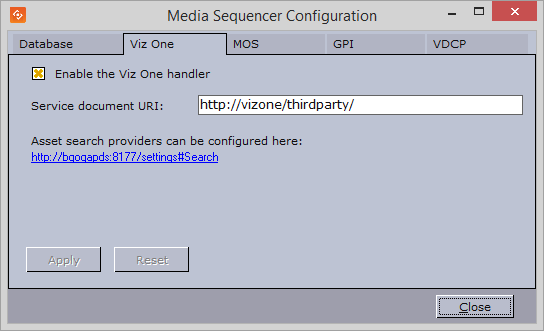
The Viz One tab sets the Viz One connection for Media Sequencer. The Viz One connection enables Media Sequencer to request transfer of media to Viz Engine for playout.
Note: Director and Viz Pilot News get their Viz One connection parameters from the Viz Pilot database.
Properties and Parameters
Enable the Viz One handler: Enables Media Sequencer to handle Viz One transfer requests.
Service document URI: Sets the service document URI which describes the services the search will provide.
Applying Viz One settings
Select the Media Sequencer Configuration option from the Tools menu.
Select the Viz One tab.
Click the asset search provider link.
From the web page (under Search Providers) copy the relevant asset search provider URL and paste it into the Service document URI field in the Viz One tab.
Click Apply.
Working with Viz One
Viz Pilot can connect to media providers and repositories that support the Pilot Data Server REST API, like Viz One.
Connecting to Viz One
Install and configure your media provider (for example Viz One).
Install and configure your Pilot Data Server by configuring Viz One as a search provider (see To configure search providers (Viz One)). See the Pilot Data Server documentation.
Configure Director’s Viz One Tab connection in order for Media Sequencer to request transfer of video files from Viz One to your configured Viz Engine for playout.
Configure your Viz Engine to enable transfer of video files over FTP from Viz One to Viz Engine for playout.
Configure your Director’s output channels in order to playout video clips from the Viz Engine storage points where Viz One files are sent for playout (see Profile Configuration).
If you're using Viz Engine to preview video clips from Viz One locally, you must also install Video Codecs (for example MPEG-4 codec and Haali Media Splitter).
MOS Tab
Main menu > Tools > Media Sequencer Configuration > MOS
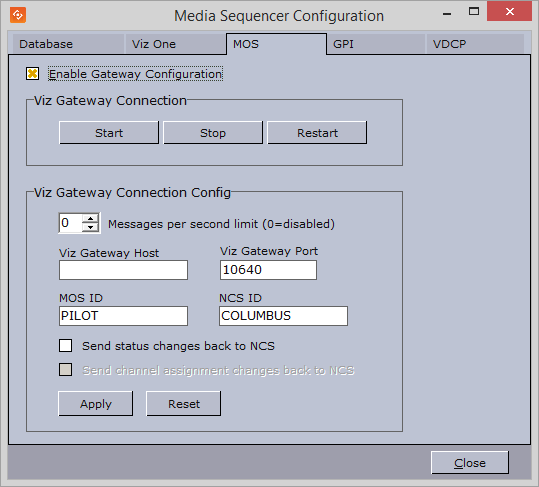
The MOS tab enables Media Sequencer to connect to Viz Gateway. If configured to use Viz Gateway 1.0, the newsroom system and Viz Gateway must be pre-configured with an NCS ID and MOS ID. For connections to Viz Gateway versions 2.0 and later, only the Viz Gateway host and port number are required.
Note: MOS IDs are configured on the NCS server, and are usually case sensitive.
Properties and Parameters
Enable Gateway Configuration: When selected, enables the user to configure the Viz Gateway connection.
Viz Gateway Connection: The controls in the Viz Gateway Connection section allows a start, stop, and restart action to be performed on a Viz Gateway connection.
Start: Starts a connection to Viz Gateway.
Stop: Closes a connection to Viz Gateway.
Restart: Restarts a connection to Viz Gateway.
Viz Gateway Connection Config: Define Viz Gateway connection settings.
Messages per second limit (0=disabled): Sets how many messages per second should be sent from Viz Gateway to the NCS. This is done to prevent flooding of the NCS. 0 disables the message throttling allowing unlimited messages per second.
Viz Gateway Host: IP address of the Viz Gateway host.
Viz Gateway Port: Connection port for the Viz Gateway.
MOS ID: ID of the connecting MOS device.
NCS ID: ID of the Newsroom Control System (NCS).
Send status changes back to NCS: Sends new status changes to the NCS.
Send channel assignment changes back to NCS: Sends changes to the NCS.
IMPORTANT! A database connection must be established in order for the MOS integration to work. See how Media Sequencer Configuration#To apply the Viz Pilot Database settings for details.
Configuring a Viz Gateway Connection
Start Director.
Select Profile Configuration from the Tools menu (see Profile Configuration).
Click the MOS tab, and enter the appropriate settings collected from the newsroom system and the Viz Gateway host.
Click OK and check that the status indicator (G) appears in the lower right of Director’s status bar.
Click the Playlists button in the Resource Panel, and check that MOS Playlists are added to the list of available playlists.
General Purpose Input (GPI Tab)
Main menu > Tools > Media Sequencer Configuration > GPI
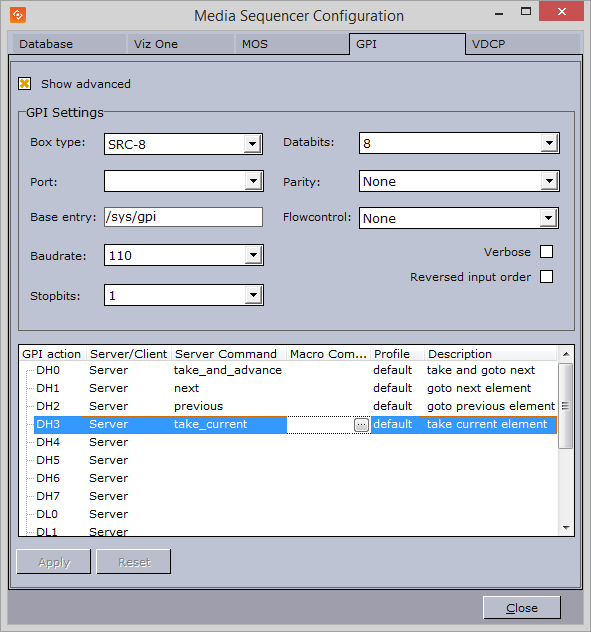
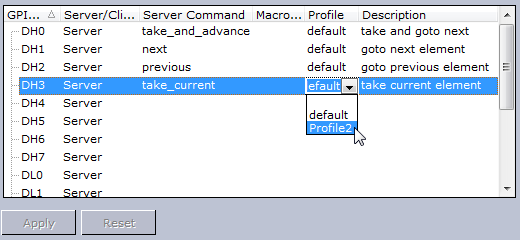
The GPI tab allows Media Sequencer to be configured to handle GPI commands. The commands can be handled by Media Sequencer itself (Server Command) or forwarded to Director (Macro Command).
Both server and client side commands are profile specific, meaning that the profile determines which Director client and potentially which Viz Engine(s) execute a client and/or server command. It is therefore very important to assign the correct profile for each GPI action as they refer to unique profiles configured per Director client.
For example, if a Director has its own profile with two Viz Engines (program and preview) and receives a client command from a GPI on Media Sequencer, the command executes some logic on Director that issues commands to the program renderer. If the correct profile is not set, such commands might end up on the wrong Director and potentially on the wrong program renderer. The same would happen if the GPI action was defined as a server command; however, it would then trigger commands from the Media Sequencer to the Viz directly and not through Director.
This section contains the following topics:
Properties and Parameters
Show advanced: Displays all the settings in the GPI tab.
Box Type: Select the type of GPI box that is being configured. The Box Type can be set to SRC-8, SRC-8 III or SeaLevel.
Port: Sets the port that the GPI box is connected to. The Port can be set to COM1-COM17, or None.
Base Entry: This is the node in the Media Sequencer’s data structure where the systems look for the GPI actions. The base entry is by default set to /sys/gpi.
Baudrate: Sets the maximum rate of bits per second (bps) that you want data to be transmitted through this port. The Baudrate can be set to 110-921600. It is recommended to use the highest rate that is supported by the computer or device that is being used.
Stopbits: Sets the interval (bps) for when characters should be transmitted. Stopbits can be set to 1, 1.5, or 2.
Databits: Sets the number of databits that should be used for each transmitted and received character. The communicating computer or device must have the same setting. The number of databits can be set to 5, 6, 7 or 8.
Parity: Changes the type of error checking that is used for the selected port. The communicating computer or device must have the same setting. The parity can be set to:
Even: A parity bit may be added to make the number of 1’s in the data bits even. This will enable error checking.
Odd: A parity bit may be added to make the number of 1’s in the data bits odd. This will enable error checking.
None: No parity bit will be added to the data bits sent from this port. This will disable error checking.
Mark: A parity bit set to 0 will be added.
Space: A parity bit set to 1 will be added.
Flowcontrol: Changes how the flow of data is controlled. The Flowcontrol can be set to:
None: No control of dataflow.
XonXoff: Standard method of controlling the flow of data between two modems. XonXoff flowcontrol is also known as software handshaking.
Hardware: Standard method of controlling the flow of data between a computer and a serial device. Hardware flowcontrol is also known as hardware handshaking.
Verbose: If enabled, Media Sequencer’s GPI handler outputs log information. This information is useful for debugging.
Reversed Input Order: Note that this check box is only available if Box Type is set to SRC-8. If enabled, the signal line that originally triggered GPI action DL0/DH0 will now trigger GPI action DL7/DH7, the signal line that originally triggered GPI action DL1/DH1 will now trigger GPI action DL6/DH6, and so on.
Commands and actions list:
GPI action: Shows a list of the available GPI actions.
Server/Client: Shows a drop-down list box in every row. This determines whether the selected GPI action applies to Media Sequencer (Server option) or the local Director (Client option).
Note: The server and client actions are mutually exclusive.
Note: GPI actions for the Client option will only work if Director is running.
Server Command: Shows a drop-down list box in every row, where the action to be performed on this GPI line can be selected. Server commands are GPI actions that apply to the Media Sequencer. When right-clicking an item in the playlist, the Playlist menu opens. In this menu, select Cursors, and then Set Next. An arrow appears next to the selected element in the playlist, which indicates that this is the current GPI cursor. The server commands can be set to:
take_and_advance: Runs the Start operation on the current element, and then shifts to the next element in the playlist.
take_current: Runs the Start operation on the current element (the element with the cursor).
next: Shifts to the next element in the playlist.
previous: Shifts to the previous element in the playlist.
continue: Runs the Continue operation on the current element.
out_current: Runs the Take Out operation on the current element.
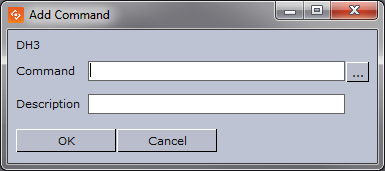
Macro Command: Macro commands are silent GPI actions. Clicking the ellipsis (...) button opens the Add Command window.
Profile: Sets the profile to be used for the GPI action. This profile must match the profile set for the playlist that is to be triggered by the GPI actions. The drop-down list shows the profiles configured on Media Sequencer.
Description: Shows the description of the GPI action, as it was specified in the Add Command window.
Assigning a Server Command
Select a GPI action, and select Server in the Server/Client column.
Select a Server Command.
Select a Profile.
Click Apply.
Assigning a Client Command
Select a GPI action, and select Client in the Server/Client column.
Select or create a Macro Command.
Select a Profile.
Click Apply.
Adding a Macro Command
Select the Macro Command column, and click the small ellipse (...) button to open the Add Command dialog box.
Enter the command in the Command text field, or alternatively click the ellipse (...) button to open the Predefined Functions window.
Video Disk Control Protocol (VDCP Tab)
Main menu > Tools > Media Sequencer Configuration > VDCP
Using Video Disk Control Protocol (VDCP), the Media Sequencer acts like a server that controls the graphics through the VDCP protocol. The Media Sequencer sets up a connection with a video controller, over which VDCP commands are sent; in this way the video controller is able to communicate with the playlist or show.
Note: The VDCP protocol defines recommended serial settings. For configuration of other settings, see Electrical and Mechanical Specifications in the Media Sequencer manual’s VDCP section.
This section contains the following topics:
VDCP Tab
The VDCP tab always shows an up-to-date status, where changes made by others are shown live. All changes are immediately propagated to Media Sequencer.
To open the VDCP Tab, either:
Go to the main menu: Tools > Media Sequencer Configuration > VDCP tab
Select Configure VDCP from the playlist’s context menu in Director ***
Once VDCP handlers have been defined, click the VDCP Indicator button at the bottom of each playlist ***
Not available if using the Legacy Playlist style.
VDCP Properties and Parameters
The configuration consists of selecting general VDCP and playlist control settings.
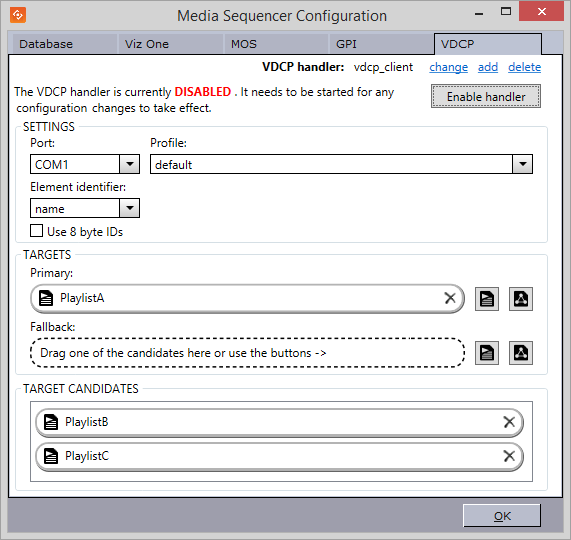
VDCP handler: This displays the currently selected VDCP handler. You can change, add or delete multiple VDCP handlers.
Enable/Disable handler: The handlers can only be modified when they are disabled.
Port: Select the appropriate COM port for the selected VDCP handler.
Profile: Select the profile to use. The profile defines the Viz Engines and video devices where the command is to be executed. In the VDCP handler, the configured playlist must be active on the configured profile. (See also Profile Configuration).
Element identifier: Use either the element’s name or description as the VDCP ID. The Name is a unique identifier, assigned to each element by the Media Sequencer, whereas the Description is the textual description of the data element, as entered when the item was created in Director/Viz Trio.
Use 8 byte IDs: Allow the use of 8 character IDs. For more information about 8 byte IDs and the Media Sequencer VDCP plugin see the 8 characters identifiers section in the Media Sequencer User Guide.
Targets: Select the Director playlists or Viz Trio shows which will be the Primary and Fallback targets.
When the vdcp_client handler receives a command over the VDCP protocol, it iterates over the primary target collection, looking for the element with the specified ID. If a matching item is found, the command is executed on it. If no match is found in the primary target collection, or if there is no primary target collection specified, then it searches the fallback target collection. If there are still no matches, an error is returned over the VDCP protocol, and it is also reported in the Media Sequencer logs.
Click the buttons next to the primary and fallback target slots to select a playlist or show. Double click a slot to clear it.
A ‘Path not found’ warning, or a missing playlist/show icon, indicates that the selected playlist or show is invalid (for example, if the playlist has been deleted).Target Candidates: Suggests some of the playlists and shows that are available. If you do not find the one you want, use the buttons next to the Primary and Fallback target slots.
Drag a candidate to a target slot or double-click one to make it the Primary target.
VDCP Macros
The following macros provide easy access for turning the VDCP control on and off for an open playlist. They only work with the VDCP handler called vdcp_client. Note that using the VDCP macros will restart the VDCP handler.
vdcp:clear_all_targets, vdcp:clear_primary_target, vdcp:clear_fallback_target, vdcp:set_playlist_as_primary_target, vdcp:set_playlist_as_fallback_target, vdcp:set_primary_target, vdcp:set_fallback_target
