The pxStack plug-in applies multiple color corrections to an image in a specific order.
It can be applied to Everything, Shadows, Mid tones and Highlights. You also have the option to preserve highlights, or not.
Note: This plug-in is located in: Plugins -> Container plug-ins -> pxColorWorks
To Apply the pxStack Plug-in
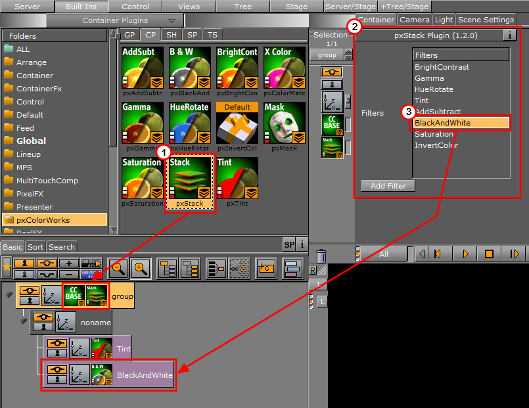
Add the pxStack plug-in to the required Container in the Scene Tree (1).
Note: When the pxStack plug-in is added to a Container, it automatically adds the pxCCBase plug-in to the same Container. Also, it automatically generates a child Container to host the color correction nodes you define later.
Click the pxStack icon in the Container. The plug-in editor (2) shows a list of color correction filters.
Click on a color correction filter.
Click Add Filter. The color correction filter is added as a new Container under the ‘noname’ Container in the Scene Tree (3). This termed as a ‘Color Correction Node’.
Repeat to add more color correction filters. Each color correction filter applied is added (stacked) as a new Color Correction Node under the ‘noname’ Container in the Scene Tree.
Click on a Color Correction Node to open its editor. Modify the effect properties as required.
Change the order of the stacked properties, as required.
IMPORTANT! Selected properties act in the sequence in which they are ordered in the scene tree.
Note: To disable or enable a Color Correction Node click the Locked/Unlock icon in the top left of the Container.
Note: To remove a color correction function, delete the plug-in.

