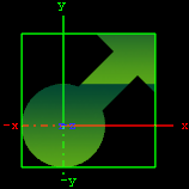
The Pointer plug-in is similar to the Arrow plug-in. The main difference is that the pointer has a joint link, so it looks more like a bend arrow.
Pointer has two reference points which controls the pointer’s position. The first point is in the joint link and the second point is at the arrow’s head.
Note: This plug-in is located in: Plugins -> Geom plug-ins -> Default
Pointer Properties
Use LOD: Enables/disables dynamic level of detail.
Point 1 X: Sets the position of point 1 on the X-axis.
Point 1 Y: Sets the position of point 1 on the Y-axis.
Point 2 X: Sets the position of point 2 on the X-axis.
Point 2 Y: Sets the position of point 2 on the Y-axis.
Width: Sets the width of the pointer shaft.
Cap Style Begin: Allows you to select the style on the pointers beginning. The options are Flat, Circle or Arrow.
Cap Style End: Allows you to select the style on the pointers end. The options are Flat, Circle or Arrow.
Arrow Length: Sets the length of the arrow head.
Arrow Width: Sets the width of the arrow head.
Circle Radius: Sets the radius of the circle, if cap style is selected.
Circle Segments: Sets the resolution of the outer side of the pointer angle. Switch to wireframe to see the effect as you change the value.
Joint Style: Sets the style of the pointer joint, either Round or Miter.
To Create a Pointer
Create a new Container.
Add the Pointer plug-in to it.
Add a material and/or a texture to the group.
Open the Pointer editor and set the following parameters:
Set Point 1 X and Y to
50.0.Set Point 2 X and Y to
75.0.Set Width to
20.0.Set Cap Style Begin and End to
CircleandArrow, respectively.Set Arrow Length, Width and Radius to
50.0.

