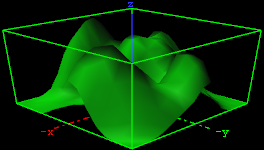
The Displacement Map plug-in enables you to create topographical (height) maps by means of a grey scale image.
The intensity value of the gray scale image is translated to a height value.
Note: This plug-in is located in: Plugins -> Geom plug-ins -> Default
Displacement Map Properties
Detail: Sets the detail level of the map, the lower the value the higher the level of detail.
Image: Drag the image you want to use creating the map, onto the placeholder. The image must be a valid luminance or alpha image.
X-size: Sets the size of the map along the X-axis.
Y-size: Sets the size of the map along the Y-axes.
Height: Sets the height of the map.
Texture X Offset %: Sets the offset of the texture in the X-axis.
Texture Y Offset %: Sets the offset of the texture in the Y-axis.
Texture X Width %: Stretches or compresses the texture in the X-axis (
0is not supported, instead the default value is used).Texture Y Width %: Stretches or compresses the texture in the Y-axis (
0is not supported, instead the default value is used).Patch Mode
Triangle Strip: Uses the same size of triangle polygon on the whole surface.
Optimized Quads: Uses bigger triangle polygons where the surface of the displacement map is flat, thereby reducing the total number of polygons and improving performance.
Inverse: Mirrors all topographic coordinates through the zero level. This makes a mountain top to a crater.
Texture Coordinates: Repeat/Clamp sets if the texture is the be repeated or clamped if it is too small to fit onto the displacement maps rectangle. Clamp stretches the texture to make it fit, Repeat starts drawing the texture over again when it reaches the end.
Texel Precision
Texel: No subpixel/subtexel correction is made.
Subtexel: There is a limited number of pixels available on the screen, if a line does not run through a real pixel, it must be moved to the nearest one, this introduces a positional error. If subtexel is selected Viz Artist breaks up pixels into smaller sub pixels in memory so that the line can be drawn to the nearest sub pixel.
Smooth: Use this parameter to smooth the look of the map, without reducing the polygon details of the map. In some cases you need the number of polygons you have to obtain the correct lightning.
Texture Coordinates: Decides if texture coordinates are to be created, and to which level, either None, Full or Partially. You need this enabled to some level, if a texture is applied using a vertex mapping. Texture mapping is resource consuming, so if you do not need it, keep it off.
Note: Please be aware not to increase to number of polygons in detail not too much, as this is a common mistake.
To Create a Displacement Map
Create a new group and add the Displacement Map plug-in to it.
Add material to the group container.
Open the Displacement Map editor, and drag and drop a gray-scaled image onto the image placeholder.
Open the group container’s transformation editor and adjust the Rotation values.
Note: An RGB or similar image does not work, and you get an information in the log field. The image must be a valid luminance or alpha image.

